FileMaker Developer
| < Day Day Up > |
| As you evolve as a FileMaker developer, your need to extend FileMaker into different arenas will grow; your work may evolve to supporting mission-critical data applications, or you may run into a circumstance that FileMaker Pro alone cannot solve but might be extended to address. You might find yourself, for example, needing to build an asset management system with file plug-ins, exploring ways to manage drawing charts in FileMaker, wanting to deploy a specialized kiosk, or developing a library of functions that you can reuse and refine across a large solution. This chapter explores FileMaker Developer and covers the variety of functions it offers. We recommend whenever possible using it as your authoring tool: The debugging tool is quite handy, and custom functions are an invaluable tool for nearly any solution. Although your end users will be fine working with FileMaker Pro, for any job that requires significant development, you will find having a copy of Developer on hand invaluable. Although we cover using and deploying plug-ins, we do not go into the details of actually writing FileMaker plug-ins. Developer includes FileMaker's plug-in API and documentation. NOTE If you are interested in authoring a plug-in, be sure to confirm that you're versed in how plug-ins work within FileMaker Pro and are familiar with writing software in C++. Script DebuggerSoftware development is a challenge, and the mark of good developers is not how few bugs they let by, but rather how quickly they can isolate and deal with them. This isn't exaggeration; we'll take a good critical thinker and debugger any day. It's rare that something works on the first try ”it's crossing the line to the second try that takes experience, skill, and a little help from FileMaker Developer. The Script Debugger provides two valuable functions. First, after turning it on, you can launch a script (via the Scripts menu or a button) and then click the ScriptMaker icon at the upper right of the debugger dialog to be taken directly into ScriptMaker with the script in question selected. There's no need to go into Layout mode or scroll through all the scripts you've written. Second, the Script Debugger enables you to step through a script and see it unfold just as if you were driving it manually. By "manually" we're referring to the idea that scripts in FileMaker essentially mimic and automate actions that you as a user could be taking. If you use the Script Debugger, you can control a script step by step just as though you were executing the script's actions yourself by hand. This is an effective way to spot problems. Notice in Figure 26.1 that two break points have been set. Breakpoints persist with scripts until they are cleared by the user . Figure 26.1. The Script Debugger enables you to watch and control the flow of a script and by demonstration enables you to spot problems.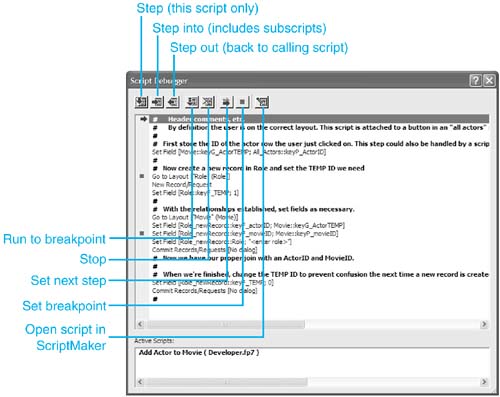 Using the Script Debugger should be fairly straight-forward. Setting breakpoints (by clicking to the left of a given script step) enables you to skip ahead to trouble areas. Notice that the bottom pane of the dialog shows active scripts. TIP It's useful to begin and end every script with a comment. This then allows you to explicitly review a script when it is entered and exited (as a sub-script) before FileMaker performs an action. Using the debugger, you'll step through each discrete step in a script. Behind the Script Debugger dialog you'll be able to see what happens as the script runs. Some of your scripts may be quite complex and include loops , If[] branches, and sub-scripts. The debugger's Step Into and Step Out controls enable you to follow the script routine into sub-scripts as you wish, and you can use breakpoints to skip through a loop that you know already works. (To do so, you set a breakpoint on the step following the conclusion of a loop and then click the Run to Breakpoint function.) Set Next Step is quite helpful: It enables you to skip down to a particular point in your script, ignoring however many steps precede it. Simply select a script step and click the Set Next Step button. The blue indicator moves from the top of the script (if you've just initiated the script) to whatever step you have selected. (All the intervening parts of the script are executed, of course.)
Database Design ReportDocumentation is always critically helpful in debugging as well, and additionally helps you simply come to understand a database with which you may not be familiar. The Database Design Report , or DDR, is a feature of FileMaker Developer that identifies every file reference, relationship, layout, script, value list, custom function, and security setting in a given set of files. You can choose to export the report into XML or HTML, and we fully expect that by the time this book is in your hands, some third-party developers will have built tools to provide a DDR import into FileMaker Pro. Such a database would likely help with finding particular elements of a database (such as errors) by using FileMaker's find capabilities, and we'd expect more facile navigation than the DDR's HTML pages offer. We'd encourage you to hop online and see what tools are available for extending the DDR. It's a great resource and we fully expect tools surrounding it to evolve. TIP You can also import the report into a FileMaker database yourself, after you get adept at writing style sheets for XML Import, as we describe in Chapter 22, "FileMaker and Web Services." The DDR generates at least two output files: a summary file and a document for each of your database files. When running it you'll have the option of including and excluding files and functions as you need. The DDR can be quite lengthy. The best way to make use of it is by performing searches for various specific elements. You can look for scripts that include a dependency on a given field, or look for relationships that use a given key field. The DDR is most frequently used in three main ways:
The HTML-based version of the DDR is excellent for simply creating documentation for a solution. (We find that clients are favorably impressed if at the end of a project we hand them a DDR.) Using either the XML or HTML version, it often also helps to search for explicit errors. Search for the strings <missing> , <unknown> , and so on. If you're preparing to convert an old solution into FileMaker 7, the DDR is an invaluable way to troubleshoot and gain insight into both the old version and new version of your files. Searching for specific strings allows you to spot uses of bad characters , problematic uses of the Today function, and other trouble spots for conversion. Developer UtilitiesFileMaker Developer allows you to perform a range of functions on a grouped set of files; check Developer U tilities under the F ile menu. This third primary function of FileMaker Developer focuses largely on modifying your files in preparation for deployment. These options vary from renaming files to building a runtime kiosk. Review Figure 26.2 for an overview of the options available. Figure 26.2. In the Developer Utilities dialog you're able to work with a group of files and apply various options or rename them. The mechanics of the dialog are fairly simple: Add all the files in a given solution to the dialog (they need to be closed for you to do so) and then specify a destination project folder. FileMaker Pro creates new files any time you use these utilities, so it needs to know where to put them. You can opt to save your Solution Utility settings. Often solutions require multiple developer utility settings. By using the Load Settings and Save Settings buttons , you'll be able to save yourself the trouble of having to reenter all the various settings. This is quite helpful: This dialog includes a number of different options, and development and testing often requires running through the process multiple times. Renaming FilesThis might sound trivial, but don't let the apparent simplicity here deceive you. Multi-file solutions in FileMaker depend on filenames to maintain internal references. If you arbitrarily rename one of the files in a given solution via your operating system, FileMaker prompts you with a File could not be found error when it next tries to resolve a reference to that file. You can risk breaking table occurrence references, script references, value list references, and more. We very strongly recommend against manually renaming files. TIP If you run across a file that shows signs of having been incorrectly renamed or lost altogether, the DDR is a great place to turn in order to root out "file missing" problems. Rename your files by using the Developer Utilities dialog. Notice, as in Figure 26.3, you will need to add all the files for a given solution to the dialog. This is important: You need to add both the file you want to rename and all those files that reference it. Then set new names for however many files you require. When you click Create, FileMaker generates new files in your destination project folder, leaving the old files unchanged. Figure 26.3. The files in this example have been prepared for renaming.
Solution OptionsUnder the Solution Options button you'll find a range of actions that FileMaker Developer can perform as it creates a new solution (and a new set of files). All these options generally pertain to readying your files for deployment; they are not necessarily something you'd use during development, but rather at the end when you're preparing files to hand off to users (see Figure 26.4). Figure 26.4. Solution options enable you to prepare a set of files for deployment with options beyond simply posting to a server.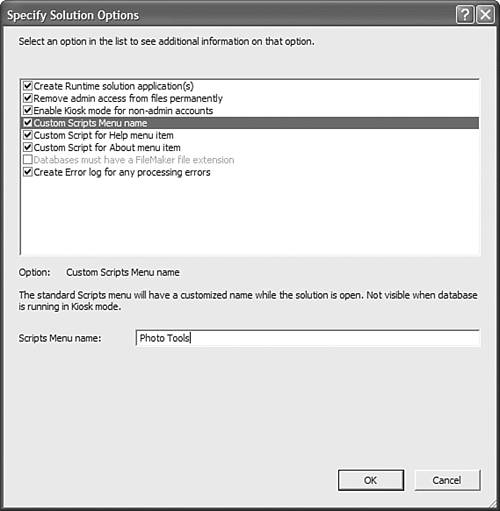 Create Runtime ApplicationFileMaker Developer enables you to bind a set of files into a runtime application ”one that includes the FileMaker "engine" and does not require that the user buy a copy of FileMaker Pro to make use of the solution you've built. This is a great way to create distributable software with FileMaker Pro, and FileMaker, Inc.'s licensing terms allow you to do so without further obligation. NOTE FileMaker Developer's licensing details for runtime solutions can be found in the Licensing PDF you'll find in the root folder of your FileMaker Developer installation. You'll need to keep some conditions in mind. A bound runtime version does not support development, works only with the files bound with it, and is single-user only. If end users want to share the files, they need to turn to FileMaker Server and standard copies of FileMaker Pro. To be specific, the resultant runtime application you create does not include Layout mode, ScriptMaker, and the Define Database functions, thus disallowing further editing of the files. The changes illustrated thus far do not, however, significantly alter your FileMaker files from the originals . The database files within the application remain FileMaker Pro files, accessible from FileMaker Pro proper ( assuming you've not disabled such access via the Remove Admin Access solution option that is covered later in this section). You can continue to work with your files, add features, and simply deploy the files themselves without having to recreate a runtime solution each and every time a change is called for. Likewise, you can have some users make use of the runtime applications and still others access separate copies of the files (or share files) with full versions of FileMaker Pro. It's rare that you'd build a database that could be used in both single-user and multi-user modes, but the point here is that it's possible. NOTE Some bound runtime solutions require a good bit of data entry prior to their being ready to distribute to a wide audience. It can be convenient to host the files ”just as they are ”on a FileMaker Server to allow multiple people to enter data. The fact that the FileMaker files themselves are unaltered by the binding process means you can swap them between a bound runtime application and FileMaker Pro or Server as needed. Binding into a runtime imposes two important modifications to the files: Your files will be renamed with a new file suffix, and your files will be associated with a bind key. There are other options as well, but these two settings are mandatory when you've opted to create a runtime solution. Bind KeysTo have the runtime application recognize its associated files, the bind key in a given file needs to match the bind key of the application. This simple pairing ensures that a given application will "authorize" use of specific FileMaker Pro files. Notice in Figure 26.5 that FileMaker Developer inserts a timestamp by default as a bind key. Figure 26.5. Runtime solutions depend on you to specify a "bind key" and allow you to add a customized closing image as well.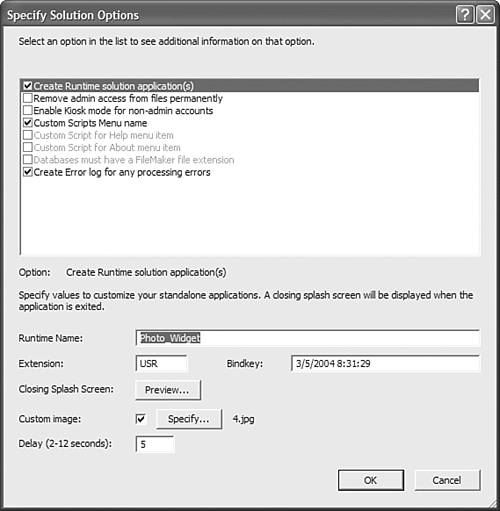 To replace or add a file to a solution that has already been bound, use the same bind key when preparing that new file, and users will be able to drop the file in question directly into their solution folders. You need not replace their entire solutions. Consider cases where you'd want to be able to add files to a solution to upgrade functionality or address bugs. This introduces the complex issue of upgrade paths in a FileMaker Pro solution. You need to remember that after someone begins using your solution, he will be adding and storing data in your files. If you were to simply replace those files with no concern for exporting or managing that data, users would open their applications and discover an empty shell waiting again for the first records to be created. In addition to managing bind keys, runtime solutions also enable you to define a custom closing image users will see for some matter of seconds before the application closes . If you choose to include a custom closing image, size it for 382x175 pixels at 72 dpi. JPEG and GIF both work best in cross-platform environments; others we don't recommend. One last note: The process of creating a runtime solution is platform specific. The Windows version of FileMaker Developer creates a Windows runtime application, and likewise the Mac OS X version creates a runtime that works only on Mac OS X. These platform dependencies apply to only the runtime application itself: FileMaker files themselves remain completely cross-platform. Database ExtensionThe extension for FileMaker-bound runtime solutions determines, in both Mac OS X and Windows, what application becomes associated with your individual solution files ”which by definition is the runtime application you're in the process of creating. Think of the extension as quite similar to your bind key, but rather than work internally with the FileMaker runtime, they apply at the operating system level. These file extensions simply help identify the application that should open your files and differentiate them from other FileMaker Pro documents. Mac OS X uses four-character extensions (creator codes) and FileMaker simply inserts an uppercase F after the first character. ( usr becomes uFsr .) On Mac
|
 To learn more about scripting,