Accessing FileMaker Data Using ODBCJDBC
| < Day Day Up > |
Accessing FileMaker Data Using ODBC/JDBCIn the preceding chapter, you learned the basics of how to use ODBC to import data into FileMaker Pro. In this chapter, you're going to learn how to use Open Database Connectivity (ODBC) and a similar technology, Java Database Connectivity (JDBC), to move data out of FileMaker. Both technologies use SQL as their query language. JDBC is designed for use with Java, whereas a variety of programming languages and tools can be used to access the ODBC interface. CAUTION
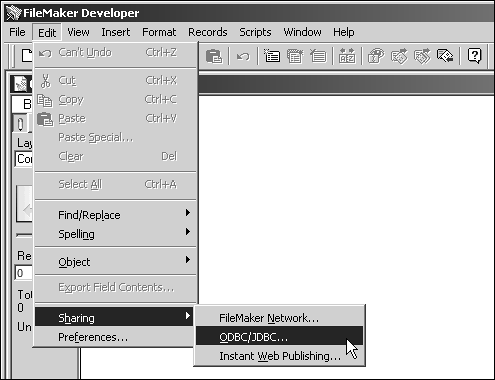
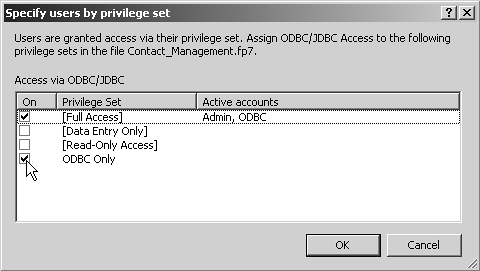
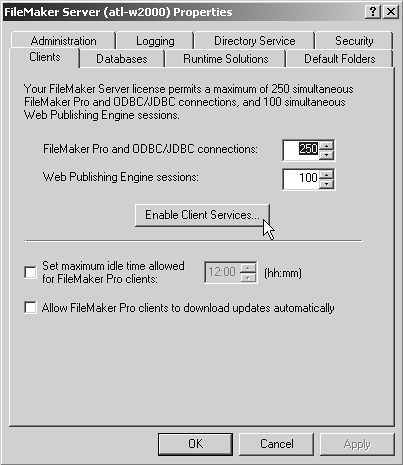
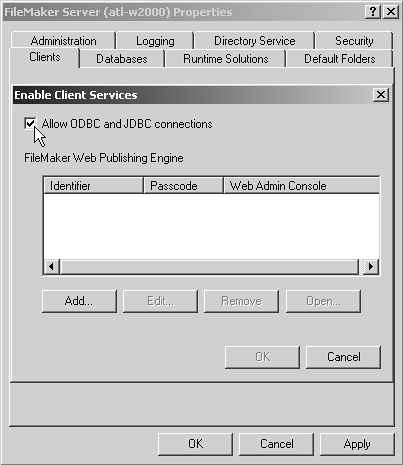
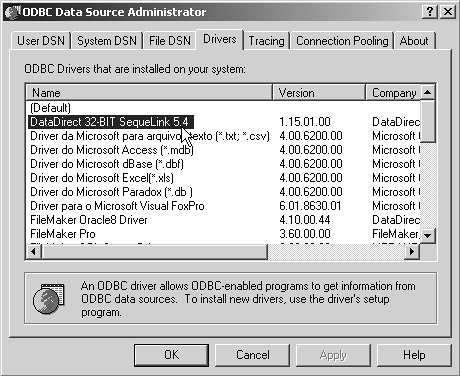
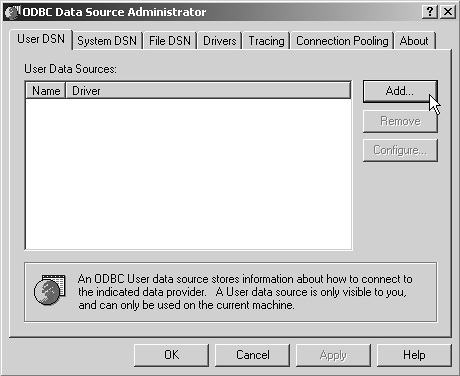
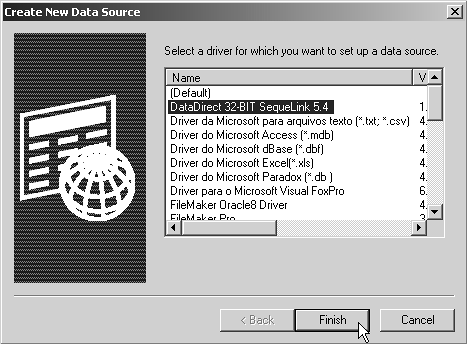
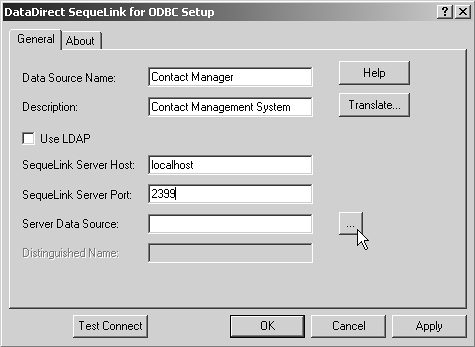
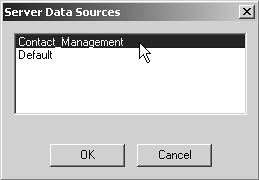
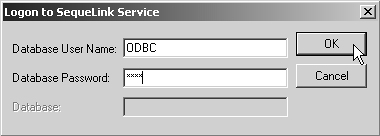
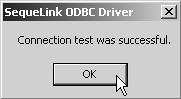
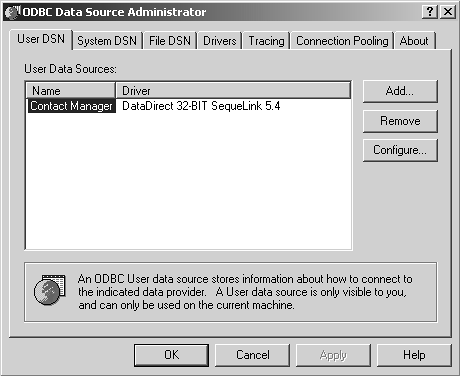
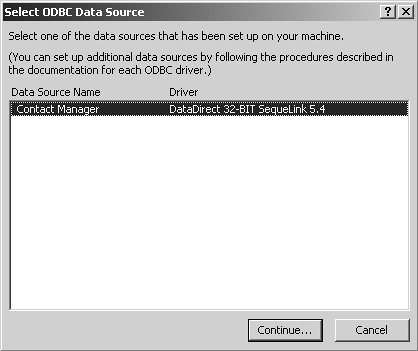
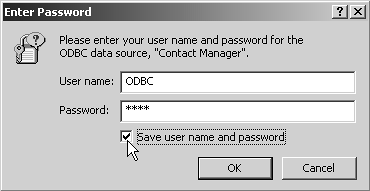
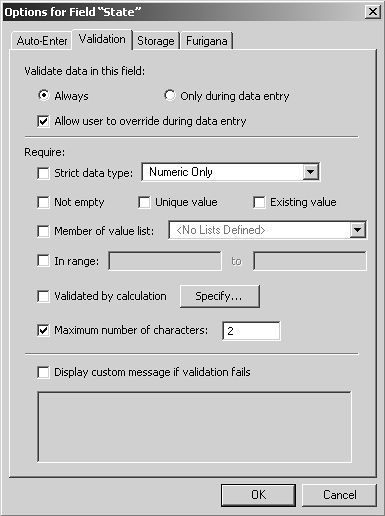
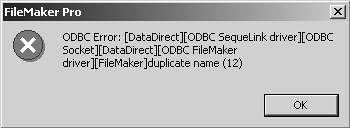
This section covers two main methods for moving data out of FileMaker. The first is ODBC/JDBC publishing, where FileMaker Pro, FileMaker Developer, or FileMaker Server 7 Advanced act as a host for ODBC clients . You might think of this as a "pull" method, where another application is pulling data from FileMaker. In this scenario, FileMaker Pro and FileMaker Developer have identical ODBC/JDBC functionality, so for this rest of this section, references to FileMaker Pro should also be considered valid for FileMaker Developer as well. The second method is a "push" method, with FileMaker Pro/FileMaker Developer use ODBC ”but not JDBC ”to send data to another application. We begin with the first method, and then combine it with the second in a single example. Setting Up FileMaker Pro to Host an ODBC/JDBC SessionIt's possible for you to host a database file that has no content. For example, if you launch FileMaker Pro and create a new file called Contact_Management.FP7, you don't really need to create any fields or new tables for it to be useful for ODBC purposes. A more typical case would be a fully fleshed out database system that would then be queried with ODBC, but that scenario is considered later in this chapter. For now, it's worth creating a FileMaker file that is only a shell so that ODBC can be used to create tables within the shell. An important aspect of FileMaker Pro ODBC/JDBC hosting is that FileMaker Pro accepts only local ODBC/JDBC connections from an ODBC/JDBC client application such as Crystal Reports or the Microsoft Query Tool. The client application needs to be on the same computer as FileMaker Pro. If you need to have remote ODBC/JDBC applications get access to FileMaker files, then you have to use FileMaker Server 7 Advanced. NOTE As of this writing, FileMaker's ODBC functionality does not handle spaces in file names properly. For any files that you might use for ODBC purposes, be sure to use an underscore rather than a space in the file name . To enable the file for ODBC/JDBC sharing, all you need to do is select E dit, S h aring, ODBC /JDBC, as shown in Figure 20.14. Figure 20.14. ODBC/JDBC sharing is currently available only in the Windows versions of FileMaker Pro and FileMaker Developer. The ODBC/JDBC Sharing Settings dialog opens (see Figure 20.15). This dialog has two parts . The upper section, labeled ODBC/JDBC Settings, controls ODBC/JDBC access to this copy of FileMaker Pro. When ODBC/JDBC Sharing is set to On, FileMaker Pro responds to ODBC/JDBC queries. Figure 20.15. ODBC/JDBC access to a file can be set for any file that FileMaker Pro is hosting, but not for files that are being hosted by FileMaker Server and that FileMaker Pro has open as a guest.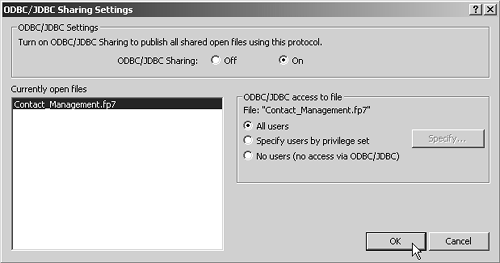 The lower part of this dialog controls ODBC/JDBC access on a file-by-file basis, but only for files that are hosted by FileMaker Pro. FileMaker Pro can't act as an ODBC/JDBC host for files that are being hosted by FileMaker Server. If you have multiple files open, you can Control+click to select multiple files so that settings changes can apply to several files at once. The settings on the right apply to the currently selected file or files. If you don't want a file to be available for ODBC/JDBC access, you can set the file access to No Users. If the file is set to All Users, the ODBC/JDBC extended privilege gets granted to all privilege sets. Select F ile, D efine, A ccounts & Privileges, as shown in Figure 20.16. Figure 20.16. Accounts, privileges, and extended privileges are accessed via the Accounts & Privileges menu. The Define Accounts & Privileges dialog appears. If you click on the Extended Privileges tab, you'll notice that the [fmxdbc] privilege, which controls ODBC/JDBC access to the file, is now in use by all privilege sets. Double-clicking the [fmxdbc] privilege brings up the Edit Extended Privilege dialog, as shown in Figure 20.17. Figure 20.17. The Edit Extended Privilege dialog shows that every existing privilege has been enabled for ODBC/JDBC access.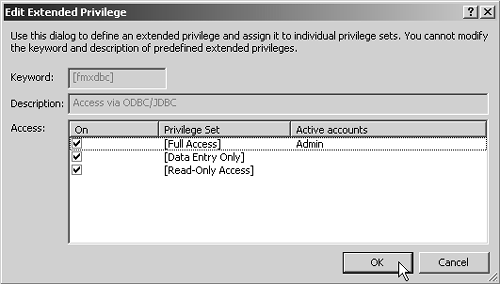 By setting the file to All Users in the ODBC/JDBC Sharing Settings dialog, you turn access on for every privilege set in the file. Any new privilege sets automatically pick up the [fmxdbc] extended privilege as well. Click OK to exit the Edit Extended Privilege dialog, then click the Privilege Sets tab. Double-click the [Full Access] privilege set to bring up the Edit Privilege Set dialog shown in Figure 20.18. Figure 20.18. The Access via ODBC/JDBC extended privilege is automatically enabled when the All Users option is selected in the ODBC/JDBC Sharing Settings dialog.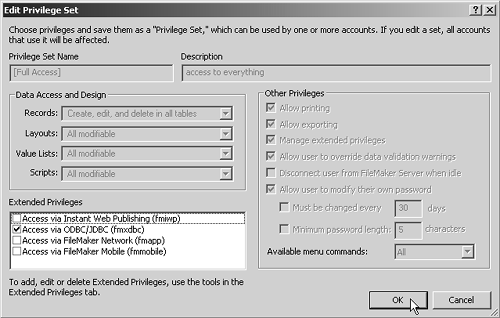 The Access via ODBC/JDBC extended privilege is selected in this dialog as well. It's worth noting that extended privileges can be selected and de-selected in two different places ”three if you count the sharing dialogs that are accessible from the Edit menu. Ordinarily, if you're just going to enable an ODBC client application to add, delete, and update records, you should create a privilege set for that purpose. It should have the same settings as the privilege set shown in Figure 20.19. Figure 20.19. For an ODBC/JDBC client to insert, update, and delete records, the privilege set needs to have only full record access. No layout access is required.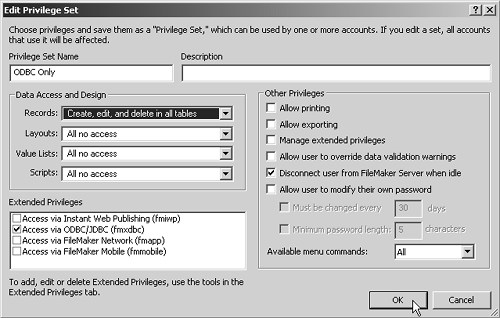 The access to records needs to be Create, Edit, and Delete in All Tables, but no Layout, Value List, or Script access is required. Scripts cannot be called via ODBC/JDBC, so there's no point in enabling access to them. If you want to allow an ODBC client to use CREATE TABLE, DROP TABLE, or ALTER TABLE to make schema changes, then the account that the ODBC/JDBC client uses needs to be tied to the [Full Access] privilege set. That's the only privilege set that allows schema changes. From a security standpoint, you should assign an ODBC/JDBC account to the [Full Access] privilege set only if that account needs to make schema changes. Otherwise, the best policy is to restrict the level of access to just the minimum privileges required. To that same point, you shouldn't leave ODBC access open to all users unless literally everyone on the network needs ODBC access to the FileMaker file. A more secure configuration would be to restrict ODBC/JDBC sharing to specific privilege sets, as shown in Figure 20.20. When that option is chosen in the ODBC/JDBC Sharing Settings dialog, the Specify Users by Privilege Set dialog comes up. This dialog enables you to assign or un-assign ODBC/JDBC access to specific privilege sets. Figure 20.20. ODBC/JDBC access can be granted to specific privilege sets ”a more secure configuration than allowing access to All Users. At this point, the file is ready for access. ODBC or JDBC client applications on that same computer can access the file. If you need to have remote ODBC/JDBC applications access the file via the network, then you need to host the file with FileMaker Server 7 Advanced. Setting up FileMaker Server 7 Advanced to Host Multiple ODBC/JDBC SessionsBecause the Contact_Management.FP7 file has already been enabled for ODBC/JDBC access with FileMaker Pro, it can just be moved to FileMaker Server 7 Advanced. (The regular version of FileMaker Server is not able to host files for ODBC/JDBC access.) The file needs to be moved into the Databases directory in the Data directory in the root level of FileMaker Server 7 Advanced. When it is there, the file can be opened with the FileMaker Server Administration tool, or SAT. Use the SAT to connect to FileMaker Server 7 Advanced and click the Files item in the Databases item in the left pane of the console. The file should be listed. If the SAT was already open at the time you moved your file in, you probably need to refresh the window. With Files still selected, select A ction, Re f resh. You can also right-click the right pane and choose Refresh from the pop-up menu. After you locate your file, right-click it and choose Open, as shown in Figure 20.21. Figure 20.21. In the Server Administration tool, you can right-click on a file to open, close, or pause it.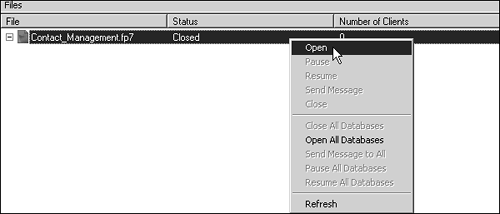 After the file is up and running, you need to enable FileMaker Server 7 Advanced to allow ODBC/JDBC client connections. To do so, select the server itself, as shown in Figure 20.22. Figure 20.22. You need to select the server before you can change server properties. NOTE You don't need to have any files hosted to allow FileMaker Server 7 Advanced to accept ODBC/JDBC client connections. You could enable the client connections first, and then host databases. With the server chosen, select A ction, P r operties to bring up the Properties dialog shown in Figure 20.23. If not already selected, click on the Clients tab. Figure 20.23. FileMaker Server 7 Advanced can host a maximum of 50 ODBC/JDBC connections. FileMaker Server 7 Advanced can have a maximum of 50 ODBC/JDBC connections, and those connections can coexist with regular FileMaker Pro connections. The total number of FileMaker Pro/ODBC/JDBC connections is 250. FileMaker Server has dynamic memory management, so you can max out the connection limits and FileMaker will use memory only as it needs it. To enable ODBC/JDBC access, click Enable Client Services to bring up the Enable Client Services dialog, shown in Figure 20.24. Figure 20.24. The Allow ODBC and JDBC Connections option enables the xDBC plug-in. Check Allow ODBC and JDBC Connections and click OK to exit the Enable Client Services dialog. FileMaker Server 7 Advanced is now ready to accept ODBC/JDBC connections. NOTE ODBC/JDBC connectivity on FileMaker Server 7 Advanced is actually implemented by a plug-in called xDBC, but it doesn't behave like a regular plug-in and can't be enabled with the plug-in section of the SAT. Using the Enable Client Services dialog is the only way to enable and disable the xDBC plug-in. Configuring a Data Source Name for ODBCTo connect to either FileMaker Pro or FileMaker Server 7 Advanced, a client ODBC application needs to use a Data Source Name, or DSN. A DSN is a configuration file. ODBC has four components : a host, a client, a driver, and a driver manager. The driver is used to connect to a specific type of host, such as a FileMaker host or a PostgreSQL host. The driver manager is used to create specific configurations for the drivers. These configurations, or data source names, contain information such as the address of the server, the name of the specific database to which you want to connect, port information, and sometimes login information. You need a separate DSN for each database file to which you want to connect. On Windows, the driver manager is a control panel called Data Sources (ODBC). You can locate it by selecting Start, S ettings, C ontrol Panel, Administrative Tools, Data Sources (ODBC), as shown in Figure 20.25. Figure 20.25. The Data Sources (ODBC) control panel is used to manage ODBC driver configurations.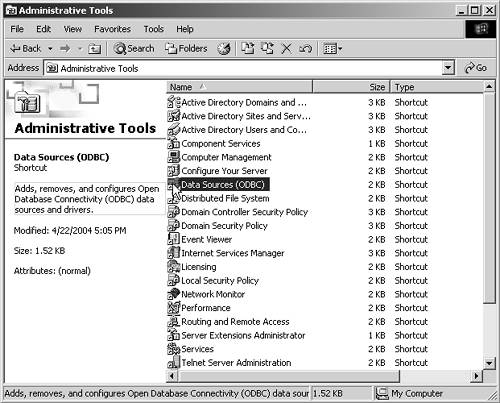 The ODBC driver for FileMaker requires a separate installation. When that is done, double-click the Data Sources (ODBC) control panel to bring up the ODBC Data Source Administrator dialog. Click on the Drivers tab. If your FileMaker ODBC driver installed correctly, you should see a driver called DataDirect 32-BIT SequeLink 5.4, as shown in Figure 20.26. If the driver isn't in the list of drivers, see the "FileMaker Extra: Installing and Troubleshooting the ODBC Client Driver" section at the end of this chapter. Figure 20.26. The DataDirect 32-BIT SequeLink 5.4 driver comes with the Windows versions of FileMaker Pro, FileMaker Developer, and FileMaker Server 7 Advanced. It has a separate installer application. After you're sure that the driver is there, you can use that driver to create a DSN. Click on the User DSN tab and click Add, as shown in Figure 20.27. Figure 20.27. Click Add to create a new User DSN. This brings up the Create New Data Source dialog. Select the DataDirect 32-BIT SequeLink 5.4 driver and click Finish, as shown in Figure 20.28. Figure 20.28. Although it doesn't say anything about FileMaker, the DataDirect 32-BIT SequeLink 5.4 driver is included with various FileMaker products for use in connecting with FileMaker databases. Ironically, after you click Finish, you get to start configuring the ODBC driver. The Finish button brings up the DataDirect SequeLink for ODBC Setup dialog. You need to enter a name for the Data Source Name, but the description is optional. The description is useful if you have multiple Data Source Names that connect to the same server, but to different files on that server. Because there are no translator .DLLs included with the driver, clicking Translate to bring up the Select Translator dialog won't get you very far. Leave the Use LDAP option unchecked. For the SequeLink Server Host, you need to enter the address of the server on which FileMaker Server 7 Advanced is running. If it's the same machine as the DSN, just use localhost. The SequeLink Server Port is 2399. That port number is the same whether you're using ODBC or JDBC to connect to a FileMaker file, so commit that to memory. After you have the name, host address, and port number entered, you can click the button to browse files available for ODBC access, as shown in Figure 20.29. Figure 20.29. You can enter the Server Data Source manually, but you can also browse to find out which files are available. Clicking the Browse button brings up the Server Data Sources dialog shown in Figure 20.30. This is where spaces in the filename cause a problem. If you have a filename with a space in it, you can select it in the Server Data Sources dialog. The problem comes immediately after that point, because the result substitutes the string %20 for any spaces in the filename, and the connection does not test correctly. In Figure 20.30, the filename uses an underscore instead of a space, so it does work properly. After you've selected the file, click OK to exit the Server Data Sources dialog. Figure 20.30. The Server Data Sources dialog lists hosted FileMaker files that have been enabled for ODBC access. Back in the DataDirect SequeLink for ODBC Setup dialog, click Test Connect to bring up the Logon to the SequeLink Service dialog. Remember that to perform schema changes via ODBC, the account needs to have the [Full Access] privilege set specified. Enter the FileMaker username and password credentials for the ODBC access account and click OK, as shown in Figure 20.31. Figure 20.31. You need to enter FileMaker account credentials when testing the ODBC connection. As long as the account credentials are correct, you get a message from the SequeLink ODBC Driver stating that the test was successful, as shown in Figure 20.32. If something is wrong with credentials, or the file isn't being hosted properly, you get an error message. This is where the error message occurs for files that use spaces in the filename. Figure 20.32. The SequeLink ODBC Driver returns the results of the connection test. Click OK to exit the SequeLink ODBC Driver dialog, then click OK to exit the DataDirect SequeLink for ODBC Setup dialog. You should now see your new DSN in the list, as shown in Figure 20.33. You can now use it to make ODBC connections to the designated FileMaker file. Figure 20.33. The new DSN is now available for use by client ODBC applications. In this case, you created a DSN to connect to a file hosted by FileMaker Server 7 Advanced, but the process would have been virtually identical to create a DSN to connect to a file hosted by FileMaker Pro. The only difference is that a DSN for FileMaker Server 7 Advanced can be created anywhere on the network, whereas a DSN for FileMaker Pro needs to be created on the same computer as the one on which FileMaker Pro is running. Using FileMaker Pro as an ODBC ClientFileMaker Pro has the capability of acting as a client to an ODBC host. That ODBC host might be Microsoft SQLServer, Oracle, mySQL, or even FileMaker Server 7 Advanced. It could also be a FileMaker 6 database, which could be useful in some conversion scenarios. For the purposes of this example, FileMaker Pro acts as an ODBC client to FileMaker Server 7 Advanced. This is only to demonstrate FileMaker as an ODBC host and client at the same time. In practice, you wouldn't need to do this because FileMaker Pro is a much more fully functioning client when you use a regular client connection to connect to FileMaker Server 7 Advanced. You would be much more likely to have FileMaker Pro acting as the client to some other ODBC host. For the record, FileMaker, Inc., doesn't support this configuration, meaning that you won't be able to get assistance from technical support if you have trouble getting this configuration to work, but it works fine for our purposes. That doesn't mean that if you try this, you'll never be able to get technical support again. It just means that they won't help you set this up. At this point, you know how to set up a file for ODBC access on both FileMaker Pro and FileMaker Server 7 Advanced. If you have a FileMaker file that's available for ODBC access, you can use SQL to create and modify tables within that file. To try this out, launch FileMaker Pro and create a new file called ODBC Example. It doesn't need to have any fields in it ”yet. CREATE TABLECREATE TABLE is a SQL command that is used to specify the name and fields for a new database table. It can be used by FileMaker Pro's Execute SQL script step to set up tables in other database systems. To try this out, select S cripts, S criptMaker to bring up the Define Scripts dialog. Click New to bring up the Edit Script dialog. Name the script Create Contact Table. In the list of script steps on the left, scroll all the way to the bottom and select Execute SQL. Click Move, as shown in Figure 20.34, to move the script step to the right side of the dialog. Figure 20.34. The Execute SQL script step can be used to run SQL statements against any host specified by a DSN on that same computer.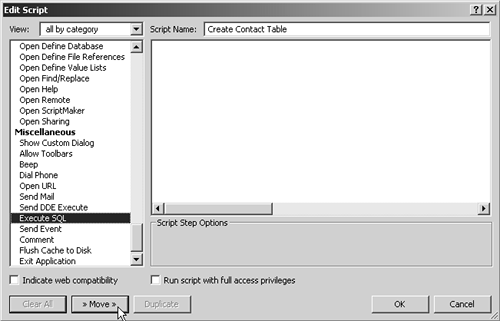 After the Execute SQL step is on the right side (and selected), click Specify to bring up the Specify SQL dialog shown in Figure 20.35. Figure 20.35. Use the Specify button to link the SQL step to a specific DSN. Click Specify in the ODBC Data Source section to bring up the Select ODBC Data Source dialog shown in Figure 20.36. Figure 20.36. The Select ODBC Data Source dialog lists any User or System DSNs that have been created. Select the DSN you want to use and click Continue to exit the Select ODBC Data Source dialog and bring up the Enter Password dialog shown in Figure 20.37. Figure 20.37. By checking the Save User Name and Password option, you enable the script to authenticate itself every time it executes. Enter the credentials for the ODBC-enabled FileMaker account that you want to use. In this case, you're about to create a SQL statement that creates a table, which is a schema change. For that statement to execute correctly, the account needs to have the [Full Access] privilege set specified. Unless you check the Save User Name and Password option as shown, you are prompted for login credentials every time this script executes. Click OK to exit the Enter Password dialog and return to the Specify SQL dialog. Enter the following text into the SQL text box: CREATE TABLE "Contact" ("Contact ID" Decimal primary key, "First Name" VarChar(20), "Last Name" VarChar, "Organization" VarChar, "Address" VarChar, "City" VarChar, "State" VarChar(2), "Zip" VarChar) Figure 20.38. SQL statements can be entered into an Execute SQL script step by hand, as in this case, or they can be drawn from a field.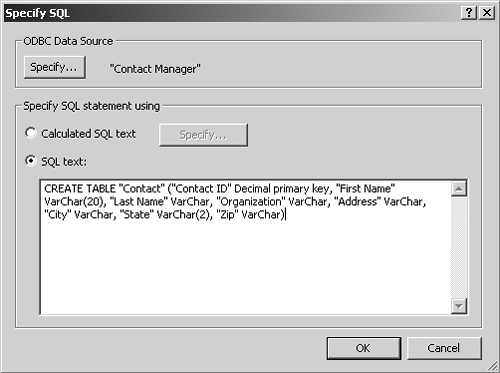 You might have noticed some inconsistencies in this SQL statement. Several of the fields were specified as VarChar , or variable-length character fields. Only two, though ”the First Name field and the State field ”had a field length specified. This is intentional. With FileMaker (Pro or Server 7 Advanced), field lengths can be explicit or undefined. You'll see the effect of this in a moment. It's also worth pointing out that the Contact ID field has been defined as the primary key. You'll see the effect of this as well. One last point: When using SQL with FileMaker, table and field names must be enclosed in double quotes. Note that these are straight quotes, not curly quotes. Click OK to exit the Specify SQL dialog, then click OK to exit the Edit Script dialog and return to the Define Scripts dialog. With the Create Contact Table script still selected, click Perform. In this case, no news is good news. If no error dialog comes up, you can assume that the script executed properly. To see the result of the script's execution, open Contact_Management as a guest of FileMaker Server 7 Advanced. Select F ile, D efine, D atabase to bring up the Define Database dialog. Select the Fields tab and select Contact from the table list. You should see the list of fields shown in Figure 20.39. Figure 20.39. The Contact table and the fields within it were created via ODBC. Notice that the Contact ID , First Name , and State fields all have validation applied to them. Select the Contact ID field and click Options to bring up the Options for Field dialog. Click the Validation tab and take a look at the validation settings. They should look like Figure 20.40. Figure 20.40. Fields specified as decimal in a CREATE TABLE statement end up with Numeric Only validation in FileMaker. TIP Remember that the Contact ID field had two specifications. One was decimal, and the other was primary key. The decimal type is enforced with FileMaker's Numeric Only validation. The primary key designation had no effect, and was ignored by FileMaker. Although functional primary keys can be created in FileMaker Pro, there is no explicit setting to designate a field as a primary key in any formal sense. The primary key designation causes no harm when present, but because it has no effect, there's no point in using it in a CREATE TABLE statement. The First Name and State fields were both VarChar fields with specified length. Take a look at the validation setting for the State field, shown in Figure 20.41. You can see that the maximum number of characters has been set at 2. Figure 20.41. Fields specified as VarChar with a fixed number of characters in a CREATE TABLE statement end up with Maximum Number of Characters validation in FileMaker. If you exit the Options for Field dialog and click on the Relationships tab, you can see that a table occurrence for the Contact table was created. However, if you click OK to exit the Define Database dialog and switch into Layout mode, you'll find that a layout was not automatically created. When you use ODBC to create tables, you need to create layouts to display data from those tables by hand. Switch back to your ODBC Example file and try running the Create Contact Table script again. You should get a duplicate name error message like the one shown in Figure 20.42. Figure 20.42. If you try to create a table with the name of a table that already exists, you get a Duplicate Name ODBC error. It's good to get feedback when things go wrong, but it's also good to get feedback when things go right. The Create Contact Table script can and should be modified so that the user is clear on the result of the script action. As it stands right now, when the script works properly, no message is given to the user. To change this, select S cripts, S criptMaker to bring up the Define Scripts dialog. Select the Create Contact Table script and click Edit to bring up the Edit Script dialog. Change the script so that after the Execute SQL step, it reads: If[Get ( LastError ) = 0] Show Custom Dialog ["SQL Action Status"; "Create table executed successfully. "] End If Click OK to exit the Edit Script dialog. The script now gives the user notification when it runs properly and when it encounters an error. To test it, you need to get rid of the Contact table so you can try to re-create it. To use SQL to delete a table, you use the DROP TABLE command. Like the CREATE TABLE command, this needs to be executed from an Execute SQL script step. DROP TABLEDROP TABLE is a SQL command used to delete a table. When you drop a table, you delete all the data that resides in that table, as well as the table itself. The DROP TABLE command can be used by FileMaker Pro's Execute SQL script step. To try using it, select the Create Contact Table script and click Duplicate to create a copy of the script. The Create Contact Table Copy script should be selected, so click Edit to bring up the Edit Script dialog. Rename the script to Drop Contact Table. Double-click the Execute SQL script step to bring up the Specify SQL dialog. Change the SQL text to DROP TABLE "Contact" Because this script is a copy of the Create Contact Table script, the ODBC Data Source has already been specified and doesn't need to be changed. Click OK to exit the Specify SQL dialog. Next, double-click the Show Custom Dialog step and change the message so that it says, Drop table executed successfully. Click OK to exit the Show Custom Dialog Options dialog. The result should look like Figure 20.43 Figure 20.43. The DROP TABLE statement is used to delete a table.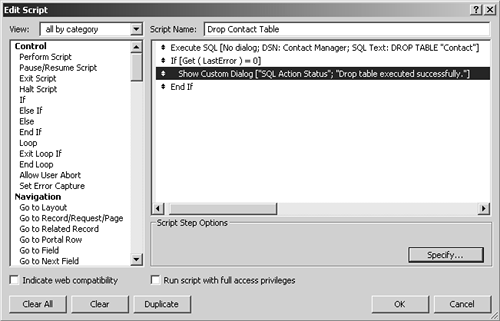 Click OK again to exit the Edit Script dialog. Run the script to drop the Contact table. You should get your message saying that DROP TABLE executed successfully. Now you can run your Create Contact Table script again to make sure that you get the Create table executed successfully message. INSERT INTOINSERT INTO is a SQL command that inserts data into a database table. The command can be used by FileMaker Pro's Execute SQL script step. Now that you have a table, you can load it with data. Usually when you use FileMaker as an ODBC client, most of the activities involve querying records that already exist on the ODBC host. Sometimes, though, you need to create a new record in FileMaker and add it to the set of records on the host. Consider a scenario where FileMaker Pro is running a database that mirrors the structure of an ODBC host. To replicate that structure with your ODBC Example file, add a Contact table with the following fields:
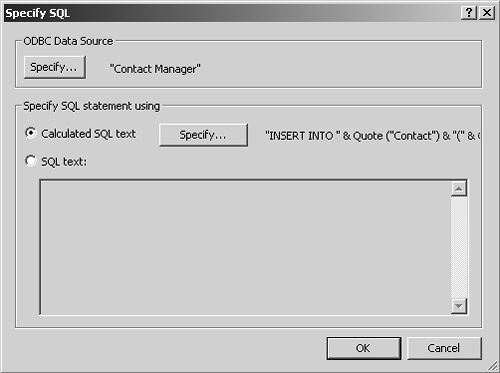
An INSERT INTO SQL command needs to incorporate the field values from the current record. You can do that in one of two ways. One way is to create a calculation field in the Contact table that assembles the SQL statement, but that clutters up the table. A better way is to put the calculation inside the Execute SQL script step. Once again, select S cripts, S criptMaker to bring up the Define Scripts dialog. Select the Create Contact Table script and click Duplicate to create a copy of the script. Click Edit to edit the copy. Rename the script to Insert Contact. Double-click the Execute SQL script step to bring up the Specify SQL dialog. Click the radio button in front of Calculated SQL text to bring up the Specify Calculation dialog. Given the fields specified above, this calculation creates the appropriate INSERT statement: "INSERT INTO " & Quote ("Contact") & "(" & Quote ("Contact ID") & ", " & Quote ("First Name") & ", " & Quote ("Last Name") & ", " & Quote ("Address") & ", " & Quote ("City") & ", " & Quote ("State") & ", " & Quote ("Zip") & ") VALUES ('" & Contact::Contact ID & "', '" & Contact::First Name & "', '" & Contact::Last Name & "', '" & Contact::Address1 & "', '" & Contact::City & "', '" & Contact::State & "', '" & Contact::Zip & "')" This calculation is also shown in Figure 20.44. Figure 20.44. The Quote function is very useful for putting quotation marks in the appropriate places.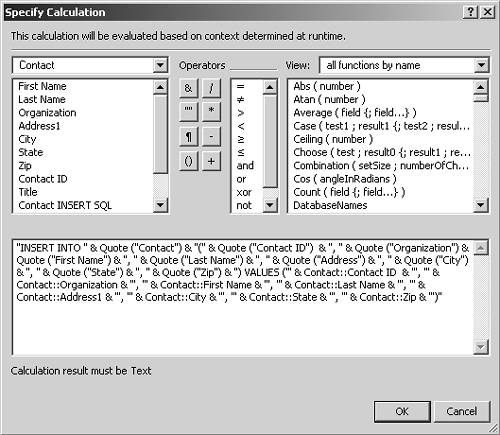 The calculated result of this formula would look something like this: INSERT INTO "Contact"("Contact ID", "Organization", "First Name", "Last Name", "Address", "City", "State", "Zip") VALUES ('1', 'Vegan Steakhouse', 'Scott', 'Stevenson', '1326 Old County Rd.', 'Mentor', 'OH', '44060') Again, a word about quotation marks. When you use SQL in an ODBC client application to connect to FileMaker files, the names of tables and fields need to be in double quotes, whereas values ”even number values ”need to be enclosed in single quotes. After the calculation has been entered, click OK to exit the Specify Calculation dialog and return to the Specify SQL dialog. It should now look like Figure 20.45, with the ODBC Data Source already specified. Figure 20.45. The Specify SQL dialog gives you the option to manually enter a SQL statement or to calculate one. Click OK to exit the Specify SQL dialog and return to the Edit Script dialog. Double-click the Show Custom Dialog step and change the message so that it says, Record Insert executed successfully. Click OK to exit the Show Custom Dialog Options dialog. Click OK to exit the Edit Script dialog, and your script is complete. This script can be called in a looping script to load all the records in a found set into an ODBC host table. UPDATEThe UPDATE SQL command is used to change data in an existing table record. This command can be used by FileMaker Pro's Execute SQL script step. After records have been loaded into a table, it may be necessary to edit them. Changes made in FileMaker need to get pushed up to the ODBC host. To do that, duplicate the Insert Contact script and modify the Execute SQL script step so that the Calculated SQL text reads as follows : "UPDATE " & Quote ("Contact") & " SET " & Quote ("Organization") & " = '" & Contact::Organization & "', " & Quote ("First Name") & " = '" & Contact::First Name & "', " & Quote ("Last Name") & " = '" & Contact::Last Name & "', " & Quote ("Address") & " = '" & Contact::Address1 & "', " & Quote ("City") & " = '" & Contact::City & "', " & Quote ("State") & " = '" & Contact::State & "', " & Quote ("Zip") & " = '" & Contact::Zip & "' WHERE " & Quote ("Contact ID") & " = '" & Contact::Contact ID & "'" The calculated result of this formula will look like this: UPDATE "Contact" SET "Organization" = 'Vegan Steakhouse', "First Name" = 'Scott', "Last Name" = 'Stevenson', "Address" = '1326 Old County Rd.', "City" = 'Mentor', "State" = 'OH', "Zip" = '44060' WHERE "Contact ID" = '1' This SQL statement has an important element: the WHERE clause. The WHERE clause functions like a find in FileMaker Pro. WHERE introduces a set of search criteria. The WHERE clause can have multiple criteria, such as WHERE "State" = 'Washington' AND "County" = 'Lake' . If the WHERE clause is left off, then the UPDATE acts like a Replace function in FileMaker, and it updates every record in the table with the specified information. Similarly, if the WHERE criteria matches multiple records, all those records are all updated in the same fashion.
DELETEDELETE is a SQL command that can be used to delete one or more records from a table. The command can be used by FileMaker Pro's Execute SQL script step. The DELETE command is quite simple. You just need to specify the table and which rows to delete. If the rows aren't specified, the contents of the entire table are deleted. Like the other examples, it can be embedded in an Execute SQL script step. An example of a DELETE statement might look like this: DELETE FROM "Contact" WHERE "Contact ID" = '53' Again, if there is no WHERE clause, the DELETE applies to every record in the table. This is another statement that you would best assemble by calculating a value from the current record. This means that if you want to delete a record in FileMaker and in the ODBC host, you need to execute the SQL statement first, and only then delete the local FileMaker record. |

 For more information about using ODBC to import data into FileMaker Pro,
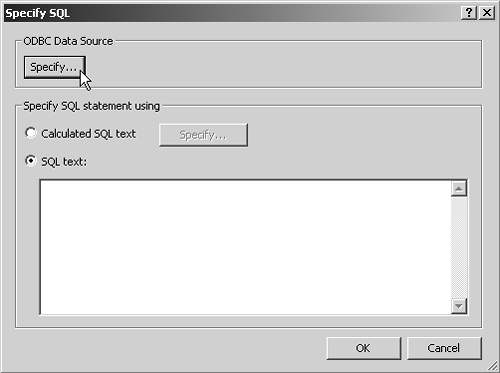

| < Day Day Up > |