Assigning Resources to Tasks
| < Day Day Up > |
Assigning Resources to TasksAs discussed in the previous section, the initial assignment schedule is influenced by task settings such as Task Type and Effort Driven, as well as by the choice of assignment units and work. As shown in Chapter 9, you can then customize the initial assignment by delaying its start, splitting the work, assigning overtime, choosing a work contour, and so forth. You can use a variety of views and dialog boxes to assign resources to tasks. They are listed here, with those that give you the most control over the assignment details listed last:
In the following sections, we will first discuss how to use the Assign Resources dialog box for less complex assignments and to help choose which resource to assign. We will then use the Gantt Chart view with the Task Form view to see how to handle more complex assignments. Then, we will put the Task Usage view in the top pane and work on fine-tuning the timephased work schedule. Finally, we will briefly explore how to use the other views and dialog boxes mentioned previously, in case you want to use them too. Using the Assign Resources Dialog Box
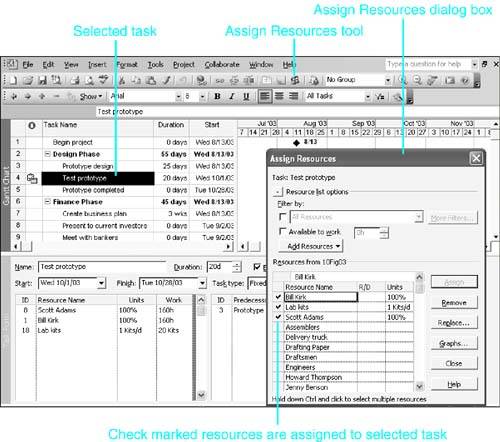
Figure 10.3 shows the Assign Resources dialog box over the Gantt Chart and Task Form views. This figure shows the resource list options expanded to display the options to apply filters and to add resources. Click the little plus-sign button to the left of Resource List Options to expand the dialog box. Figure 10.3. You can use the Assign Resources dialog box to assign resources to selected tasks. The selected task in Figure 10.3 is Test Prototype. You can see in the Assign Resources dialog box which resources are assigned to the task because they appear first in the Resource Name list and have check marks next to their names when that task is selected. The underlying view shows more detail about the assignments in the Resources area of the Task Form view in the bottom pane. TIP Because you might need to change the task type or effort-driven status of a task before making or changing a resource assignment, you usually want the Task Form view in the bottom pane of the underlying view. Remember to consider the settings for those parameters before making any changes in assignments. CAUTION The Undo command is not available for resource assignment actions you take with the Assign Resources dialog box. The Assign Resources dialog box is the only pop-up dialog box that you can leave on the workspace while switching back and forth between the dialog box and the underlying views while selecting different tasks. When displayed, the dialog box remains accessible even if the underlying active view is not a task viewand even in different projects. However, it has reduced functionality if the active view is a form or is not a task view. The following list and Figure 10.4 highlight the powerful features of the Assign Resources dialog box: Figure 10.4. The Assign Resources dialog box has a number of powerful features for managing the resource list and for assigning resources to tasks. The Assign Resources dialog box offers the following features:
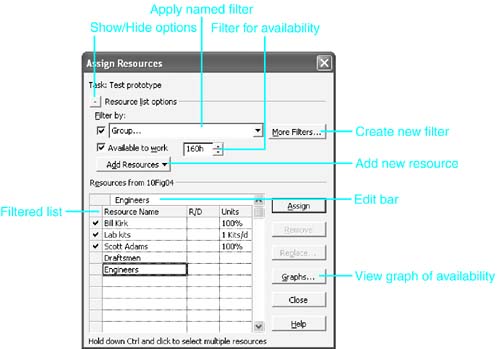
NOTE If you are using Microsoft Project 2003 Professional, you see an additional column titled R/D in the Assign Resources dialog box. This topic is addressed in the "Assigning Resource Units" section later in this chapter, on page 374 . Filtering the Resource ListIf you have a large number of resources, the list of resource names in the Assign Resources dialog box can be quite long. At the top of the list are the resources, if any, who are assigned to the selected task. The rest of the list is alphabetized, with resources of different types intermingled. Applying a filter can shorten the display to just the resources that meet the filter criteria. NOTE Note that resources that are already assigned to the selected task (those that are checked at the top of the list) are listed whether they meet the filter criteria or not. You can apply two types of filters:
These two filter types can be used alone or in combination for greater precision in finding the right resource for a task. Using the Named Resource FiltersSeveral predefined resource filters come with Project 2003 and can be helpful in finding the resource you want to use:
TIP The Group filter selects only the resources whose Group field value matches exactly what you enter in response to the prompt. You might find it more useful if you change the filter test from equals to contains (or contains exactly if you put multiple comma-separated values in the field). To make the most effective use of resource filters, you should use custom fields, in which you enter special keyword values that you can use when filtering the resource list. For example, you might use a custom text field to list resource skills. Then you would create an interactive filter that prompts you to specify the skill you want so it can display a short list of resources with that skill. NOTE If some resources have multiple skills, you can use comma-separated entries in the field. The filter needs to test that the field contains or contains exactly the specified skill. Note that you must not include a space after the comma separator if you use the contains exactly test. Another useful custom field that you could use for filtering is one that contains the city where a resource is located so that you can select resources that are near the facility where work will take place. Other examples include fields that contain department or organization codes, job codes, or cost accounting codes. To apply a filter to the list of resource names in the Assign Resources dialog box, follow these steps:
NOTE If you create a new filter from the Assign Resources dialog box, be sure to click the Apply button to close the More Filters dialog box. The new filter does not appear in the Assign Resources list of filters until you close and reopen that dialog box. To remove the filter after you finish using it, choose All Resources in the filter list. Using the Available to Work FilterSuppose you select a two-day task that is scheduled for Monday and Tuesday and that you want to assign a resource to do the 16 hours of work on the task. If you enable the Available to Work filter and enter 16h in the criterion box, Project displays only the resources that have at least 16 hours of working time available during the Monday and Tuesday when the task is scheduled. To select the resources that the filter will display, Project does the following calculation (see Table 10.3):
Table 10.3. Calculating the Available to Work Value for Resource A
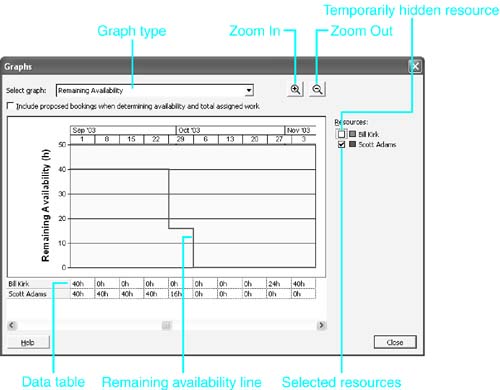
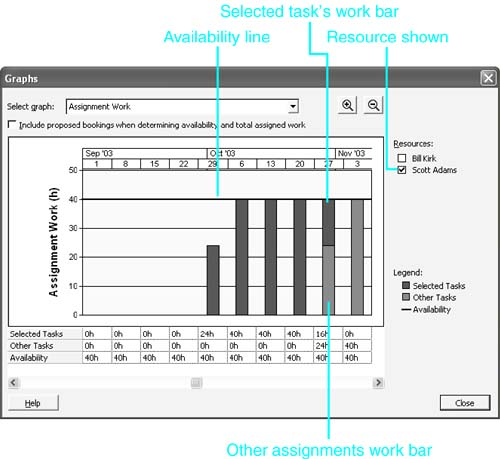
To use this filter, you need to fill the Available to Work check box and then enter the amount of work you require for the task. For the example illustrated in Table 10.3, you could enter 16h . You can enter the work by using any time units (for example, 2d would work in this case), but Project converts the entry to hours. When the filter is turned on, you can select different tasks in the underlying task view, and the list of names is adjusted for the duration of each selected task. Graphing Resource AvailabilitySuppose that you want a specific resource to work on a task, but the resource doesn't have available work hours during the time the task is currently scheduled. One of the possible solutions could be to reschedule the task to a time when the resource has enough work time available. You can select the resource in the Assign Resources dialog box and click the Graphs button to display timeline graphs and accompanying data tables that show information about the selected resource's availability and currently assigned work. You can choose among three graphs:
To view a graph, follow these steps:
NOTE You can't modify the formatting of the graph. Your only controls are those listed here. Assigning Resource UnitsThe preceding sections show how to use the Assign Resources dialog box to select a resource for an assignment. You can also use this dialog box to create assignments. To add a resource assignment to a selected task or group of tasks, follow these steps:
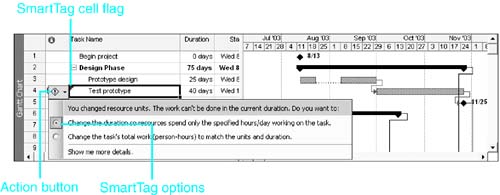
When you use the Assign Resources dialog box to change resource assignments, Project displays a SmartTag to let you choose how it should calculate changes in the schedule (see Figure 10.7). The SmartTag feature compensates for the limited control you have over the variables when you modify an assignment in the Assign Resources dialog box. For example, if you change the units assigned, Project immediately changes the task duration (unless it's a fixed-duration task). But you can use the SmartTag to have Project put duration back where it was and change the work instead. Figure 10.7. SmartTags present options for how schedule changes will be calculated. As soon as you change the assignment, a small green triangle appears in the top-left corner of the task name cell. If you select the cell or merely move the mouse over the cell, an Action button appears, and you can click it to display the calculation options. SmartTags stay visible only as long as you can undo an action. For example, if you change the units for an assignment, the SmartTag lets you choose to have either work or duration change as a result. If you assign an additional resource to a task or remove an existing resource, the SmartTag lets you choose to change duration (keeping work and units unchanged), change work (keeping duration and units constant), or change units (keeping work and duration constant). NOTE SmartTags are triggered by assignment changes that are made in the Assign Resources dialog box and in cells in tables. They are not triggered when you make changes by using the Task Form view or the Task Information dialog box, because in those venues , you can control all the scheduling variables before you click OK. Scheduling Resources for a Specific Amount of WorkFor work resources, you can also use the Assign Resources dialog box to calculate the number of units needed to complete a specified amount of work within the task's current duration. Normally, you enter a simple percentage in the Units column of the Assign Resources dialog box. If you enter a work amount in the Units column (a number followed by a time unit, such as 40h for 40 hours), Project calculates the number of units of that resource that are needed to do that much work within the current duration for the task. This procedure does not work if the task is effort driven and this is the initial assignment of the resource to the task. You can use the technique to recalculate an existing working resource assignment, even if the task is effort driven. To assign resources by using a work amount, follow these steps:
Adding Resources by Using Drag-and-DropWith the Assign Resources dialog box, you can create an assignment by dragging a resource name to a task. An advantage to using this drag-and-drop assignment method is that you do not have to preselect the task for which a resource should be assigned. However, Project automatically assigns the default units (usually 100%). To assign resources to a task by using the drag-and-drop method, perform the following steps:
TIP To assign multiple resources to a task by using the drag-and-drop feature, hold down the Ctrl key while selecting the resource names in the Assign Resources dialog box. When you click on one of the gray buttons and drag the mouse pointer to the task, all selected resources are assigned at once. Removing Resource Assignments from One or More TasksTo remove a resource assignment from one or more selected tasks, follow these steps:
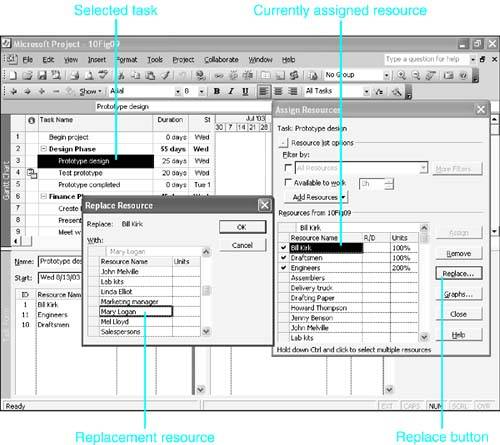
Modifying an AssignmentYou can use the Assign Resources dialog box to replace one resource with another, to change the assigned units for a resource, or to change the amount of work assigned to a resource. Each assignment should be modified individually, and different techniques can be used, depending on what you want to modify. To replace an assigned resource with another resource name, follow these steps:
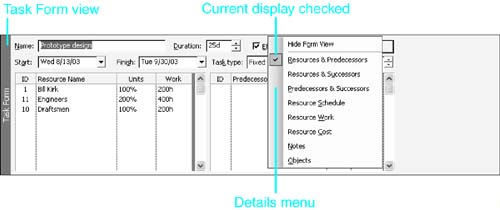
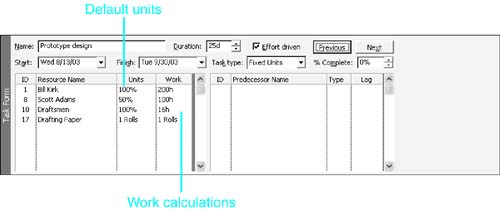
NOTE If you have filtered the list of resource names, the list in the Replace Resource dialog box is filtered also. To replace the number of units in a resource assignment, you simply edit the entry in the Units field. You select a different cell or press Enter to complete the change. You can then use the SmartTag to override Project's default calculation. To replace the amount of work assigned to a resource, select the cell for the units and type a work amount (a number followed by a time unit abbreviation). Project divides the task duration by the work amount you entered and assigns the resulting units. You can use the SmartTag to override Project's default calculation. Assigning Resources with the Task Entry ViewThe Task Entry view, with the Gantt Chart view in the top pane and the Task Form view in the bottom pane, is one of the best combination views for assigning resources. You have access to the important fields that govern the task, and the form can display resource assignment details in a table at the bottom of the form. The most commonly displayed details are ID resource, name, units, and work for each assigned resource, but you can also display the overtime work fields and the scheduled delay fields for fine-tuning individual assignments. This is a convenient place for assigning resources because it enables you to enter resource units, work, or both for each resource assignment. TIP If you use the Task Form view to create and modify assignments, you might still want to use the Assign Resources dialog box to filter the resource list to help determine the best resource to assign. The Task Entry view is the view you get when you display the Gantt Chart view and use the Window, Split command. The Task Form view is displayed in the bottom pane, with one of eight possible sets of details. You can right-click over the form and select the details you want to use (see Figure 10.10). For assigning resources, you should use either the default details, Resources and Predecessors, or you should use Resource Work. Figure 10.10. The Details menu for the Task Form view shows the current display with a check mark and enables you to select a new display. Entering the Assignment ValuesTo assign resources by using the Task Form view, follow these steps:
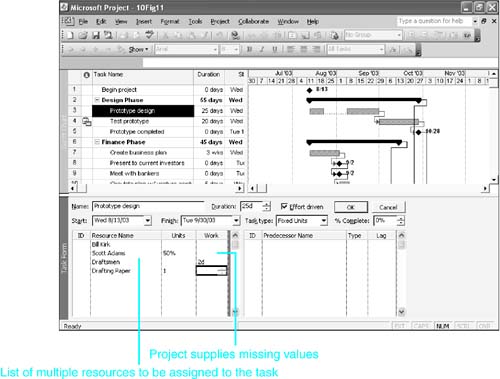
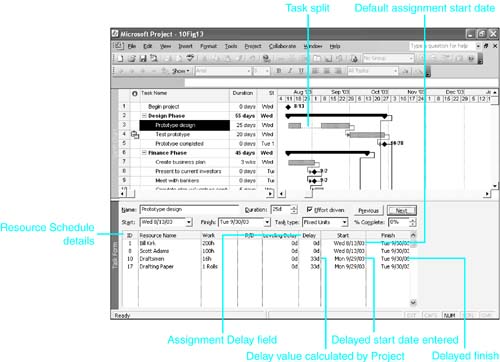
When you click OK, Project calculates the values for the fields that you did not fill in, in accordance with the principles discussed in Chapter 9 (see Figure 10.12). Figure 10.12. Project calculates all the initial assignments at once, filling in the fields you don't supply. Adding Delay to an Assignment in Fixed-Start-Date ProjectsWhen you assign a resource to a task in a project that has a fixed start date, Project schedules the work to start when the task starts. Sometimes, however, one or more of the resources assigned to a task might be allowed to delay starting until after the task is partly completed by other resources. NOTE This discussion is presented in terms of forward - scheduled projectsprojects with fixed start dates. The case of the project with a fixed finish date is explained later in the section "Adding Delay in Fixed Finish Date Projects." For example, if you assign a marketing manager, an engineer, and a draftsman to draw up a preliminary design for a product, the draftsman's work on the task doesn't really start until some design details have already been proposed. To accurately schedule the draftsman's work, Project needs to delay the start of the draftsman's scheduled work to some time after the task starts. Microsoft Project provides an Assignment Delay field, which you can use to force a delay in the scheduled work for a resource beyond the start of the task. If you want to enter a value in the Delay field on the Task Form, you need to display the resource schedule details, where the Delay field is available for editing. NOTE You can get to the Delay field by replacing the Task Form view with the Resource Form view and displaying the schedule details (which is just like the resource schedule details on the Task Form view). You can also enter delays on the Task Usage and Resource Usage views. The Task Usage view is discussed in the section "Assigning Resources with the Task Usage View" later in this chapter. The Resource Usage view is explored in greater detail in Chapter 11, "Resolving Resource Assignment Problems." Figure 10.13 shows the Task Form view with the resource schedule details displayed. The Prototype Design task is selected, and the assigned resources are listed in the assignment details. The Draftsmen resource is scheduled to work only 16 hours, which is much less than the hours for the other work resources. Figure 10.13. You can use the resource schedule details to delay the start of an assignment either by adding a delay or by entering the date when the assignment should start. You can also see in Figure 10.13 that Project has scheduled all resources except the draftsman to start at the start of the task, which is 8/13/03, and to finish on 9/30/03. (Because of the task split, the difference between the start and finish dates is more than the task duration.) In reality, the draftsman is expected to execute his assignment in the last 2 days of the task (9/29/03 and 9/30/03), after the other resources have completed most of their work. You can create a delay in the Task Form view by entering the amount of the delay in the Delay field or by entering the start date for the assignment. Because of the task split, it is easier to create this particular delay by entering the start date for the draftsmen assignment (9/29/03) than to try to calculate the amount of the delay. In Figure 10.13, the date 9/29/03 was entered in the Assignment Start field for the Draftsmen resource, and Project has calculated the delay to be 33d and the assignment finish to be 09/30/03. Note that all resources finish their assignments on the same date (which is also the finish of the task). Of course, if the delay causes the draftsman's assignment to finish after all the other assignments are finished, it also delays the finish of the task and increases the task's duration. To enter a delay in an assignment, follow these steps:
CAUTION As noted earlier in the chapter, you can create a delay either by entering the Delay value or by entering a new date in the Start field. You should not, however, attempt to enter a delayed date in the Finish date column because Project doesn't treat that as a delaying tactic. Instead, Project treats it as extending the assignment, and it recalculates the Work value of the assignment. If the Draftsmen resource doesn't start work until 9/29/03, then the material resource Drafting Paper is not needed until that date also. Delaying a material resource can be done effectively only in the Task Usage or Resource Usage views because of the way Project schedules material resources. The units of a material resource are distributed evenly over the task duration. In this case, the 1 roll of paper would be distributed over the 25 days of the task duration, with .04 roll scheduled each day. If you were to delay that assignment, the scheduled use of paper would be pushed out past the current finish date for the task. We will come back to this problem in the section "Assigning Resources with the Task Usage View," later in this chapter. To remove a delay for an assignment, you enter in the Delay field and click the OK button. Project reschedules the assignment at the start of the task.
Adding Delay in Fixed-Finish-Date ProjectsAs noted earlier, the discussion in the previous section is based on a project with a fixed start date, and the delay is used to offset the start of an assignment from the start of the task. If a project has a fixed finish date, Project schedules the finish dates for tasks first and then works backward to calculate the start date. Thus, in fixed-finish-date projects, Microsoft Project already delays tasks and assignments to As Late As Possible. So, in a case such as the draftsman who should start later than the others, Project automatically does that. Suppose, however, that you have a task for which one resource has a small amount of work that needs to be done toward the beginning of the task and other resources who continue on the task after that one is finished. In a project with a fixed finish date, Project would schedule that one resource's work at the end of the task. You need to force Project to schedule an early finish for that one resource. Thus, the concept of the delayed start becomes an early finish. Instead of adding the value in the Assignment Delay field to the task start to calculate the assignment start, in fixed-finish-date projects, the Assignment Delay value is subtracted from the task finish to calculate an early assignment finish. That in turn leads to an earlier start for the assignment. For fixed-finish-date projects, the Assignment Delay field accepts only negative numbers , and the delay amount is subtracted from the task finish date, to calculate an early finish for the assignment; then the start is calculated. You can also enter an earlier date in the Finish date field, and Project calculates the negative delay and new start date for you. If you enter a new date in the Start Date column, Project recalculates the Work value of the assignment instead of calculating a delay. As before, to remove a delay, you set the entry in the Assignment Delay field to . Assigning Overtime WorkRecall that Project schedules work during the working times that are defined in the resource calendar (or in the task calendar, if one is assigned and you have elected to ignore the resource calendars). Work that is scheduled during calendar working times is called regular work in Microsoft Project. If you want a resource to complete more work than can be done in regular time for a given period, you can assign part of the work as overtime . Project reduces the amount of the assignment's work that is scheduled during the regular hours, but the total work, regular plus overtime, remains the same. Note that when you enter overtime work hours, you do not designate the exact days and hours when the overtime work takes place; you just tell Project that a certain number of hours on the task are overtime hours. Project schedules the overtime work by spreading it out evenly over the duration of the assignment. Later, when you enter actual work completed, you can specify exactly how many hours of overtime were completed in any given time period. The cost of the overtime hours is calculated by using the overtime rate that you defined in the Resource Information dialog box for the period in which the work took place. Another way to schedule more work during a specific time period is to change the resource calendar and increase the working time hours for that time period. You can edit the resource calendar and change nonworking days or hours into working times. Be aware, however, that Microsoft Project charges the standard rate for work scheduled during the regular working time hours. If the overtime rate for the resource is not zero, changing nonworking days or hours into working times is not a good solution because the cost is misrepresented. However, if you don't pay for overtime, editing the calendar is satisfactory. Indeed, editing the calendar gives you the ability to state explicitly when the extra work time takes place. The drawback in this situation is that if you are to reassign the resource to different tasks, or if the task gets rescheduled to a different date range, you no longer need the extra working time. Project uses the time for other assignments unless you remember to remove the extra working time from the calendar. You can view scheduled overtime in the Task Usage and Resource Usage views, but you cannot enter overtime in those views unless you add a column to the table for the Overtime Work field. The Overtime Work field appears in three views for you to view and edit:
NOTE If you assign all the work to be done in overtime, Project reduces the duration of the task to zero and automatically flags the task as a milestone. You can remove the Milestone flag by opening the Task Information dialog box and clearing the Mark Task as Milestone check box on the Advanced tab. The milestone symbol no longer appears in the Gantt Chart view for the task, although its duration is still zero. To enter overtime in the Task Form view, follow these steps:
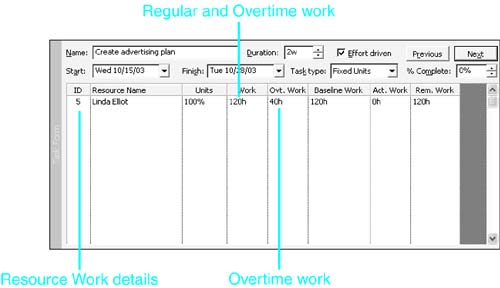
NOTE If you want to eliminate overtime, you must enter in the Overtime field. You cannot leave the field empty because this field must contain a value. In Figure 10.14, overtime has been entered for Linda Elliot's assignment to the Create Advertising Plan task. The total workload for this assignment is 120 hours, which was originally scheduled to take 3 weeks, but after recording 40 hours of overtime, the regular hours are only 80 and the task duration is reduced to 2 weeks. Usually, overtime is scheduled for just this reasonto reduce the calendar time required to complete a task. Assigning Resources with the Task Usage ViewEverything you accomplished in the previous section with the Gantt Chart view in the top pane can also be done with the Task Usage view in the top pane. In fact, you can do much more:
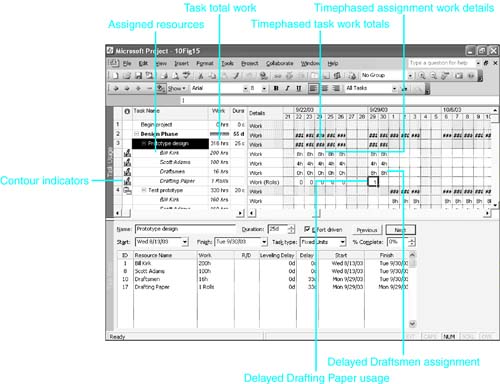
Figure 10.15 shows the Task Usage view in the top pane and the Task Form view in the bottom pane. Figure 10.15. The Task Usage view provides timephased detail about individual task assignments for viewing and editing. To display the Task Usage view, click the icon for the view on the View bar or choose View, Task Usage. The table area of the Task Usage view displays all the tasks in the project, using (by default) the Usage table. Indented under each task are rows for that task's assignments. You can hide or show the assignments by using the outline icon to the left of the task name. The Work field for the task is the sum of the Work field values for the assigned resources. The right side of the view is a timescale grid of cells that show timephased assignment details. In Figure 10.15, the work details are displayed in the grid. This is the default assignment detail, but you can display other details if desired. However, for creating and editing assignments, the Work detail is the most important. The value in the Work field for each resource in the table on the left is the sum of the timephased values displayed in the cells on that row in the timescale. Figure 10.15 shows the delay in the Draftsmen resource's assignment: The timephased work values are all zero until the last two days of the task duration. You can also see that the Drafting Paper material resource usage has been delayed to the date when the Draftsmen resource starts. The following section explains how this was done. Modifying Work Schedules with the Task Usage ViewAs mentioned previously, you can use the Task Usage view to customize the amount of work scheduled for each time period and to split and delay task assignments. To change the amount of work scheduled for any given time period in the Task Usage view, simply select the timephased cell, type a new value, and either press Enter or select another cell. When you type a value for a work resource, Project assumes that the unit is hours unless you provide a different measurement unit. NOTE If you type a value with a time unit that is not hours, Project converts the value to hours in the display. For example, if the timescale unit is days (that is, each cell is one day) and you type 1 week , Project displays 40h (40 hours) in that cell. If the assignment units is 100%, this is too many hours for that one day. This example also serves to warn you that you should not enter a work value that represents more hours than are available for that time period. You can use several techniques for editing the cells in the timephased grid:
For example, if you want to increase the work and duration of an assignment, you can select the last cell in the assignment and drag its fill handle to the right to fill as many additional work periods as you choose. Also, if you want to introduce a split in an assignment, you select the cells where the split is to occur and press the Insert key. To remove the split, you can select the cells that display 0h and press the Delete key. If you modify a timephased cell on the task Work row, the new value is apportioned among all the work resource assignments that had work scheduled for that time period. The relative proportions of the total work for each resource are kept the same. If you modified a timephased cell on an assignment row, the new values change the sum in the row for the task. When you complete a cell modification, Project immediately recalculates the task and assignments as follows:
CAUTION Be very careful when using these editing techniques when you have a project with a fixed finish date. The results are not the same as for a fixed-start-date project and therefore are likely to cause you to lose a lot of time trying to correct the changes. To introduce a split in a task or in an individual assignment using the Task Usage view, follow these steps:
To delay an assignment, you could select the cell for the beginning of the assignment and press the Insert key repeatedly until the work is moved to the date when you want the work to start. Alternatively, you could select all the work cells for the assignment and drag the selection to the period where you want the work to be scheduled. In Figure 10.15, the usage of the material resource Drafting Paper is shown to be delayed until 9/29/03. Originally, Project had distributed the 1 roll of paper evenly over the 25 days of the task duration (0.04 rolls per day). To create a delayed usage as in Figure 10.15, you would have to delete all the fractional units and type in the new usage, as shown in the figure. The quick way to remove all the fractional units is to type in the Work column on the left. Then select the timephased cell for the date where you want to schedule the usage (9/29/03) and type in the value. TIP Drag-and-drop can be difficult to use if the destination is offscreen , because when you drag past the last visible cells, the screen scrolls quite rapidly . In those instances, it is easier to cut the selection, scroll to the destination, and paste. Using the Assignment Information Dialog Box
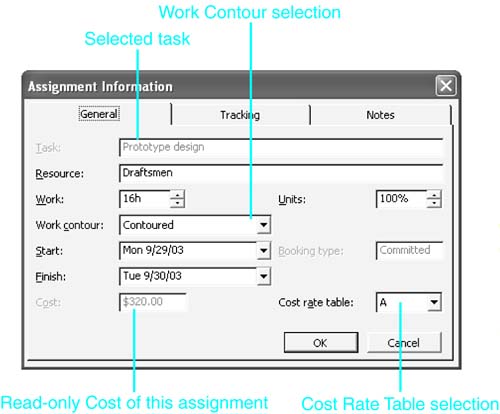
Figure 10.16 shows the Assignment Information dialog box for the draftsmen's delayed assignment from the previous example. As you can see, the dialog box provides several fields that you have already worked with on forms and tables, including Assignment Work, Assignment Units, and Start and Finish. The Cost field is a read-only total cost for the assignment. You can also change the name of the assigned resource here, but there is no drop-down list to choose the resource, so you must know how to spell the nameor you might end up creating a new resource out of a typographical error. Figure 10.16. You can use the Assignment Information dialog box to enter assignment notes, to choose the Cost Rate table for the assignment, or to apply predefined work contours. There are three fields in the Assignment Information dialog box that you won't find on any other standard view or dialog box in Project:
The Tracking tab has fields you can use to monitor work progress and record when work starts, how much work has been done so far and when work is completed. See Chapter 14, "Tracking Work on a Project," for information about using those fields. Selecting a Predefined ContourBy default, the work that Project schedules for an assignment is evenly distributed across the available time periods of the assignment (that is, the Flat contour). As you have already seen, you can edit the assignments in individual time periods to customize the schedule. You can also choose one of eight predefined contour patterns for Project to apply to an individual assignment. For example, if a resource schedule needs to show lots of hours up front, with a tapering off toward the end, you can assign the Front Loaded contour to the assignment, and Project changes the work in the individual periods to reflect that pattern. To select a contour for an assignment, follow these steps:
Selecting a Cost Rate Table for an AssignmentOne of the important features in Project is the ability to define a graduated scale of standard and overtime cost rates for a resource so that work on assignments can be charged at different rates for different types of work. For example, a consulting firm might assign a seasoned consultant to highly technical cases at higher rates than it would use for other more mundane tasks. The only way to change the Cost Rate table for an assignment is to display the assignment by using either the Task Usage view or the Resource Usage view. The most convenient method in those views is to use the Assignment Information dialog box (but you can also display the Cost Rate Table field in the table on the left of the view). Choose one of the lettered cost tables in the drop-down list in the Cost Rate Table field to assign that cost table's standard, overtime, and per-use rates to the assignment. If there are dated changes in the rates, Project applies the rates that are defined in the table for the dates in which the task is scheduled. NOTE
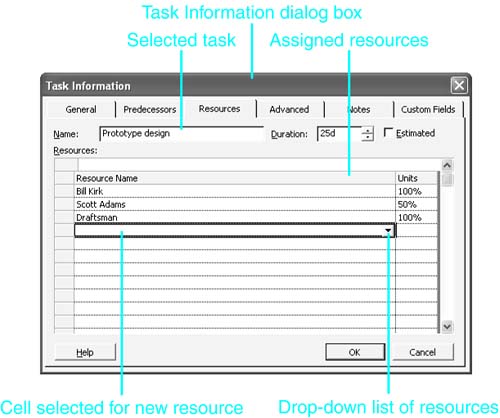
Creating Assignment NotesYou use the Notes tab of the Resource Information dialog box to document an assignment. You can type and format the note text just as you do the text of task notes and resource notes. You can insert documents into the note or insert links to documents that are stored outside the Project file. You can also insert hyperlinks to Web sites. Assigning Resources with the Task Information Dialog BoxYou can use the Resources tab on the Task Information dialog box to add, change, or delete the resource assignment information for a selected task. As with the Assign Resources dialog box, you can use the Units field of the Task Information dialog box to enter either units or work; you are prevented from creating a new assignment on an effort-driven task by defining the work. If you enter work (by using a numeral followed by a time unit), Project calculates the units that would produce that much work, given the task's duration. To change assignments by using the Task Information dialog box, follow these steps:
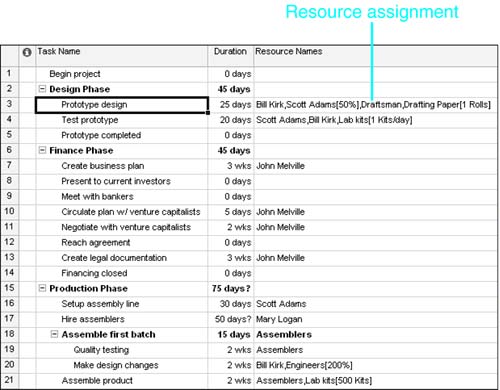
If you use the Ctrl key to select more than one task before opening the Task Information dialog box, Project displays the Multiple Task Information dialog box so that any resource you select is automatically assigned to all selected tasks. The resource assignment entries you make in the Multiple Task Information dialog box are added to existing resource assignments for the selected tasks. NOTE You cannot change existing resource assignments for multiple tasks by using the Multiple Task Information dialog box. Assigning Resources with the Task TableYou can use the Resource Name field on the Task table to assign resources to a task. However, entering the resource assignment data in the Resource Name field requires a text entry that has very specific syntax, and you will not likely assign resources here often. The entry must have the following syntax: ResourceName1 [ Units ], ResourceName2 [ Units ], ResourceName3 [ Units ] ... When entering data using this format, note that the Units value follows immediately after the resource name, without an intervening space, and it is placed in square brackets. Units values of 100% do not need to be included. Notice, too, that multiple resource assignments are separated by commas. For example, the Resource Name field entry for the Prototype Design task might be Bill Kirk,Scott Adams[50%],Draftsmen,Drafting Paper[1 Rolls] Figure 10.18 shows this assignment. Because of the width of the Resource Names column, other columns and the Gantt Chart view are hidden in the figure. Figure 10.18. You can use the Resource Names field to review or enter resource assignments. TIP If you want to import a list of tasks with resource assignments, you must have used the Resource Name field format in the source data to identify the resource assignments. For information about importing data, see Chapter 17, "Exporting and Importing Data with Other File Formats." To assign resources to tasks in the Resource Names field, follow these steps:
|


| < Day Day Up > |
EAN: 2147483647
Pages: 283