Your Computer Display
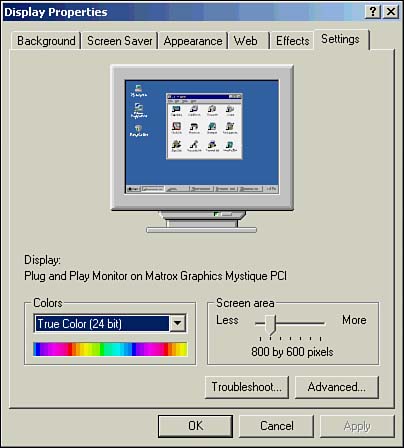
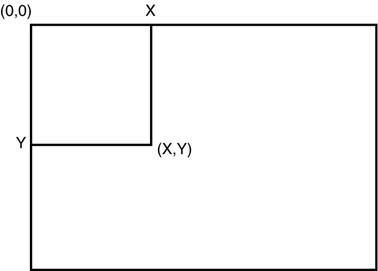
| As you probably know, your display consists of thousands of tiny dots called pixels (that is, picture elements). Most displays are capable of showing different numbers of pixels. You can access the display settings information by selecting Start, Settings, Control Panel, Display and then selecting the Settings tab. Figure 22.1 demonstrates how to determine your current display setting. Figure 22.1. Determining your display setting by using the Control Panel's Display program. As I am writing this book, I have the display set to 800x600 pixels. You might hear this setting referred to as the display resolution. If you do some quick math, you find that my current display resolution uses 480,000 pixels to present information onscreen. You can change your display resolution by moving the slider control shown in Figure 22.1. If you increase the resolution, everything onscreen gets relatively smaller. This is because you are spreading the same display information over a larger number of pixels. It is important that you understand this because when you start doing graphics programming, what you see in this book might not be what you get. If your display resolution is different from mine, your graphics output might look different. Display resolution is not the only thing that affects graphics displays. You might see information about a display such as ".26 dot pitch." What's that all about? The dot pitch parameter actually measures the spacing (in millimeters) between the pixels on the screen. As a general rule, the smaller the dot pitch value, the better the quality of any image shown on the display. Back in the old days, some displays actually had dot pitch values approaching .50. This means that there was a relatively large amount of black space between the pixels. As a result, an all-white screen actually looked gray because the human brain mixes the white pixels with the black background. The higher the dot pitch number, the more black there is between pixels. The result is that colors look subdued and less crisp than on displays that have lower dot pitch numbers. Therefore, an image that looks great on one monitor with a low dot pitch number might look faded or washed out on a monitor with a higher dot pitch. The Visual Basic .NET Graphics Coordinate SystemWindows and Visual Basic .NET use a coordinate system to determine which pixels have which colors. Most modern displays support 24-bit color , which means there are more than 16.7 million possible colors for each pixel. The .NET Framework uses the Graphics Device Interface Plus (GDI+) to manage just about everything that happens on the display. Every display pixel is uniquely identified by its coordinates. For two-dimensional images, each pixel has an x-coordinate and a y-coordinate. The x-coordinate measures the horizontal distance relative to the left edge of the display. The y-coordinate measures the vertical distance relative to the top of the display. This system is shown in Figure 22.2. Figure 22.2. The x,y-coordinate system for display pixels. The Visual Basic .NET coordinate system is a little different from what you learned in your high school math class. Most of us are used to thinking of the lower-left corner as the origin (0,0) of a graph, and we extend that expectation to computer graphics. Alas, the Visual Basic .NET graphics coordinate system is different. The GDI+ system uses the upper-left corner of the display as the origin of the coordinate system. Increasing values of the x-coordinate represent horizontal movement from left to right. You should feel right at home with the x-coordinate and its direction of movement. It's the y-coordinate movement that throws a curve. You are probably used to thinking of increasing values of y as moving from the bottom of the graph upward. For the GDI+ coordinate system, it's exactly the opposite . Increasing the y-coordinate moves you from the top of the display toward the bottom. So if my display resolution is 800x600, the lower-right corner of my display has the x,y- coordinates (800,600). A pixel in the center of the display would be found at coordinates (400,300). Although the display coordinate system might seem a bit weird right now, with a little practice, it will all begin to make sense. This chapter uses the Visual Basic .NET PictureBox control to introduce the Visual Basic .NET graphics system. The PictureBox ControlYou can use the PictureBox control in a variety of ways in the Visual Basic .NET graphics system. At the moment, you should be concerned with its capability to display images. Simply stated, the PictureBox control serves as a container within which you can display the types of images shown in Table 22.1. Table 22.1. Image File Formats Supported by the Visual Basic .NET PictureBox Control
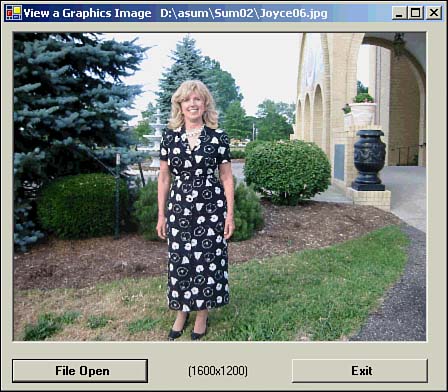
Image Storage SizeThe earliest PC display devices did not support color. Therefore, an image could store each pixel as a single bit. The pixel was either on or off. Eventually, color displays (for example, Color Graphics Adaptor [CGA] displays) became available, although they were pretty crude by today's standards. As display devices became more technologically advanced, each pixel gained greater capability to display an ever-increasing range of colors. Today's image devices typically use 24 bits to represent the color value for a single pixel. For example, even low-end digital cameras are capable of 1600x1200 image sizes. A little quick arithmetic shows that a color image from a digital camera could require up to 5.5MB of disk storage. Although disk storage is relatively inexpensive today, the time to load a 5MB image is still noticeable. Smaller image sizes have smaller footprints on the hard drive and quicker load times. Therefore, there has always been a drive to shrink the storage requirements for images while maintaining their quality and fidelity. The GIF and JPEG formats both seek to compress the image storage size while maintaining the image's quality. In fact, the image shown in Figure 22.6 later in this chapter was stored as both a 1600x1200 BMP image and a JPEG image. That image is a busy image in that it has lots of contrasting textures and colors. Such images do not lend themselves to image compression as well as less busy images do. The BMP version of the image took 5.626M of file storage space. When the image was converted to a JPEG file, the storage requirement dropped to 610KB! This means the converted JPEG image is about 11% of its bitmap size, yet to the human eye there is no noticeable difference in the image quality. There are some very bright people out there! Figure 22.6. A sample run of the Imageviewer project. |
EAN: 2147483647
Pages: 238
- Chapter VII Objective and Perceived Complexity and Their Impacts on Internet Communication
- Chapter VIII Personalization Systems and Their Deployment as Web Site Interface Design Decisions
- Chapter X Converting Browsers to Buyers: Key Considerations in Designing Business-to-Consumer Web Sites
- Chapter XV Customer Trust in Online Commerce
- Chapter XVII Internet Markets and E-Loyalty