| With the release of Windows 2003 R2, Microsoft added a new component that provides better quota and storage management of files in a Windows 2003 environment. File Server Resource Manager, or FSRM, is a technology that enables administrators to set storage quota limits as well as identify and enforce data storage policies. Unlike quota functions in other operating systems that allow administrators to set quotas for the storage of just file data on servers, FSRM provides more flexibility in the way it allows files to be managed. For example, in typical file quota processes, an administrator may set the storage limit for users to be 100MB. That's fine for the typical user who commonly writes memos or small documents; however, in a highly collaborative environment, a manager may be responsible for viewing and editing all documents created in the organization. As the final editor of all documents, the manager will exceed his 100MB limit because he will frequently open and save files that he edits. So the organization changes the manager's quota, typically to an unlimited storage amount. This violates the company policy of limiting storage because this manager now no longer has a storage limit. FSRM allows administrators to still enforce the 100MB limit on the manager for personal files, but can waive storage limits for all files the manager opens and saves to a specific branch of the filesystem, such as a shared folder or a data directory to which edited documents are commonly saved. This allows the manager to continue to perform his job of editing and saving shared documents, but still enforces the organizational 100MB limit on all other files. However, this too creates a hole in the organization's file storage limit process. Therefore, FSRM includes yet another feature that prevents this manager from potentially overstepping his rights of unlimited shared storage, by allowing administrators to add a file type limit. If the users are storing only shared Word documents and Excel spreadsheets for review and edits, then the administrator can specify an unlimited storage of *.doc and *.xls file types in the shared folder, and block the saving of files that are not .doc or .xls files, such as MP3 audio files or MPG video files. Multiple policies and filters can be added to folders, users, and groups of users to allow, disallow, enable, or disable the users' abilities to store files, certain file types, or other designations to help the administrator best manage and administer the environment. Uses of File Server Resource Manager When administrators are initially introduced to File Server Resource Manager, they immediately think about setting and enforcing storage quotas to limit users on the amount of disk space they can access. However, in production environments, several practice uses of FSRM functionality have drastically simplified administration and management functions for a network. The most common uses of FSRM are as follows: Setting Limits on User Storage An administrator can set the limit on how much disk space a user or group of users can store on a system. This is the traditional quota limit item that can limit users to store, say, 100MB of files on the network. Providing Flexibility of Group Storage When a user or group of users need to have different storage limits, instead of allowing these users unlimited access, FSRM can be configured to allow the extension of storage usage beyond the default for specific file types (that is, *.doc or *.xls files) or file locations (for example, shared storage locations or public posting areas of the network). Enforcing Storage Policies FSRM does more than just define storage policies; it helps administrators enforce the policies by creating reports and generating notifications of policy violations on a real-time basis.
Installing the File Server Resource Manager Component The File Server Resource Manager is a component within the Windows 2003 R2 update. To install the File Server Resource Manager component, the Windows 2003 R2 components must be installed on the system (see the section, "Preparing a System and Installing the Windows 2003 R2 Components," in Chapter 3 for installation instructions). Perform the following steps to enable the File Server Resource Manager component option on the system: 1. | Log on to the desired server using an account with Local Administrator access.
| 2. | Select Start, Settings, Control Panel, Add/Remove Programs.
| 3. | Click Add/Remove Windows Components, and double-click the Management and Monitoring Tools folder. Select the File Server Resource Manager component and click Next.
| 4. | Click Next to install the component, and then click Finished when you're done. Typically, you will be required to restart the server in order for FSRM to be enabled.
|
Configuring User Storage Limits with File Server Resource Manager After the File Server Resource Manager component has been enabled on a server, an administrator can launch the utility and begin creating FSRM policies. To open the FSRM utility, do the following: 1. | Select Start, Settings, Control Panel.
| 2. | Open the Administrative Tools folder and double-click File Server Resource Manager to launch the FSRM Component.
|
When you open the FSRM component, a screen will appear similar to the one shown in Figure 30.4. Figure 30.4. File Server Resource Manager utility in Windows 2003 R2. 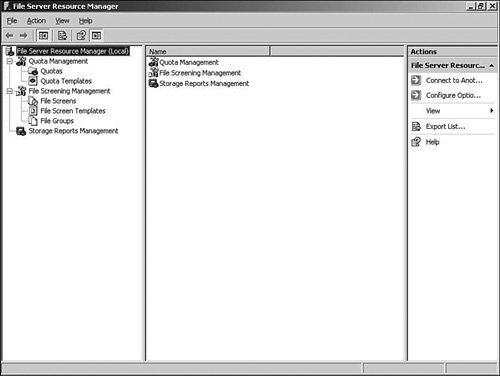
To create a simple quota within the File Server Resource Manager utility, do the following: 1. | Click the Create Quota action item in the far right pane of the FSRM utility, or click Action, Create Quota from the menu bar.
| 2. | Specify the path for the quota, such as c:\Home Directory.
| 3. | Choose the option Create Quota on Path to create a new quota, or choose Auto Apply Template and Create Quotas on Existing and New Subfolders if you have created a quota template (more on quota templates in the next section, "Creating a Quota Template").
| 4. | Specify the storage limit quota from one of the quota property templates, or create a custom quota limit.
| | | 5. | View the quota designation in the Summary screen, as shown in Figure 30.5, and click Create to create the quota.
Figure 30.5. Creating a quota from the Create Quota action item. 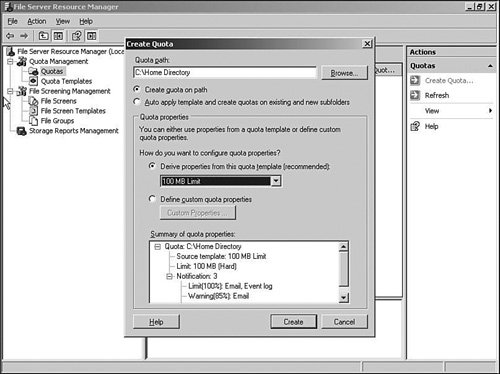
|
After the quota has been created, the quota shows up on the Quotas folder in the Quota Management section of the FSRM utility. An administrator can choose to view, edit, or delete the defined quota. Creating a Quota Template When working with quotas, rather than defining the storage limits on each folder being issued a quota, an administrator can create a quota template and apply the template to the folder, simplifying the quota policy creation process. Within the quota template, the administrator can define the following: Amount of Disk Space of the Quota The administrator can define in KB, MB, GB, or TB the amount of space to be set as the quota for the template. Hard Limit or Soft Limit A hard limit does not allow a user to extend beyond the hard limit for storage, whereas a soft limit gives the user a warning that they have exceeded the policy limit. However, it allows the user to continue to save files beyond the limit. Notification Thresholds When the storage limit nears or reaches the quota limit, a series of events can occur. For example, an automatic email warning, event log, or script can be generated and executed. The various nofication threshold options are shown in Figure 30.6.
Figure 30.6. Threshold settings for a quota template. 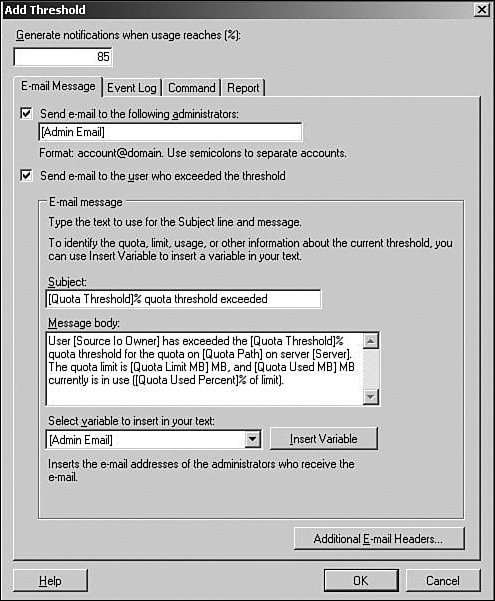
To create a template, click the Quota Templates item of the Quota Management section of the FSRM utility, and then follow these steps: 1. | Click the Create Quota Template action item in the far right pane of the FSRM utility, or click Action, Create Quota Template from the menu bar.
| 2. | Give the quota template a name, such as 250MB Limit for Execs.
| 3. | Specify the storage limit for the quota in KB, MB, GB, or TB. In this example, you would enter 250 and choose MB from the list.
| 4. | Pick whether you want a hard limit or soft limit for the quota.
Note To properly create a storage policy, hard limits should be used as the default. This will ensure the policy is being enforced. However, many organizations choose to identify certain quota policies with soft limits based on organizational politics (for example, allow executives in the organization, or the legal department, to exceed the limit through the use of soft quota limits). | 5. | Create notification thresholds by clicking the Add button and defining limits. Some of the common thresholds are an 85% limit that notifies users when they have achieved 85% of their limits and to consider deleting files so they do not exceed their limits.
| | | 6. | The quota limit will look something like Figure 30.7. Click OK when you're satisfied with your settings.
Figure 30.7. Quota template settings. 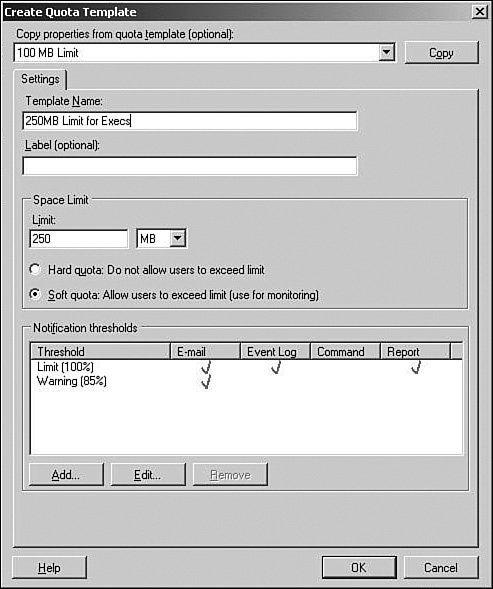
|
The administrator can now create quotas and apply this template or other templates to the quota settings. Creating File Screens Another function of the File Server Resource Manager is the capability to create file screens. A file screen is a form of storage limit that looks at the file type being stored and either allows or disallows a user from saving certain file types. As an example, an organization can allow the storage of *.doc Word documents and *.xls Excel spreadsheets and deny the storage of *.mp3 audio files and *.mpg video files to a given storage area. To create a file screen within the File Server Resource Manager utility, click the File Screens option in the File Screen Management section of the FSRM utility. Then do the following: 1. | Click the Create File Screen action item in the far right pane of the FSRM utility, or click Action, Create File Screen from the menu bar.
| 2. | Specify the path for the file screen, such as c:\Home Directory.
| | | 3. | Choose the option Derive Properties from the File Screen Template, or choose Define Custom File Screen Properties depending on whether you want to apply a template or create a custom screen (more on file screen templates in the following section, "Creating a File Screen Template").
| 4. | View the file screen designation in the summary screen, as shown in Figure 30.8, and click Create to create the file screen.
Figure 30.8. Creating a file screen from the Create File Screen action item. 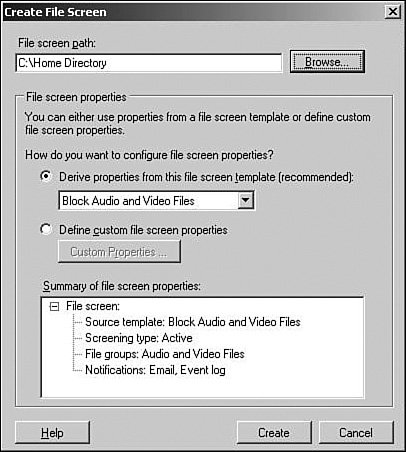
|
After the file screen has been created, it shows up on the File Screens folder in the File Screens Management section of the FSRM utility. An administrator can choose to view, edit, or delete the defined file screen. Creating a File Screen Template When working with file screens, rather than defining the file type limits on each folder being issued a file screen, an administrator can create a file screen template and apply the template to the folder, simplifying the file screen creation policy process. Within the file screen template, the administrator can define the following: File Groups The administrator can define the file types into groups, such as an Office files group containing *.doc Word files and *.xls spreadsheet files, or a Audio and Video files group containing *.wav and *.mp3 audio files and *.mpg and *.vob video files. Active Screening and Passive Screening An active screen does not allow a user to save the file types designated. A passive screen will notify the user that the file type storage is not permitted but allows the user to proceed with saving the file type. Notification When a user attempts to save a file that matches the file screen designation, a notification can be generated. The notification can be the automatic generation of an email warning or an event log, or a script can be executed.
To create a file screen template, click the File Screen Templates item of the File Screen Management section of the FSRM utility, and then do the following: 1. | Click the Create File Screen Template action item in the far right pane of the FSRM utility, or click Action, Create File Screen Template from the menu bar.
| 2. | Give the file screen template a name, such as No Video Files.
| 3. | Pick whether you want an active screen or a passive screen for the quota.
Note To properly create a file screen policy, active screens should be used as the default. This will ensure that the policy is being enforced. However, many organizations choose to identify certain file screen policies with passive filtering based on organizational politics (that is, allow executives in the organization, or the marketing department, to store files that otherwise violate the file screen policy). | 4. | Create email message, event log, command, and report notification settings to alert those who want to be alerted when a file screen policy has been violated.
| 5. | Click OK to create the file screen template.
|
The administrator can now create file screen policies and apply this template or other templates to the file screen settings. Generating Storage Reports from FSRM The File Server Resource Manager provides the capability to create or automatically generate reports for quota and file screen activity. The various reports that can be generated include Generating Reports in Real Time Reports can be generated on a real-time basis to view the file storage information on demand. To generate a report, right-click the Storage Reports Management option of the FSRM utility and choose Generate Report Now. Then do the following: 1. | Click Add to choose the volume or file share that you want to generate a report, such as c:\Home Directory.
| 2. | Choose what you want to report on, such as duplicate files, file screening audit, or files by file group.
| 3. | Choose the report format you want to generate the report, whether it is DHTML, HTML, XML, CSV, or Text.
Note Typically, reports are generated in HTML format so the administrator can view the report out of any browser. However, if the report will be posted on a web server so others can view it, the DHTML or XML format will provide a more versatile report-viewing format. Additionally, the CSV file format can generate a report that can be imported into a spreadsheet or database for data or trend analysis. And text format is commonly used when a unformatted display of information is desired. | 4. | Click OK when finished.
|
The report or reports specified will be generated and displayed onscreen. The reports can be printed, or the reports can be saved for view or analysis at a later date. Scheduling Reports to Be Generated on a Regular Basis Reports can be generated on a regular basis (such as weekly or monthly), typically for the purpose of reporting file storage information to management. To schedule a report, right-click the Storage Reports Management option of the FSRM utility and choose Schedule a New Report Task. Then do the following: 1. | Click Add to choose the volume or file share that you want to generate a report, such as c:\Home Directory.
| 2. | Choose what you want to report on, such as duplicate files, file screening audit, or files by file group.
| 3. | Choose the report format you want to generate the report, whether it is DHTML, HTML, XML, CSV, or Text.
| 4. | Choose Delivery and specify the user name of the individual to whom you want the report to be delivered. This may be the administrator account or an auditor's account.
| | | 5. | Define a schedule if you want the report to be automatically generated and sent. This option is commonly used by organizations that want to generate weekly or monthly reports that are analyzed and reported regularly to management.
| 6. | Click OK when finished.
|
The report or reports specified will be generated at the scheduled time and the individual designated in the report form will be notified when the report has been completed. |