Managing Users with Local Security and Group Policies
| Windows Server 2003 systems provide local security policies to manage user and group administrative access on a per-server basis. Within Active Directory, you can use group policies to set configurations and security on a specified collection of computers, users, or groups of users from a single policy. These policies can be used to deliver standard desktop configurations and security settings for server access and application functionality. Also, policies can set user configurations to deliver software on demand, redirect desktop folders, plus affect many more settings. Many settings within each policy explain what the setting controls and whether computer-based settings apply to only Windows XP workstations. Chapter 15, "Security Policies and Tools," describes security policy in more depth, but the best way to discover and learn about all the Group Policy settings is to open an actual Group Policy Object and start browsing each section. Viewing Policies with the Group Policy Object EditorYou can view Active Directorybased group policies or server and workstation local security policies with very little effort by using a single console. Using the Group Policy Object Editor MMC snap-in, you can read and configure both Group Policy Objects and local security policies. To open an existing policy, follow these steps:
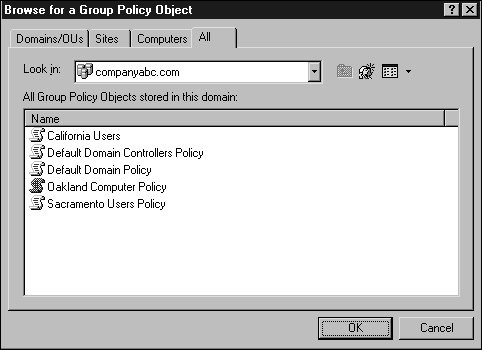
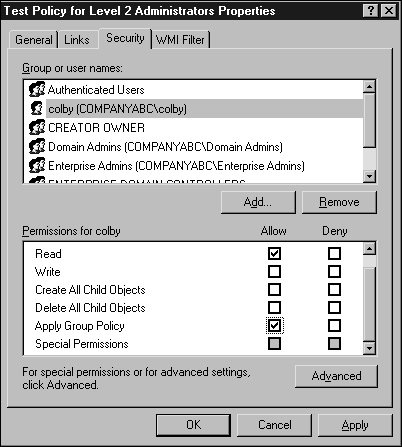
After you access the policy, you can view each setting or settings container to determine the default value and, in some cases, learn what the setting controls. Keep in mind that, with the correct level of permissions, any changes you make to this policy are live changes; there is no undo other than reversing the individual setting changes or performing a Primary restore of the SYSVOL folder on a domain controller that has already replicated the changes. Creating New Group PoliciesWhen changes need to be made or tested using group policies, the administrator should leave the production environment untouched and create test policies in isolated test lab environments. When test labs are not available or cannot replicate the production environment, the administrator can test policies in isolated organizational units within a domain. Also, if domain- or site-based policies need to be created for testing, security filtering could be modified to apply the policy only to a specific set of test users or groups. The preceding section described how to locate a group policy. Using the Active Directory Users and Computers and Active Directory Site and Services snap-ins, you can create, configure, and open site, domain, and organizational unit (OU) group policies for editing. The following steps outline how to create a new domain-based policy and configure its security filtering to apply to a single user:
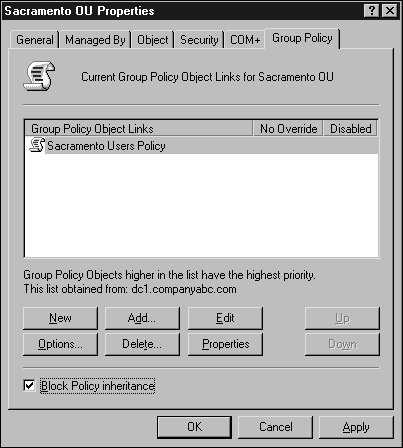
Configuring and Optimizing Group PolicyAfter a Group Policy Object is created, a few steps should be taken to configure how the policy will be applied and to optimize the time to apply the policy. Group policies can be limited to computer- or user-specific settings. To determine whether either type of setting can be disabled, the administrator should figure out which settings are necessary to provide the desired policy settings. In many cases, a policy uses settings for both types. To disable either user or computer policy settings, open the properties as described in the section "Viewing Policies with the Group Policy Object Editor" earlier in this chapter. When the policy is listed, right-click the policy and select Properties. On the General tab, check the appropriate boxes to disable computer or user settings and click OK to save the settings. Figure 19.9. Modifying a group policy's application scope. When multiple group policies exist, they are applied in a predefined order. For a particular user or computer, the order can be derived using the Resultant Set of Polices snap-in described in the "The Resultant Set of Policies MMC Snap-in" section. The results of standard policies are that if setting X is enabled on a top-level policy and disabled on the last policy to apply to an object, the resulting setting will disable setting X. Many policy settings have three states: enabled, disabled, and the default of not configured. You can limit group policies to apply to specific users or computers by modifying the security entries. They can be limited to which types of settings will be disabled using the general properties of the policy, and policies can be blocked at the site, domain, or OU container level using a setting called Block Policy Inheritance. When company-wide, domain-wide, or site-wide settings need to be configured and imposed, the group policy can be configured to use No Override. Block Policy InheritanceThe Block Policy Inheritance option allows an administrator to prevent higher-level policies from applying to users and computers within a certain site, domain, or OU. This capability can be useful to optimize Group Policy applications and to ensure that rights are grandfathered down to the Active Directory objects within the container. To block policy inheritance, follow these steps:
The No Override OptionsConfiguring the No Override option prevents lower-level policies from blocking policy inheritance and from changing the parameters or configured settings in a policy. This option should be used only if policy needs to be enforced on AD objects in every container and subcontainer with a link or inheritance to this policy object. To configure the No Override option for the default domain policy, follow these steps:
Troubleshooting Group Policy ApplicationsWhen policies are used throughout an organization, sometimes the policy settings do not apply to a user or computer as originally intended. To begin basic troubleshooting of Group Policy application issues, you need to understand the policy application hierarchy. First, the local server or workstation policy applies to the user or computer, followed by site group policies, domain group policies, and finally the organizational unit group policies. If nested OUs have group policies, the parent OU policies are processed first, followed by the child OUs, and finally the OU containing the Active Directory object (user or computer). You might find it easier to remember "LSD-OU"the acronym for local, site, domain, and then OU. Now that you know the order in which policies are applied, you can proceed to use the Group Policy testing and troubleshooting tools provided with Windows Server 2003namely the Resultant Set of Policies MMC snap-in and the command-line utility GPResult.exe, which is the command-line version of the RSOP snap-in. The Resultant Set of Policies MMC Snap-inThe RSOP snap-in can be used to show the effective policy settings for a user who logs on to a server or workstation after all the respective policies have been applied. This tool is good for identifying which policies are being applied and what the effective setting is. To test the policies for a user, use the RSOP snap-in as follows:
Within the console, you can review each particular setting to see whether a setting was applied or the desired setting was overwritten by a higher-level policy. To figure out which actual policies have been applied, right-click either the Computer Configuration or User Configuration container and then select Properties to see the list of policies applied for the specified user. |

EAN: 2147483647
Pages: 499
- Integration Strategies and Tactics for Information Technology Governance
- An Emerging Strategy for E-Business IT Governance
- Measuring and Managing E-Business Initiatives Through the Balanced Scorecard
- Technical Issues Related to IT Governance Tactics: Product Metrics, Measurements and Process Control
- Governance Structures for IT in the Health Care Industry
- Article 314 Outlet, Device, Pull, and Junction Boxes; Conduit Bodies; Fittings; and Handhole Enclosures
- Article 330 Metal-Clad Cable Type MC
- Tables 11(A) and 11(B)
- Example No. D5(a) Multifamily Dwelling Served at 208Y/120 Volts, Three Phase
- Example No. D5(b) Optional Calculation for Multifamily Dwelling Served at 208Y/120 Volts, Three Phase