Section 20.6. Exchange Restore
20.6. Exchange RestoreAssuming the rebuild and repair options didn't work, here is an overview of how to restore Exchange. 20.6.1. OverviewThe following synopsis describes the overall restore process:
20.6.2. Restoring Exchange Mailbox or Public Folder StoresYou can choose from several methods when restoring your Exchange stores. The basic procedure is similar for most methods, as outlined earlier. 20.6.2.1. Online database restoreAn online database restore is almost always the easiest type of restore because it is the primary focus of most backup applications. With ntbackup, it is as easy as dismounting the store you wish to restore, running the aforementioned program, and selecting which backup set to restore. ntbackup takes care of the rest. A detailed walkthrough of a basic online restore can be found later in this section. 20.6.2.2. Incremental and differential backupsFrom the backup section, we learned that incremental and differential backups saved a great deal of time during the backup process. Now comes the time when those savings could potentially be lost, when we want something the fastest, during the restore. The issue is that now that you are ready to restore, you must restore your last full backup, then proceed to restore all the incremental or differential backups to the same temporary location. Then, when the last backup medium is loaded, you specify that this is the last backup, and the replay of the transaction logs starts. This places you at the mercy of your backup medium. If you are backing up to tape, you are likely to encounter more problems than if you backed up to a SAN or NAS. If you did not check the Last Restore Set checkbox on the Restore Database Store screen, or you are copying files from other locations, you have to do a manual hard recovery in order to play back the transactions. 20.6.2.3. Hard recovery versus soft recoveryA hard recovery is the act of replaying the transaction logs after the restore of a database from an online backup. After the hard recovery has successfully completed, the database is said to be in an inconsistent or unsynchronized state. One major difference between hard and soft recovery is that with a hard recovery, the checkpoint file is not used; the restore.env file is used instead. This file specifies the range of transaction logfiles that must be present in the temporary folder. A soft recovery is the act of replaying the transaction logs into an offline file copy backup. This process assumes that all the files necessary are all still available and not corrupt. The checkpoint file is used to determine from which point to start the replay. If no checkpoint file exists, replay begins at the oldest transaction logfile. 20.6.3. Offline Database RestoreAn offline restore is a restore in which you simply copy the files from backup media into the proper location on the Exchange Server. Before you begin an offline restore, you need to decide if you want a point-in-time restore or a rollforward restore:
20.6.4. Recovery Storage GroupRecovery Storage Groups (RSGs) are a great feature of Exchange Server 2003. They allow you to mount a second copy of a mailbox database on the same server while the primary database is still online. This can be a great time saver for the Exchange administrator because in prior versions of Exchange it was necessary to build an entire replacement Exchange Server to mount the databases. After the RSG is created, you can restore your backups to this database with no impact on the current system or its users. After the restore, you can use the Mailbox Merge wizard (ExMerge) or the Recover Mailbox Data feature to merge the information back into the primary storage group. Recovery Storage Groups should not be viewed as your main savior from disaster. Instead, they are a supplemental recovery method that complements existing recovery methods. You should keep in mind that RSGs are primarily designed to recover individual mailboxes and do not work with public folders. 20.6.4.1. Example of RSGRun Exchange System Manager from Start Figure 20-15. Location of Recovery Storage Group in System Manager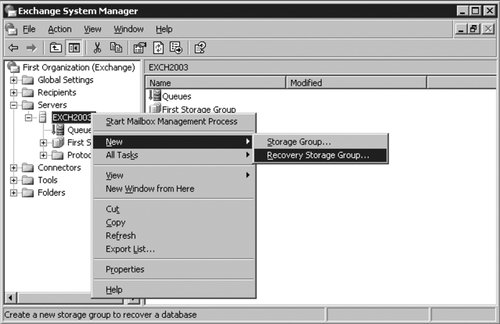 The default locations for the logfiles and system path are shown in Figure 20-16. These should be adjusted for your specific configuration. After the values have been corrected and verified, click OK to create the storage group. Figure 20-16. Properties window for Recovery Storage Groups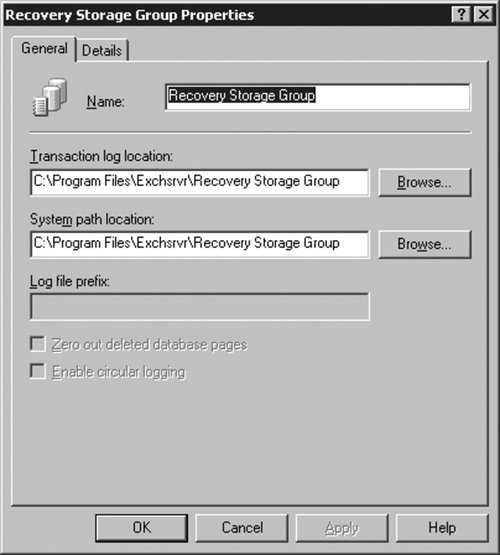 Now your storage groups should look similar to those in Figure 20-17 if you have a standard Exchange installation. There are now two storage groups, the First Storage Group and the Recovery Storage Group. It is worth noting that no email can be delivered to the Recovery Storage Group. Figure 20-17. Recovery Storage Group in System Manager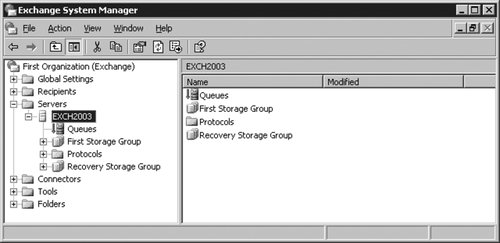 Right-click the Recovery Storage Group, and select "Add Database to Recover" as shown in Figure 20-18. Figure 20-18. "Add Database to Recover" option for Recovery Storage Groups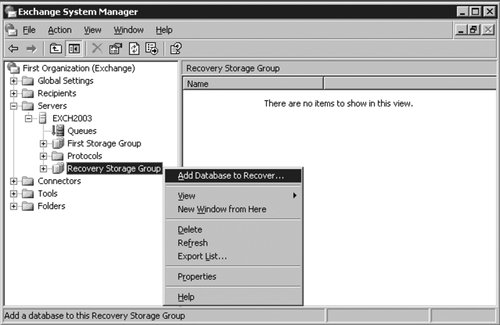 The dialog box in Figure 20-19 is then displayed. Select the backup you wish to restore to the RSG, and click OK. Figure 20-19. Database recovery selection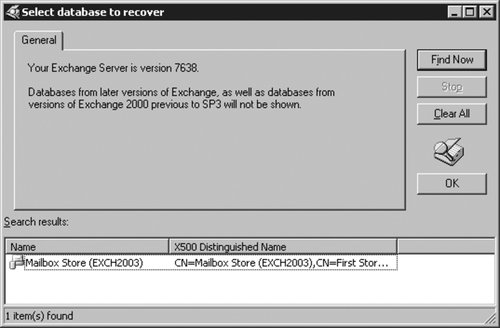 On the Mailbox Store Properties dialog (Figure 20-20), go to the Database tab and select a location to restore the .edb and .stm files. After you've adjusted the location or are happy with the current location, click OK. Figure 20-20. Mailbox Store Properties dialog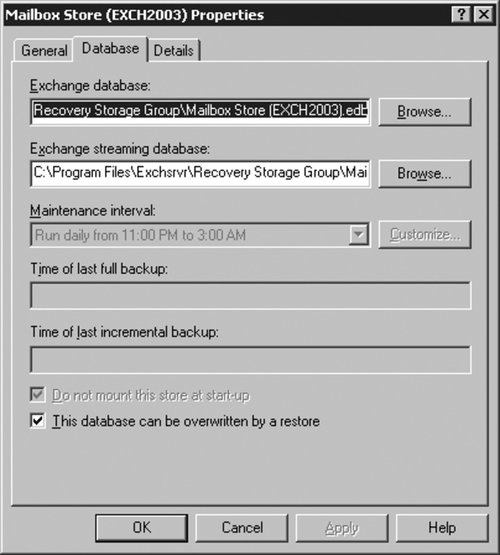 Your mailbox store is now restored into the RSG. It will always restore to an unmounted state, so you must manually mount the store. Now you can run your restore as usual. If the restore process finds an RSG, it automatically uses this storage group rather than the default. 20.6.4.2. When to use RSG: Dial-tone restoreA perfect example of when to use the RSG involves a method called dial-tone database restore. The premise is to restore the mailboxes as soon as possible, most likely without messages (that is, get the dial tone back). This enables users to send and receive new messages immediately. From this point, you can take a more leisurely approach restoring the mailboxes. While this doesn't give the users their data immediately, it does keep operations at the company from grinding to a halt due to unavailability of email. This is especially useful for companies that use email as their primary method of communication. If the Exchange Server crashes due to a hardware failure and needs a full restore, and the restore includes large amounts of data, it may take hours and hours. In this scenario, you give the users the ability to send and receive email immediately while you restore the backups. 20.6.5. Overlooked (and Often Easy) Restore MethodsUsually when something bad happens, the administrator immediately has a flash of terror as he thinks about having to do a full restore, at 4:00 a.m., for the president of the company. No small task indeed! However, some new and easy methods for mailbox and message recovery are often overlooked. 20.6.5.1. Restoring deleted mailboxesExchange Server has a feature in which you can delete a user's account and the mailbox can remain for a predefined number of days, disconnected from any user account. This allows a grace period from the time the user account is deleted until the mailbox is deleted from the store. Figure 20-21 is an example of a user called Temp User who has been deleted. Notice that the mailbox is still present in Exchange System Manager, but its icon has a little dot with an X in it that indicates that it does not have an associated user account. Figure 20-21. Delete-user example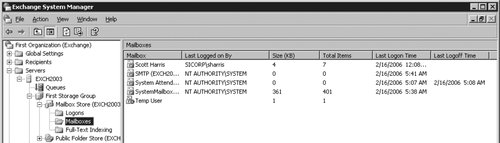 From this point, there are two ways to reconnect the mailbox to a user account. In each case, you must create a user account without an associated mailbox. If you right-click on the Temp User mailbox, you can select the Reconnect option. This displays the object searcher where you can find a user account to try and reconnect. After a user account without a mailbox is found, select it, and click OK. The mailbox is now connected with that user account. The second option is to run the Mailbox Recovery Center. The principles with this method are the same, but you need to mount a store with unattached user accounts first. After that point, the reconnection is virtually identical. This ability to mount a different store allows the Mailbox Recovery Center to import mailboxes more easily from backups of different stores. Keep in mind that Active Directory permissions hold here, so reconnection may not always work due to permissions issues. 20.6.5.2. Restoring deleted itemsThe ability to restore deleted items is one of Exchange's greatest features because it takes the burden of the restore process off the administrator's hands and places it directly in the user's. If you are an Outlook user and need to restore something long since deleted and not simply moved to Delete Items, you can do this with the Recovery Deleted Items option from within Outlook. Simply click on your Deleted Items mail folder, and then select Recover Deleted Items from the Tools menu. A window such as the one in Figure 20-22 is displayed where you can undelete the message. Figure 20-22. Recovering deleted items from Outlook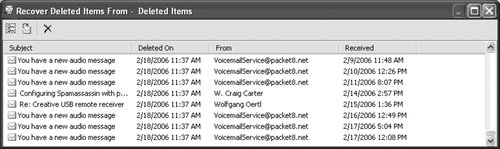 For this option to work, the Keep Deleted Items setting must be enabled on the mailbox store. These options are set in the Limits tab of the store's Property option in Exchange Server Manager, as seen in Figure 20-23. This method also works for public folder stores. Figure 20-23. Storage limits for deleted items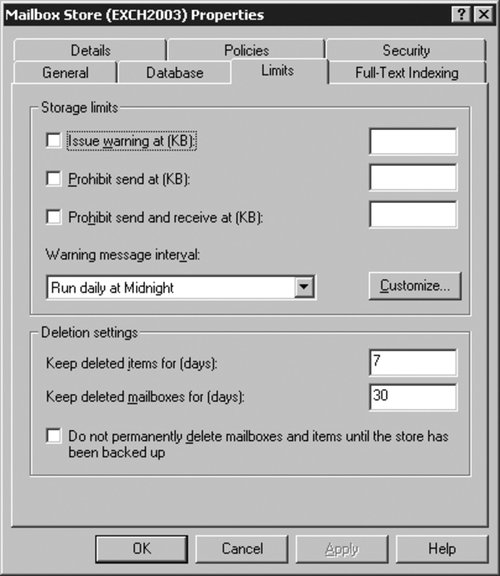 20.6.6. Using ntbackup to Restorentbackup can also be your friend when it comes time to restore. 20.6.6.1. Performing a basic restoreBefore you begin, you need to take the stores you wish to restore offline and allow them to be overwritten by the backup. To do this, open up Exchange System Manager from Start Figure 20-24. Dismounting a store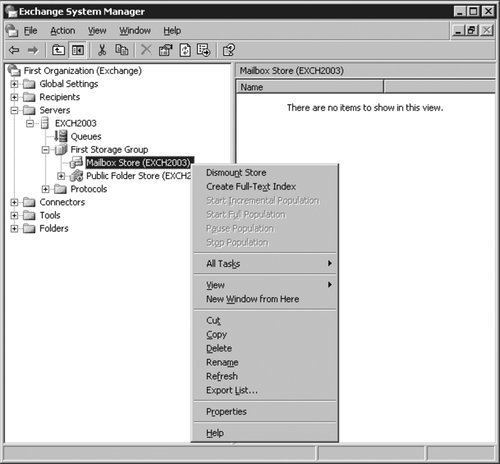 Right-click on the store again, and select Properties to display the dialog box shown in Figure 20-25. From here, select the Database tab, and then make sure the "This database can be overwritten by a restore" checkbox is checked. Figure 20-25. Ensuring the database can be overwritten Next, start ntbackup as described in the section "Making a Basic Backup" earlier in this chapter. Select the "Restore and Manage Media" tab. The screen displays the list of your backups, allowing you to select which backup to restore (Figure 20-26). Locate the backup to restore, expand it, and select the items you wish to restore. Figure 20-26. Selecting a backup to restore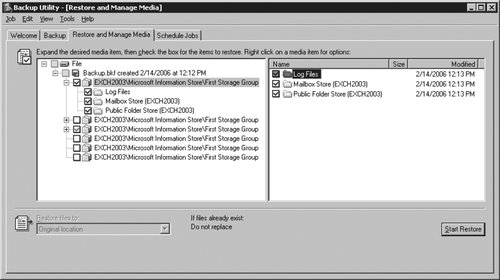 After you've selected the items to restore, click the Start Restore button to display the dialog in Figure 20-27. Figure 20-27. Restoring Database Store options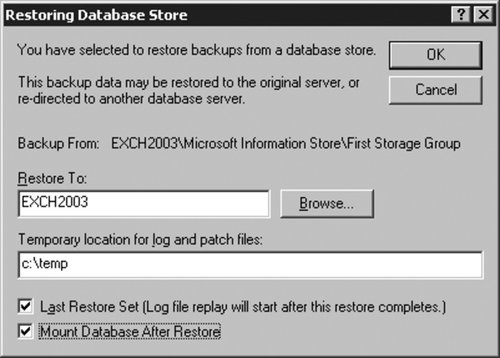 Verify that the proper Exchange Server is in the Restore To location, and then enter a temporary location for the logfiles. Since this is a basic full restore, and you will use only one backup set, check the Last Restore Set checkbox. If this were part of a normal, differential, or incremental backup and this wasn't the last set in the backup process, you would leave this box unchecked. Don't forget to remount the store. If you select the last checkbox, Mount Databases After Restore, Exchange take cares of this detail for you. Click the OK button when all the options are set and the restore begins. After it is finished, the Restore Progress window shows the status as completed. If you forget to check the Last Restore Set checkbox, your database is in an inconsistent state. You can manually replay the transaction logs using eseutil /cc. Verify that the restore process was successful by ensuring the Status field is Completed (Figure 20-28). Again, view the report as well as the event logs for additional information. Figure 20-28. Restore progress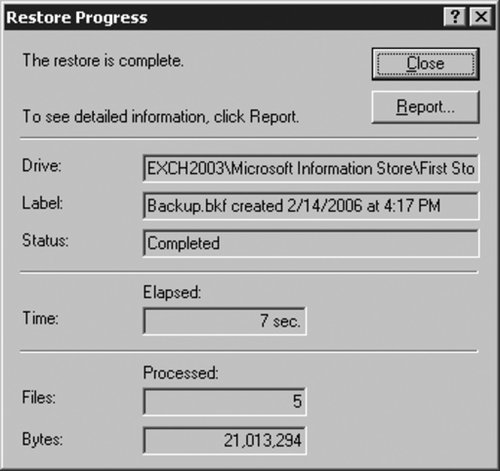 Check to make sure the stores have been mounted. Then lastly, try to connect to Exchange using Outlook or Outlook Web Access (OWA) to verify the data you expectto be there is there.
|
 All Programs
EAN: 2147483647
Pages: 237