Editing Tracks
| < Day Day Up > |
| The VS-880/890 workstations include seven track-editing functions. Repeatedly pressing the TRACK Edit Condition button cycles through the following choices:
For each of these track-editing functions, you will need to set one or more edit location points, select the track-editing function you wish to apply, select the appropriate V-Track(s) you want the function applied to, and then execute the function. Setting Your Edit Location PointsEach of these track-editing functions works in conjunction with one or more edit location points. These edit location points define the beginning and end of audio sections, as well as specific reference points within a section of audio. There are four types of edit location points used in track editing:
Each of these location points is a specific point in time. When you invoke a particular track-editing function, you can set these location points by using the jogwheel or by using the NUMRICS button. You could also use previously defined locator points to set these track-editing location points. However, the VS workstations have another set of locators that are used to specifically set the START, END, FROM, and TO edit location points. These edit location points can be set as follows :
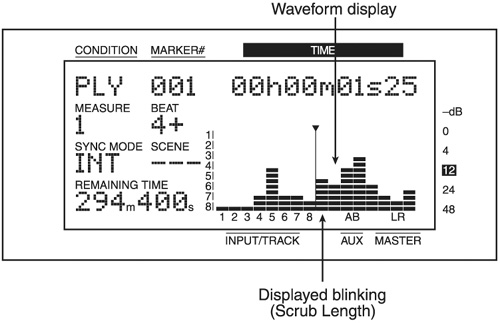
You can set the track-editing location points whenever the VS is in the Play Condition. You can use the Preview and Scrub functions to locate precise points in time, and once you have located these points, you can set them as the track-editing location points. Preview Preview will play a small section of audio before and/or after the current point in time. The default for the preview length is one second, but you can change it via SYSTEM Figure 5.2. The preview functions play back short sections of audio before and/or after the current point in time Scrub Scrub is similar to Preview, but it will repeatedly play a small section of audio within a single track. The default for the Scrub length is 45 ms, but you can change it via SYSTEM Figure 5.3. Invoking the Scrub function brings up a representation of the waveform in the display Selecting the V-Tracks to EditThree of the track-editing functions ”Track Copy, Track Move, and Track Exchange ”work with source V-Tracks and target V-Tracks. Before you invoke one of these three functions, you must have selected the proper source V-Tracks, as you cannot change the source V-Track designation in these three functions. In other words, if you want to copy something from track 1-4 to someplace else, you must first make sure that V-Track 4 is selected on recording track 1 and so on then execute the Track Copy function. When using any of these three functions, the SELECT buttons represent the source recording tracks, and the STATUS buttons represent the target recording tracks. Once you have specified the target recording track, you can use the jogwheel to select the appropriate V-Track within that target recording track. The rest of the track-editing functions ”Track Insert, Track Erase, Track Cut, and Track Comp/ Exp ”work with source V-Tracks only. When you invoke one of these functions, the STATUS button represents the recording track you wish to apply the function to. You can then use the jogwheel to select the appropriate V-Track within this recording track. You can apply the track function to all V-Tracks within a given recording track by turning the jogwheel until the V-Track is represented with an asterisk (*). For example, if you selected all V-Tracks on recording track 1, the display would show 1-*, and all the V-Tracks on recording track 1 would flash on the display. Additionally, you can apply the track function to all V-Tracks across all recording tracks by turning the jogwheel until both the recording track and V-Track are shown as asterisks (*-*). When you do this, all V-Tracks across all recording tracks will flash on the display. The Track-Editing FunctionsNow that we've seen how to set our edit location points and what those edit location points represent, let's talk about each of the track-editing functions in more detail. Track CopyTrack Copy will copy a section of audio from a currently selected V-Track to another location. You can copy audio within the existing V-Track, to a different V-Track within the same recording track, or to a V-Track on a different recording track. If audio already exists at the destination, it will be overwritten. You can also have multiple copies of the data placed in the destination V-Track. There are a number of situations where you might want to use Track Copy. For example, you can copy an entire track so that you end up with two tracks of exactly the same audio. Then, you could process each track differently in terms of EQ, effects, etc., and then blend them together during mixdown . Another use for Track Copy is when you want to compile, or "comp," multiple takes together. In the recording examples from the previous chapter, we recorded three takes of the lead guitar. We could copy individual sections of the various lead guitar takes to a new V-Track, resulting in a new V-Track that contains the best parts of the individual takes. You can also use Track Copy when working with loops . Suppose you recorded four measures of a drum track. You could use Track Copy to copy those four measures to a new V-Track and specify the number of copies as 10. The resulting new V-Track would contain 40 measures of the drum track. Track Copy works well when you've set up a tempo map and have recorded your tracks using the tempo map. You could, for example, sing the chorus one time and then use Track Copy to copy it to the remaining chorus parts.
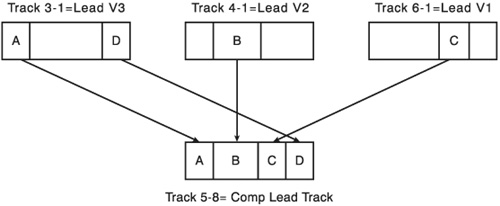
Track MoveTrack Move is similar to Track Copy, except the section of audio on the source V-Track will be replaced with silence. Like the Copy function, if audio already exists at the destination, it will be overwritten. Track Move is useful when you simply want to realign audio that has already been recorded. In the tracks we've already recorded, suppose all the instruments play a final note, then the drummer does a small drum fill, and then all the instruments play a final note at the very end of the drum fill. During recording, the bass and guitar parts might not have been played at the exact point where the drummer hits the crash cymbal at the end. You can use Track Move to move the last note of the guitar and bass tracks to line up with the exact spot of the cymbal crash. Another way I've used Track Move is when audio has been brought into the VS from an external source. For example, during one of the collaborative projects I worked on, I received an audio CD containing keyboard tracks. I played these tracks from a CD player into the VS, and then used Track Move to align them so they were in sync with the existing tracks in the song. Track ExchangeTrack Exchange allows you to swap any two V-Tracks. When you use Track Exchange, all audio on the selected V-Tracks is swapped. You can swap recorded audio with blank audio by selecting a V-Track that doesn't have any audio recorded on it. Track Exchange is the only track-editing function that does not use any location points, as it works with V-Tracks as a whole. Let's go back to our recording example and see how Track Exchange and Track Copy can be used to create our comp track of the lead guitar. We have three takes of our lead guitar part residing on tracks 6-1, 6-2, and 6-3. Since we can only select one V-Track per recording track, we cannot currently play back all three takes of the lead guitar track, as they all reside on the same recording track. This is where we can use Track Exchange. Let's exchange track 4-1 with 6-2, and track 3-1 with 6-3. Figure 5.4 shows our track sheet after performing this operation. Figure 5.4. VS-880EX track sheet for our working example after using Track Exchange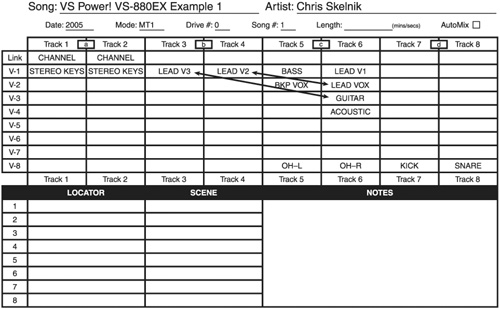 We can now listen to each version of the lead guitar part at the same time, since they are on different recording tracks, and use Track Copy to build our composite lead guitar tracks. Figure 5.5 shows how we can build this composite lead guitar track on track 5-8 from pieces of the existing lead guitar tracks using Track Copy. Once we've built our new comp track, we can then use Track Exchange to put our lead vocal and rhythm guitar tracks back where they belong. We can then use Track Exchange again to swap track 5-8, which is our new comp track, with 6-5, which is an empty track. This way, all of our individual lead guitar tracks and our new comp lead guitar track reside within recording track 6, as shown in Figure 5.6. Figure 5.5. Use Track Copy to build a composite track from the best parts of the existing lead guitar tracks Figure 5.6. VS-880EX track sheet for our working example after building the lead guitar comp track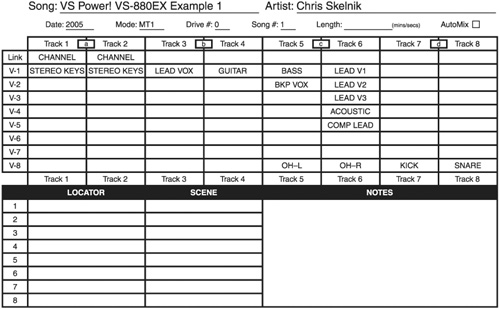
Track InsertTrack Insert will insert blank space into a V-Track at a point you specify via the TO point. All data after the TO point is shifted backward in time. If you are using a tempo map, this is an easy way to insert additional measures into the middle of a song. I've also used Track Insert to insert space at the beginning of a song, so that I could record a lead-in to the song. Remember that you can insert blank space into all V-Tracks in all recording tracks by setting the destination to *-*. Track CutTrack Cut is the opposite of Track Insert. The range of data specified within the START and END points is removed, and all data following the END point is shifted forward in time. You can use Track Cut to eliminate sections of songs, creating a radio-friendly version of your opus.
Track EraseTrack Erase is similar to Track Cut, but the source audio is replaced with silence. Track Erase is frequently used to clean up beginnings and endings of songs. In our recording example, we might consider using Track Erase to also remove background noise from the vocal track when the vocalist isn't singing . Another example of using Track Erase would be to clean up any noise that exists on the lead guitar track between the time you pressed the REC button and when the lead begins. Track Expansion/CompressionTrack Expansion/Compression allows you to lengthen or shorten a piece of audio. While this sounds great in theory, you want to use it sparingly, as it can produce unwanted artifacts in the resulting audio. The recommendation is that the compression or expansion range is within 93% to 107%. There are a number of parameters specific to this function, including whether or not to keep the pitch of the audio the same, the type of source material, and the resulting amplitude of the new audio. This function can be used to stretch or expand samples that you have recorded into your VS. If you plan on using Track Copy to create longer patterns from these samples, I'd suggest that you first use Track Expansion/Compression, verify the results, and then use Track Copy. |

 SYSTEM PRM?
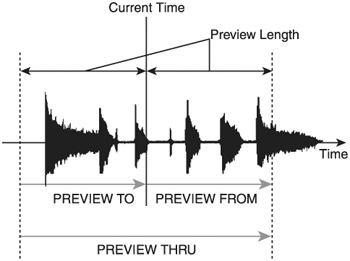
| < Day Day Up > |