Managing Your WebLogic Servers Using the Node Manager
| When you have a production WebLogic domain consisting of distributed managed servers, it is important for critical tasks such as starting, stopping, killing, and restarting the managed servers to be performed in the most efficient manner. Rather than creating your own scripts to perform these tasks , you can use the Node Manager. The Node Manager, as shown in Figure 24.23, is a standalone Java program that can be leveraged to improve the availability of your distributed managed servers within a WebLogic domain by performing the following automated administration tasks: Figure 24.23. The architecture and operation of a Node Manager within a WebLogic domain.
Note You cannot automatically restart managed servers that were booted without using the Node Manager (for example, servers started directly from scripts or the command line). To automatically restart managed servers, you must configure and start the servers using the Node Manager. You can use the Administration Console to shut down a managed server, but you cannot use it to start a managed server without employing a Node Manager. As illustrated in Figure 24.23,
Configuring the Node Manager on a Machine NodeNow that you have learned the objectives and reasons for using a Node Manager within a distributed WebLogic domain, the next step is to learn how to configure and start the Node Manager. The steps in the following sections guide you through the process of configuring a Node Manager on the machine nodes where your managed servers are located. Step 1: Configuring Your Trusted HostsTo ensure the Node Manager receives only legitimate and trusted communication, you need to explicitly specify the network address of the administration server machines from which the Node Manager node will be receiving connection requests . You can do so by editing the nodemanager.hosts text file located in the WL_HOME\ common\nodemanager\config directory and entering the IP address or DNS names of the administration servers that will be initiating Node Manager connections. You need to perform this task only for the machines that will be hosting managed servers. If you specify a DNS name for an administration server in nodemanager.hosts , you will need to enable reverse DNS lookup in the Node Manager startup script using the following command-line argument: -Dweblogic.nodemanager.reverseDnsEnabled=true Note By default, reverse DNS lookup is disabled for a Node Manager. Step 2: Configuring SSL Communication Between the Administration Server and Managed ServersAll communications between administration servers and the Node Manager use the SSL protocol, which requires the use of the same public key infrastructure as WebLogic Server 7: a certificate as well as a private key. To enable SSL, you have two options:
Because using the default WebLogic Server demonstration key and certificate files is the fastest and easiest roadmap for configuring SSL within a WebLogic domain, use the same steps to enable SSL as discussed in the section "Enabling the Administration Port" earlier in this chapter. The administration server SSL configuration applies to the domain as a whole. Step 3: Configuring the Node Manager MachinesBecause the administration server is the client of the Node Manager, it must be configured to recognize the following:
The first two points can be accomplished by following the steps to configure the machines and servers using the Administration Console, described earlier in this chapter. These steps ensure you have mapped the managed servers to their respective machine nodes. To configure the listen address and port number the administration server will use to connect to a Node Manager process, follow these steps:
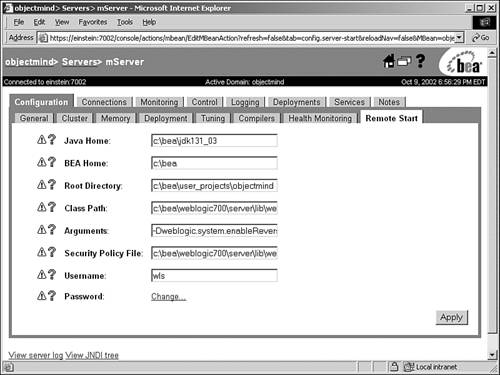
Step 4: Specifying the Managed Server's Startup InformationYou should have a consistent set of startup arguments for each managed server in your domain, regardless of the startup method you use. For a Node Manager to start a managed server successfully, it must receive that managed server's startup arguments and environment information from the administration server. To enter these startup arguments and environment information for each managed server using the Administration Console, follow these steps:
You have now completed all the steps required to configure the Node Manager and the managed servers that will be managed via the Node Manager. Starting the Node Manager ProcessYou can start the Node Manager Java program by using one of the following methods :
Because you have to specify the same Node Manager environment variables and properties regardless of the startup method you select, you should use the startup script initially. This approach allows you to easily proof your Node Manager startup settings. When you have the Node Manager fully operational with the ability to start, monitor, and shut down a managed server via the Administration Console, you can implement a Windows service or Unix daemon with a proven set of Node Manager environment variables and properties. The following sections discuss how to configure and start the Node Manager using a startup script and then how to create a Node Manager Windows service. Starting the Node Manager Using a Startup ScriptThe default Node Manager startup script, named startNodeManager.cmd , is located in the WL_HOME\ server\bin directory, where WL_HOME is the WebLogic Server installation directory ( C:\bea\weblogic700 by default). To start the Node Manager, you need to review and edit the environment variables and properties (startup arguments) set in this file using any text editor. To assist in this task, you can use the Node Manager and WebLogic environment variables and properties described in Table 24.3 as a guide for correctly configuring your Node Manager startup script. Table 24.3. The Environment Variables and Properties for a Node Manager Startup Script
The following are sample values that can be assigned to the environment variables and properties described in Table 24.3: WL_HOME =C:\bea\weblogic700 NODEMGR_HOME=% WL_HOME %\common\nodemanager JAVA_HOME=C:\bea\jdk131_03 DOMAIN=c:\bea\user_projects MEM_ARGS=-Xms32m -Xmx50m -Djava.security.policy=% WL_HOME %\ server\lib\weblogic.policy -Dweblogic.nodemanager.sslHostNameVerificationEnabled=false -Dweblogic.nodemanager.javaHome=%JAVA_HOME% -Dweblogic.nodemanager.sslHostNameVerificationEnabled=FALSE weblogic.nodemanager.reverseDnsEnabled=TRUE -Dweblogic.ListenAddress=SOCRATES -Dweblogic.ListenPort=7266 -Dweblogic.nodemanager.javaHome=%JAVA_HOME% -Dweblogic.nodemanager.keyFile=c:\bea\user_projects\objectmind\demokey.pem -Dweblogic.nodemanager.certificateFile=c:\bea\user_projects\objectmind\democert.pem After you appropriately edit the Node Manager startup arguments, you can start the Node Manager from the command line by executing the startNodeManager.cmd command, as shown in Figure 24.25. Figure 24.25. The startup console for the Node Manager. Creating a Node Manager Windows ServiceThe script that is used to create a Node Manager service, named installNodeMgrSvc.cmd , is located in the WL_HOME \server\bin directory. You need to edit this file before it can be invoked, similar to the startNodeManager.cmd script, to ensure the Node Manager's service name and startup arguments are set according to your WebLogic environment. You also need to reflect the changes you make in the uninstallNodeMgrSvc.cmd file, which is the script used to uninstall the Node Manager service. After the Node Manager service is created, you can start and stop it using the Windows Service Manager. Remotely Starting the Managed ServersAfter a Node Manager is successfully started on a machine, you can engage in starting one, multiple, or a cluster of managed servers on that machine in the context of a WebLogic domain using the Administration Console. Note All managed servers you intend to remotely start must be configured as described earlier in the section "Step 4: Specifying the Managed Servers Startup Information." To start a managed serverfor example, mServer that was created earlier in this chapterusing the Administration Console, follow these steps:
When you start a managed server using the Administration Console via the Node Manager, you can view the startup messages using the Details tab, as shown in Figure 24.26. Figure 24.26. Reviewing the startup messages for a remotely started managed server. To stop the server, you can perform the same steps except that you select the shutdown option. You can also use the Administration Console to start and stop all the managed servers in a cluster or in a domain, as long as the managed servers are configured for remote start. The Node Manager always starts or restarts a managed server in its last runtime state, regardless of the startup mode you have specified. Reviewing the Node ManagerAssociated Log FilesIf you incur any problems starting a Node Manager or while starting or stopping managed servers via the Node Manager, reviewing the log files associated with Node Manager should be your first task in diagnosing the root cause of the problem. These files hold valuable information that will help you isolate the problem. The log files related with a Node Manager and the managed servers it starts are located on the machine that hosts the Node Manager within the NodeManagerLogs directory, which is within the directory specified by the %NODEMGR_HOME% variable in the startNodeManager.cmd script. The Node Manager Startup Log FilesEach time a Node Manager is started, the related startup and status messages are written to a unique log file named NodeManagerInternal_ timestamp , which is located in the NodeManagerInternal subdirectory of the NodeManagerLogs directory. You should view this file using a text editor to ensure there are no problems with the startup or operation of the Node Manager. Tip Because the NodeManagerInternal_ timestamp file is created each time you start a Node Manager, whether or not the startup process is successful, it is good practice to delete the log files that are no longer required. The Managed Server Log FilesFor each managed server that is successfully started using the Node Manager, a separate log file subdirectory is created under the NodeManagerLogs directory. The naming convention used for these managed server directories is domain _ server , where domain represents the name of the domain and server represents the name of the managed server. The files generated for each started managed server in this directory are as follows :
Caution BEA recommends not deleting this file when a managed server is running. Alternatively, you can also view the log files on the administration server. The NodeManagerClientLogs directory, which is located in the root directory of the administration server, contains a log file subdirectory for each managed server that is started via the Node Manager. Tip If you are having problems starting a managed server via the Node Manager for the first time, there is a possibility that no managed server log files will be generated because this depends on how far the startup process goes before it fails. For this reason, you should initially review the Node Manager log ( NodeManagerInternal_ timestamp ) if you have problems starting a managed server. Monitoring the Health of Your WebLogic Domain Using the Node ManagerThe Self-Health monitoring capability is a new feature of the WebLogic Server; it enables decoupled critical subsystems such as the WebLogic Server Kernel, JMS, and JTA to provide feedback on their health to determine the overall health of a WebLogic Server instance. When a WebLogic Server starts, all self-healthenabled subsystems register themselves with their Health Monitoring System. Rather than the WebLogic Server determining the health of these subsystems, which can be a resource/performance overhead, each of the registered subsystems is responsible for internally and asynchronously monitoring its own health based on criteria specific to its subsystem. If at any point a self-healthenabled subsystem determines it can no longer operate in a consistent and reliable manner, it registers a Failed health state with its associated runtime MBeanfor example, the JMSRuntimeMBean for a JMS subsystem. To determine the overall health of a WebLogic Server instance, the Health Monitoring System periodically (the default is 180 seconds) queries the health state attribute of the runtime MBeans associated with self-healthenabled subsystems. If any of these subsystems are found to be in a Failed state, the overall state of the associated WebLogic Server instance is also considered to be in a Failed state because the overall health of a WebLogic Server instance is determined as the sum of all the registered subsystems. To improve the reliability and availability of your WebLogic domain, you can use the Health Monitoring System in conjunction with the Node Manager to ensure managed servers that are deemed to be in a Failed state are immediately shut down and, if required, restarted again. A Node Manager can deem a managed server to be in Failed state for a number a reasons; the following are some examples:
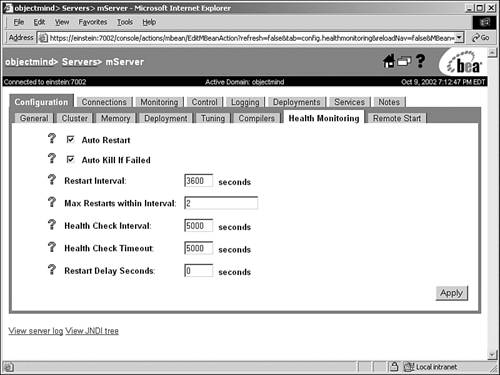
The only caveat is that the Node Manager can monitor the health state of only those managed servers it has started. To configure a Node Manager to monitor a managed server's health, you need to edit the managed server's Health Monitoring attributes, which you can do using the Administration Console as follows:
Table 24.4. The Node Manager Self-Health Monitoring Attribute Descriptions
Note Disabling the Auto Restart and enabling the Auto Kill If Failed attributes will cause a Node Manager to kill a Failed managed server if a Failed state is detected . However, the managed server will not be restarted. Because a Node Manager can apply the Health monitoring and subsequent shutdown and restart activities only on those servers it starts, you need to shut down and then restart those servers that will be monitored via the Node Manager. |
EAN: 2147483647
Pages: 360