| The creation and extension of WebLogic domains are fundamental administration tasks that anyone required to create a WebLogic Server environment (whether development, test, or production) must be proficient in performing. BEA provides two tools to assist in you these tasks: the Configuration Wizard and the Administration Console. The Configuration Wizard is a standalone Java-based GUI application that uses domain templates to assist you in creating the most appropriate preconfigured WebLogic domain for the type of solution/application your WebLogic Server instances will host. The types of templates presented by the Configuration Wizard vary according to what software components of WebLogic Platform (WebLogic Server, Portal, or Integration) you have installed on the machine where you launch the Configuration Wizard. However, the Configuration Wizard does not support the migration of domains from previous WebLogic Server versions or support the modification of existing domains. These operations are supported only by the administration console. Table 24.1 shows the full list of WebLogic domain templates the Configuration Wizard can present and their respective domain context. The domain templates are located under the WebLogic Platform installation directory in common\templates\domains . Table 24.1. The Domain Templates of the Configuration Wizard | Template Name | Domain Context | Template Description | | WLS Domain | WebLogic Server | Creates a very basic WebLogic Server domain. (This is the most appropriate domain template if you want to create an empty WebLogic domain.) | | WLS Petstore | WebLogic Server | Creates a WebLogic Server domain comparable with the Pet Store sample domain. | | WLS Examples | WebLogic Server | Creates a WebLogic Server domain comparable to the WebLogic Server Examples domain. | | WebLogic Workshop | WebLogic Server | Configured to support the development of WebLogic Workshop solutions. | | BPM Domain | WebLogic Integration | In addition to configuring the Business Process Management (BPM) functionality within a WebLogic domain, this template also configures a domain to contain all the necessary Application Integration components required for internal Enterprise Integration. | | EAI Domain | WebLogic Integration | Configures a domain to support the development of Enterprise Application Integration solutions. This template configures a domain that contains all the necessary components for internal Enterprise Integration. | | WLI Domain | WebLogic Integration | Configures a domain to support the development of solutions that employ the full range of WebLogic Integration functionality, which includes both internal and external integration. | | WLP Domain | WebLogic Portal | Supports the development of WebLogic Portal solutions. | | Platform Domain | WebLogic Platform (This template requires all WebLogic Platform components to be installed.) | Provides support for developing applications using all WebLogic Platform software components. | The Configuration Wizard also allows you to organize WebLogic Server instances within a domain, as shown in Table 24.2. Table 24.2. The Configuration Wizard's Options for Organizing WebLogic Server Instances in a Domain | WebLogic Server Instance Option | Description | | Single Server (Standalone Server) | Creates a new WebLogic domain with a single WebLogic Server instance that behaves as the administration server as well as the managed server. | | Admin Server with Managed Server(s) | Creates a new domain with a dedicated administration server and one or more managed servers, which are used to host the deployed applications. | | Admin Server with Clustered Managed Server(s) | Creates a new domain with a dedicated administration server with one or more managed servers assigned to a cluster. (Clustering managed servers requires the WebLogic Server machine to have dedicated IP addresses for each managed server in the cluster.) | | Managed Server (with owning Admin Server configuration) | Allows you to extend an existing WebLogic domain by creating a new managed server on the same machine as the Configuration Wizard. | Tip You can also use the Administration Console to extend a WebLogic domain that was initially created by the Configuration Wizard.
The option you select for creating the WebLogic Server instances depends on the topology of the WebLogic Server instances that will optimally host your deployed applications and the resources available on those WebLogic Server machines. For example, creating a WebLogic domain where the administration server and one or more managed servers are resident on the same machine may not be ideal for a development or production enterprise environment from an application availability perspective, or if resource utilization will be an issue. Tip Before you create your WebLogic domain and populate it with managed servers, you should graphically represent the topology of your domain, providing a visual structure of how the WebLogic instances within the domain will be used to host their respective applications and the machines that will host the administration server and respective managed servers.
The following sections provide a step-by-step guide for creating and extending a WebLogic domain using the following information: Note These names are used in the following examples, but you can use your own names if you prefer for the domain, administration, and managed server.
Because a WebLogic domain can always be extended, the ObjectMind domain with the AdminServer standalone WebLogic Server will be created first. The domain will then be extended through the introduction of the mServer remote managed server. Creating a WebLogic Domain and Standalone WebLogic Server Using the Configuration Wizard To create a WebLogic domain in a Windows environment, follow these steps: -
Launch the Configuration Wizard by clicking Start, Programs, WebLogic Platform 7.0, Domain Configuration Wizard. Alternatively, you can start the Configuration Wizard by executing the dmwiz.cmd script from the command prompt. This script is located in the %WL_HOME%\common\bin directory. -
On the Choose Domain Type and Name screen, do the following: -
Select the domain template that is most aligned to what type of application you will be hosting and the WebLogic infrastructure that will be needed to support it. For the purposes of this example, use the WLS Domain template. -
Enter a suitable name for the domain. For the purposes of this example, the name objectmind is used. Click Next. -
On the Choose Server Type screen, select the Single Server (Standalone Server) option. Click Next. -
On the Choose Domain Location screen, enter the top-level directory to store your WebLogic domain. Even though you can create this directory anywhere on your local file system, BEA recommends that you do not locate this directory under the WebLogic Platform software directory. The default location is BEA_HOME/user_projects/domain , where BEA_HOME is the BEA Home directory that contains the WebLogic Platform installation filesfor example, c:\bea . user_projects is the root directory location specified for the domainfor example, c:\bea\user_projects . domain is the name of the domain directory, which correlates with the name of the associated WebLogic domainfor example, objectmind . Click Next. -
On the Configure Standalone/Administrative Server screen, enter the following information: -
Server Name Enter the server name using alphanumeric characters . Hyphen (-) and underscore (_) characters are supported, but spaces are not. For the examples in this chapter, use an administration server with the name AdminServer. -
Server Listen Address Enter the IP address or DNS name that will be assigned to your WebLogic Server. For a standalone WebLogic Server, you can also use Localhost as the server listen address. Note If you provide a DNS name for the listen address, you should include the -Dweblogic.system.ReverseDNSAllowed=TRUE startup option in the administration server startup script ( startWebLogic.cmd ). -
Server Listen Port Enter a numeric value for the listening port of the WebLogic Server. The default port is 7001, and the range of values is 1 to 65535. -
Server SSL Listen Port Enter a numeric value for the SSL listening port. The default port is 7002, and the range of values is 1 to 65535. Click Next. -
On the Create Administrative User screen, enter the administrator username and password that will be used to start and connect to the WebLogic Server you have just configured. The password must be at least eight characters. Click Next. -
On the Install Server as Windows Service screen, indicate whether you want WebLogic Server to start with the Windows operating system. It is recommended you do not use this option in development environments. Click Next. Note You must have Windows Administration rights to be able to create a Windows service. -
In the Create Start Menu Entry for Server screen, indicate whether you would like the option to start your WebLogic Server via a Windows Start menu. Click Next. -
In the Configuration Summary screen, review the information that has been collected to create your WebLogic domain and administration server. The Configuration Wizard will use this information to create a new config.xml file, which describes the organization of your WebLogic domain, including any necessary network configurations for the administration server. It also creates and populates the necessary startup scripts and other files and directories to enable you to immediately start your administration server. If you need to modify this information, you can use the Back button to edit an entry on any of the Configuration Wizard screens. -
Click Next to create your WebLogic domain and its administration server. If you select the Admin Server with Managed Server(s) option in step 3, the only difference from the preceding series of steps would be that you would see the Configure Managed Servers in Admin Server screen, as shown in Figure 24.4. From this screen, you can add multiple managed servers to your WebLogic domain by clicking the Add button and entering the new managed server information in the displayed Add Server dialog. However, these managed servers will be configured to run on the same machine as the administration server of the domain. Figure 24.4. Adding managed servers to a WebLogic domain using the Admin Server with Managed Server(s) option in the Configuration Wizard. 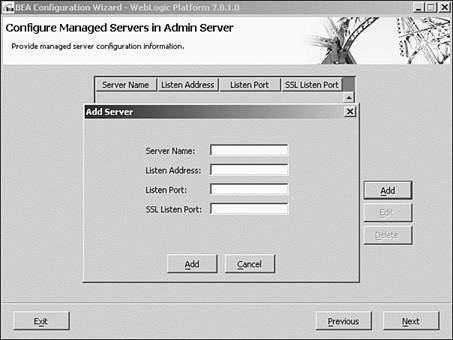 You can start the administration server (AdminServer) you have just created by executing the following scripts from the command prompt, which can be located in the BEA_HOME/user_projects/domain directory: -
setEnv.cmd Configures the WebLogic Server operating system environment, including the CLASSPATH variable. -
startWebLogic.cmd Starts your administration server. You need to enter the administrator username and password you specified in the configuration of the administration server using the Configuration Wizard. After you successfully start the administration server, the last two lines of the startup process in the command console should look similar to the following: [View full width] <Oct 8, 2002 3:20:11 AM EDT> <Notice> <WebLogicServer> <000365> <Server state changed to  RUNNING> <Oct 8, 2002 3:20:11 AM EDT> <Notice> <WebLogicServer> <000360> <Server started in RUNNING mode> RUNNING> <Oct 8, 2002 3:20:11 AM EDT> <Notice> <WebLogicServer> <000360> <Server started in RUNNING mode> Tip If you have problems starting the administration server, make sure you have set up the WebLogic environment correctly using the setEnv.cmd script. You can also review the config.xml file using an XML editor, ensuring the attribute values you specified using the Configuration Wizard are correct.
Extending a WebLogic Domain with a Remote Managed Server Using the Configuration Wizard To extend a WebLogic domain using the Configuration Wizard, you must install the WebLogic Server software, which includes the Configuration Wizard, on the machine that will host the managed server. After you satisfy this prerequisite, you can follow these steps to add a remote managed server named mServer to your newly created WebLogic domain (ObjectMind): -
Start the Configuration Wizard. -
On the Choose Domain Type and Name screen, enter the domain type and name of the target WebLogic domain where your managed server will reside. Your entry should correlate with the information you used to initially create the domain. Click Next. -
On the Choose Server Type screen, select the managed server (with owning Admin Server configuration) option and click Next. -
On the Choose Domain Location screen, enter the top-level directory to store your WebLogic domain. For management purposes, you should try to have a consistent location for your domain directories on the WebLogic Server machine. -
On the Configure Administrative Server Connection screen, as shown in Figure 24.5, enter the following information required to satisfy a remote connection to the administration server of your target WebLogic domain: Figure 24.5. The Configure Administrative Server Connection screen of the Configuration Wizard.  -
Admin Server Name or IP Enter the DNS server name or IP address of the administration server. -
Admin Server Listen Port Enter the listening port of the administration server. -
Admin Server SSL Listen Port Enter the SSL listening port of the administration server. -
Managed Server Name Enter the machine name of the managed server. Click Next after you have entered this information. -
On the Configure Standalone/Administrative Server screen, as shown in Figure 24.6, enter the following information to configure your managed server: Figure 24.6. The Configure Standalone/Administrative Server screen of the Configuration Wizard.  -
Server Name Enter the server name using alphanumeric characters. Hyphen (-) and underscore (_) characters are supported, but spaces are not. -
Server Listen Address Enter the IP address or DNS name that will be assigned to your WebLogic Server. -
Server Listen Port Enter a numeric value for the listening port of the managed server. -
Server SSL Listen Port Enter a numeric value for the SSL listening port. Click Next. -
On the Create Administrative User screen, enter the administrator username and password that will be used to start the managed server. You should try to keep the administrator username and password consistent throughout your WebLogic domain. Click Next. -
On the Install Server as Windows Service screen, indicate whether you want WebLogic Server to start in the Windows operating system. Click Next. -
On the Create Start Menu Entry for Server screen, indicate whether you would like the option to start your managed server via a Windows Start menu. Click Next. -
On the Configuration Summary screen, review the information that has been collected to create your managed server and connect to the administration server of your target WebLogic domain. -
Click Next to create and populate the scripts, files, and directory structure necessary to support your managed server. A common misconception of extending a WebLogic domain using the Configuration Wizard is that you can start a remote managed server after it is created. This is not true, and most people make this mistake. If you want to start a remote managed server: -
The domainwide config.xml file needs to be updated with the remote managed server's informationfor example, server and machine name as well as the listening port information. -
A config.xml file, which contains a subset of the information contained in the domainwide config.xml file specific to the managed server, needs to be copied from the administration server to the managed server. Note These tasks are performed automatically for you, only if the managed servers are created locally on the same machine as the administration server using the Admin Server with Managed Server(s) option of the Configuration Wizard.
Because the Configuration Wizard does not make a connection with the administration server, the domainwide config.xml file is not updated with the new managed server information, and a config.xml file is not copied from the administration server to the remote managed server's file system. Instead, the Configuration Wizard just creates a skeleton version of the config.xml file and places it in the root of the managed server's domain directory. To successfully start a remote managed server, you need to use the Administration Console to register the managed server with its associated domain's administration server. This two-step process involves These tasks are described in the following two sections. Configuring a New Machine Definition within a WebLogic Domain The following steps will guide you through the configuration of a new machine definition within a WebLogic domain using the Administration Console: -
Start the Administration Console using http://hostname:port/console where hostname is the DNS name or IP address of the administration server and port is the address of the port on which the administration server is listening for requests (7001 by default). -
Enter the appropriate administration username and password. -
Click the Machines node in the left panel of the Administration Console. -
Click the Configure a New Machine link in the right panel of the Administration Console. -
On the screen shown in Figure 24.7, enter the machine name of the managed server. This machine name is used to identify the machine only within the WebLogic domain and does not need to correspond to the machine's network name. Click Create. Figure 24.7. Configuring a new machine definition using the Administration Console. 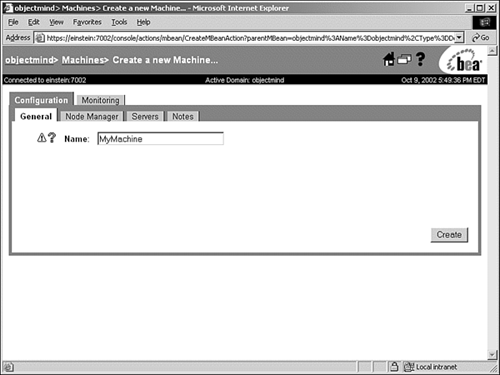 Note In scenarios in which the physical location of the server is required (for example, in clustering and Node Manager operations), you need to specify the machine names for the respective server. -
If you now click the Machine node in the left panel of the Administration Console, you can verify the machine has been added to the WebLogic domain. You should repeat these steps to create a machine definition for the administration server machine. Configuring a New Server Definition within a WebLogic Domain The following steps will guide you through the configuration of a new WebLogic Server definition for your remote managed server using the Administration Console: -
Select the Servers node in the left panel of the Administration Console. -
In the right panel of the Administration Console, click the Configure a New Server link. -
Enter the following information in the General tab to configure your managed server, as shown in Figure 24.8: Figure 24.8. Configuring a new server in a WebLogic domain using the Administration Console. 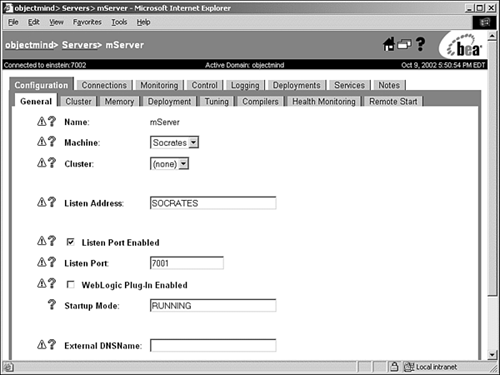 -
Name Enter the name of the managed server, for example, mServer . -
Machine Select the machine name that hosts the managed server from the drop-down list box. -
Cluster Select None from the drop-down list box. -
Listen Address Enter the TCP/IP address or DNS name of the machine that will host the managed server. -
Listen Port Enabled Select this box because it indicates the managed server will enable non-SSL HTTP communication. -
Listen Port Enter the number assigned to your listen port. -
Startup Mode Enter Running for the startup mode of the managed server. -
External DNSName If the managed server will receive HTTP requests from behind a firewall that performs Network Address Translation, enter the DNS name of the machine name, to enable requests to be routed to the appropriate managed server. -
Click Create to configure your managed server in the WebLogic domain's config.xml file. You should also assign your administration server to a machine definition. After you complete these steps, you can start your remote managed servers by executing the following scripts from the command prompt, which can be located in the BEA_HOME/user_projects/domain directory of the remote physical machine where the managed server is being hosted: -
setEnv.cmd Configures the managed server's operating system environment, including the CLASSPATH variable. -
startManagedWebLogic.cmd Starts your managed server. You will be promoted to enter the administrator username and password you specified in the configuration of the managed server using the Configuration Wizard. However, you can securely bypass this prompt using the boot.properties file. You can also provide the respective username and password values to the WLS_USER and WLS_PW variables in the startup script. The disadvantage of this approach is that the username and password are in clear text and viewable through any text editor. During the startup operation, the managed server connects to its associated administration server and copies over the necessary configuration files it requires to start, which will be cached to the managed server's root directory. From this point onward, by default, the managed server is configured to start in independence mode if the administration server is not available during its startup operation. If your domain's configuration changes frequentlyfor example, during the development phase of your projectthe administration server has an option that can replicate the configuration files to the managed server every five minutes, if required. You can enable this option by selecting the MSI File Replication Enabled option in the Configuration, Tuning tab for a managed server in the Administration Console, as shown in Figure 24.9. Figure 24.9. Enabling the replication of configuration files for a managed server. 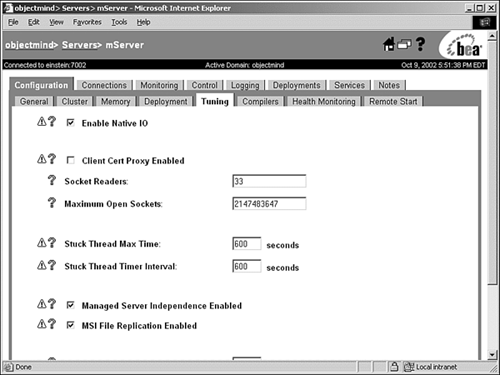 Caution Because changes to a WebLogic domain should be very tightly controlled in a production environment, MSI should be enabled only for development managed servers. BEA recommends that you not enable file replication for a server that shares an installation or root directory with another server because unpredictable errors can occur for both servers.
|