TIP 199: Creating Imagemaps


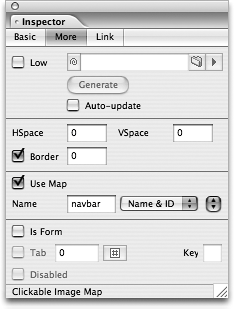
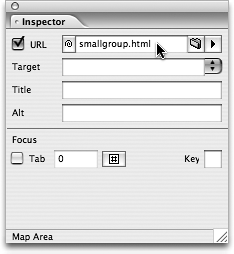
Imagemaps are just one more way to create interesting navigation bars in a page.Instead of slicing a design in Photoshop or creating a DHTML drop-down menu,imagemaps can be a simpler solution. Follow these easy steps:

1.

Place an image in the Layout Editor and enable the Use Map checkbox in the More tab of the Inspector. GoLive automatically adds a unique name for the map in the Name field, but you can customize this if you want (Figure 199a). Also, notice the addition of a little yellow square with the letter M in the Layout Editor. This is a visual indicator that there's an imagemap on the page.

Figure 199a. Make a normal image into an imagemap by clicking the Use Map option in the Inspector.


2.

Now look at the toolbar and see how it changed to offer the tools you need to draw hotspots (clickable areas) with hyperlinks (Figure 199b). To create a rectangular or circular hotspot, select the tools in the toolbar and click and drag on the imagemap graphic in the Layout Editor. To create a polygonal hotspot, select the tool and click repeatedly with the mouse to create the corner points of the custom shape.

Figure 199b. Use the tools in the Toolbar to draw out the imagemap regions.


3.

When you're done creating the hotspots, select each one and assign a hyperlink in the URL field of the Inspector (Figure 199c).

Figure 199c. Assign hyperlinks to the hotspots just as in a normal link.


Zooming

You can zoom in on an imagemap without zooming the entire page. To get better control over very intricate image maps, hold down your Shift key and resize the image proportionally from the bottom-right corner so that it's larger. Your image will get larger, and the hotspots will stretch accordingly. Now adjust the hotspots as required. Click the Set to Original Size icon in the Basic tab of the Clickable Image Map Inspector, and the hotspots will scale proportionally to fit.


Now that we have the basics out of the way, we want to show you a few power user tips you're going to love:

  • To create several hotspots of the same size, as for a navigation bar, create one hotspot and copy and paste the rest. This will create multiple hotspots with the exact same dimensions.

  • If you have a hard time positioning an imagemap hotspot exactly where you want it, select the hotspot and use the Transform palette to fine tune its size and position.

  • Use Smart Guides (seeTip 60) to help you align the edges of hotspots on an imagemap.

  • It can also be challenging to line up your hotspots evenly. Hold down Shift to select multiple hotspots and use the Align palette to tidy things up.


    Adobe GoLive CS2 Tips and Tricks The 250 Best
    Adobe GoLive CS2 Tips and Tricks The 250 Best
    ISBN: B008CMGJS0
    EAN: N/A
    Year: 2005
    Pages: 301

    flylib.com © 2008-2017.
    If you may any questions please contact us: flylib@qtcs.net