Improving Efficiency with Assignments
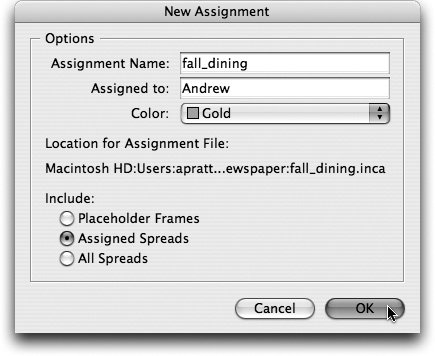
| In previous versions of InDesign and InCopy, you had to choose between opening entire InDesign layouts with copyfit calculations or tiny InCopy files without copyfit statistics. The new assignments feature gives you the best of both worlds: speed and copyfit statistics. Instead of opening the entire InDesign file, an assignment file (.inca) is a relatively small snapshot of the page geometry, which is just enough information for an InCopy user to see the InDesign layout related to his story and to view the copyfit statistics, but doesn't include anything that isn't needed. Tip Page geometry refers to the position and size of text frames, graphic frames, text wrap, layers, and how various page elements interact in the layout. Assignments help solve the features vs. performance dilemma that arises when multiple contributors are collaborating on a design-intensive publication, but that's not the only purpose of this exciting new feature. Another annoyance in previous versions of InDesign/InCopy was that if the designer used separate, unthreaded text frames in InDesign for different story elements such as headline, story, and caption, then the InCopy user had to open a different InCopy file for each story element. Now with assignments, the InDesign user can bundle separate text threads into one assignment, which makes it much easier for the InCopy user to participate in the workflow (Figure 8.14). Instead of opening separate InCopy files for the headline, story and caption, or a large InDesign file, the InCopy user just opens the InCopy assignment file (.inca), which provides faster access to all the necessary elements in one window. Figure 8.14. Assignments bundle several stories into a logical grouping that's easy to edit with InCopy. Creating Assignments with InDesignNow that you understand why InCopy assignments are the greatest thing since sliced bread, let us show you how a designer using InDesign creates them. It's important to remember that assignments are just a snapshot of the page geometry of the InDesign layout. This means that if an InDesign user creates an assignment and then changes the page layout or adds stories to the assignment, she must update the assignment before InCopy users can see the changes. The nice thing about the assignment being a snapshot of the layout and stories is that the InDesign user doesn't have to push design changes until they're relevant to the other contributors using InCopy. In this chicken-and-egg cycle, the InDesign user should first export the InCopy stories that are supposed to be a part of the managed, collaborative workflow. After the InDesign user has exported the InCopy stories, she should select the stories in the layout that she wants to assign as a logical group (assignment) to a writer or editor. When she has all the pieces of the story selected (headline, body, photo captions, and maybe even graphic frames) she chooses Edit > InCopy > Add Selection to Assignment > New. When she's prompted to save the assignment file (.inca), she should save it in a different location than the exported InCopy stories, such as a folder reserved just for assignment files. You can name the assignment file whatever you want, but give it an understandable name and always use the .inca file extension, as in weekend_dining.inca. Saving the assignment file with the .inca extension and in a specific folder helps keep InCopy users from accidentally opening the wrong files. Tip Only InDesign can create InCopy assignments (.inca), and only InCopy can open them. After the InDesign user names the assignment file and chooses where to save it, she still has a few more decisions to make in the New Assignment dialog that appears (Figure 8.15). The first field is for the Assignment Name, which defaults to the name of the .inca file she specified in the previous dialog. She can change this to be different from the .inca file name if she wants, but if she's chosen a useful filename for the .inca file, then changing this here is only going to cause confusion. In fact, we've even heard from InCopy users who wish that InCopy required that the assignment name always match the .inca file and didn't allow users to change it. Figure 8.15. The New Assignment dialog in InDesign lets the designer control several important parameters. In the Assigned to field, the InDesign user can type the name of a particular person, a department, a role, or leave it blank, whichever makes sense. The Assignments palettes in InDesign and InCopy reference the value of the Assigned to field, but don't necessarily prohibit other users from accessing the assignment. It's more of a reminder note for you and your co-workers as to who is expected to work on that assignment. The third option in the New Assignment dialog is the Color pop-up menu, where the InDesign user can choose from a list of dozens of different colors. It's technically not necessary to choose a different color for each assignment, but it's helpful when dealing with complex publications that have several contributors. The color of an assignment is used both as a visual reminder in the Assignments palette and as the frame tint and border color when the Assigned Frames option is enabled in the View menu. The last option in the New Assignment dialog determines how much detail is included in the assignment file. The three options are:
If you use assignments in your InCopy/InDesign workflow, make sure all placed images are linked to a file server instead of the designer's hard drive. If the images aren't available on the server, InCopy users will see gray boxes instead of image previews when they open an assignment file. If InCopy users open InDesign files instead of InCopy assignments, they don't have to have access to the file server to see the image previews because the .indd file stores low-res image previews. Managing Assignments with InDesignAfter the InDesign user creates assignments in InDesign, she might need to make changes to the layout, stories, or organization of the content. For example, if she decides to add a sidebar to a story, she'd start by adding a new text frame to the InDesign layout and exporting it as a new InCopy story. This new frame is itself a story, and she'll probably want to add the new story to the related assignment. To add new content to an existing assignment, the InDesign user follows these steps:
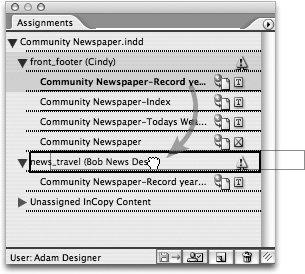
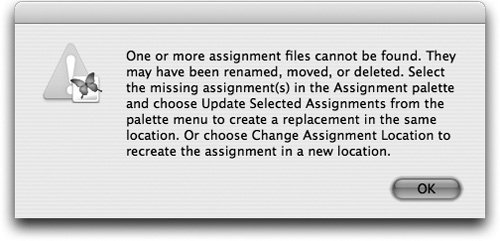
Altered assignments show a small yield triangle icon Figure 8.16. After you make a design change in InDesign, update the assignments so InCopy users can see the latest changes.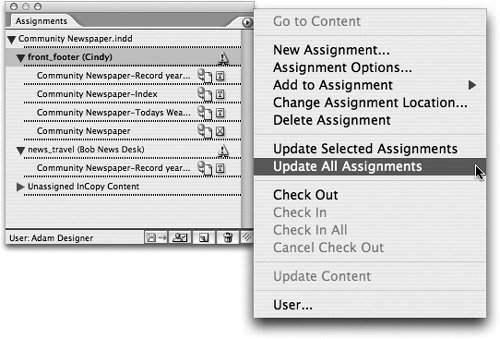 Adding new stories to an existing assignment obviously requires the assignment to be updated, but so does making a change to the InDesign layout. If the InDesign layout is changed by doing things such as resizing a text frame, adding a new text frame, or changing the text wrap on an image, the assignments should be updated. To update specific assignments, the InDesign user selects them in the Assignments palette and chooses Update Selected Assignments in the Assignments palette menu. Tip If an assignment is updated while an InCopy user is working on it, the InCopy user must update his design. See "Managing Updates" later in this chapter for more details on this update process. In some cases, the InDesign user might accidentally add the wrong story to an assignment. If that happens, she can just drag the mismatched story in the Assignments palette to the correct assignment (Figure 8.17). After she reassigns the story, both assignments must be updated. She can drag and drop stories to change their sequence within an assignment in the Assignments palette, but this has no effect on the sequence of the stories when the assignment file is opened in InCopy. Figure 8.17. InDesign users can reassign a story in the Assignments palette by dragging it from one assignment to another. If the InDesign user inadvertently adds a story to an assignment, she can change her mind and remove it. To remove a story from an assignment, select the story in the Assignments palette and choose Remove from Assignment from the palette menu. After the story is removed from the assignment, the InDesign user must update the assignments as previously described. There are a few more scenarios to be aware of where InDesign users might need to manage assignments. If the designer opens an InDesign file in InDesign and the associated assignment files cannot be located, she'll see the warning dialog box shown in Figure 8.18. Figure 8.18. If an InCopy assignment has been moved, renamed, or deleted, InDesign warns the user that it can't find the expected files. This dialog box is pretty verbose, but it actually does a good job of explaining what has happened: An assignment file has been moved, renamed, or deleted. To fix the problem she should select the assignment in the Assignments palette and choose Update Selected Assignments from the palette menu. InDesign will create new assignment files with the same names in the same locations and resolve the issue. InDesign can recreate the assignments from scratch because assignments are just snapshots of the current page geometry. InDesign remembers that the assignments exist, but an InDesign file doesn't have a dependent link to an assignment in the same way it requires linked files such as images and InCopy stories. To change the name or location of an assignment, the InDesign user selects it in the Assignments palette and chooses Change Assignment Location in the palette menu. When prompted, she must choose a new location for the .inca file and can change the filename if desired. This is another way to fix missing assignments and an easy way to correct mistakes if an assignment was accidentally saved in the wrong place on the file server. To change assignment options other than location and filename, the InDesign user selects the assignment and chooses Assignment Options in the Assignments palette menu to change settings such as the assigned user and the color. To delete an assignment altogether, the InDesign user chooses the assignment(s) in the Assignments palette and clicks the trash can icon |

EAN: 2147483647
Pages: 122