Automating Software Installation
| Deploying applications using the software installation services of group policy requires that the applications are packaged using a Windows Installer Package file (*.MSI). When deploying applications to users, the package can be assigned to a user or the pack can be published. When deploying applications to computers, the application can be assigned. Assigned applications will be installed automatically when the policy is applied to the computer or user. For users, published applications will be listed in the Control Panel Add/Remove Programs applet. If a user has an application published to her, the user only needs to open the Add/Remove Programs applet and double-click on the application for it to be automatically installed. Depending on how you configure the application when defining the application deployment properties in group policy, the application can be deployed using elevated privileges and can be customized using Transform files, which are used to specify installation criteria normally answered during a manual installation. Below is a step-by-step scenario for creating a software push assigned to a group of user computers: To create a software push via group policy, perform the following steps:
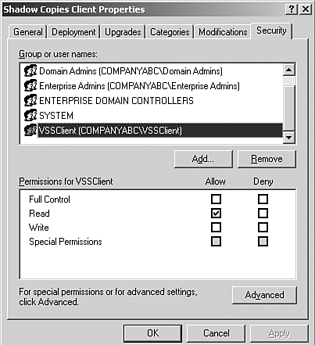
For This Scenario... it is assumed that a separate Software Distribution GPO and a security group, with all of the computers receiving the push as members , have been created. Why Select Advanced? This selection lets you modify a push before it is saved and applied. Because Authenticated Users is applied to a push by default, if the push was applied before you removed it, some computers might get the push that shouldn't. Why Remove the Authenticated Users Group? Strangely enough, Authenticated Users actually includes both users and computers. As such, any computer that can read a push policy will get the push applied. Because Authenticated Users includes all computers in an OU, every computer would receive the push if the group were not removed. Why Create a Separate Software Distribution GPO? The separate GPO allows for the capability to block the policy from certain OUs, like the Domain Controllers OU, to prevent software packages meant for your desktops from being applied inadvertently to your domain controllers. When the computers with membership in the security group have been re- booted , the software package will be installed during logon. |
EAN: 2147483647
Pages: 325
