Giving Back to the Community
| No matter how good Visual Studio gets, most developers often think of great additions or extensions to the existing functionality. These extensions may simply be project specific, or they may apply to all Visual Studio users. Of course, developers also like to write code. Therefore, it is not surprising that some go so far as to write their own custom extensions (add-ins, snippets, macros, and the like). This feat is often successful for single, personal use. The trouble comes when you want to share your time-saving creation with the rest of the team. Often, you end up writing a page of installation instructions and doing one-on-one troubleshooting with each developer as he or she installs your "timesaver." Visual Studio 2005 offers a solution in the form of a packaging mechanism that allows developers to publish, exchange, and install Visual Studio content. Previously, we looked at consuming community content. Now we will demonstrate how you can package your own creations and exchange them with team members, friends, or through community websites. Creating Shared Items (Project and Item Templates)In previous chapters, we demonstrated how to create snippets, macros, and add-ins. What we have not covered is creating project and item templates. These items are very useful for large teams that want to disseminate standards and provide guidance. Rather than dedicating an entire chapter to these two items, we will cover them here as creating shared content. Creating Project TemplatesProject templates are what appear in Visual Studio's New Project dialog box. Projects are grouped by project type (C#, VB, Windows, Office, and so on). In addition, the templates themselves are split between Visual Studio installed templates and My Templates. The latter refers to the custom templates you install. Figure 12.25 shows the New Project dialog box in action. You choose between a project type or group and then between actual templates themselves. Figure 12.25. The New Project dialog box.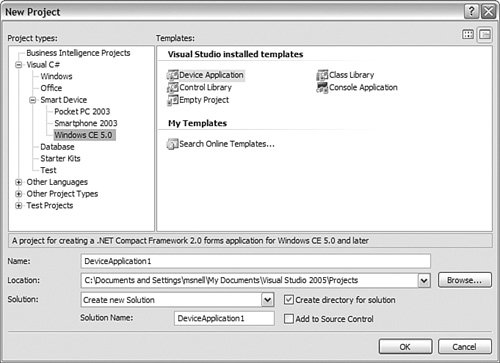 You can create a project template manually or use the Visual Studio Export Template Wizard. It simply makes the task of putting together the right XML files and zipping your project slightly easier. To create a project template, you follow these basic steps:
Next, let's look at each of these steps. Step 1: Create Your ProjectMost templates you create will start with an existing Visual Studio template (or an empty project). Typically, developers look to templates to enforce standards and practices and provide guidance to teams. Therefore, the hardest part of creating a project template is defining the template itself in terms of what content should go into it. As an example, perhaps your team uses a common set of libraries, resources, or controls. You can define a project template that has these items either built in or referenced. Step 2: Determine Project ParametersProject parameters define the items that are set by default when Visual Studio sets up a new project based on the given template. For example, when you create a new project, the namespace of the code files is set to the namespace of the project. This is a project parameter. Visual Studio uses a number of reserved template parameters for this purpose. Table 12.3 provides an overview of these parameters.
The Export Template Wizard helps you with these parameters. After you define them manually in your code, the Export Template Wizard will pick up the settings. As an example, suppose you have a project template titled SmartClient. When a user chooses to create a project based on this template, you want the template to behave as another template in the dialog box. For instance, you want the project's namespace to be defined as the project name the user has chosen. To implement parameters in the template, you define the parameter's position within the code. In the namespace example, you must use the reserved template parameter safeprojectname in place of the actual namespace defined throughout the code files in the project. This indicates to Visual Studio that when a new project is created, the namespace should be set to the safe project name as defined by the user. The following code example shows how to define the code: namespace $safeprojectname$ { class Framework {Note Your code will not build with these parameters in place. Therefore, it is best to debug your code prior to setting up parameters. Now that you've defined your parameters, the Export Template Wizard will pick them up and place them in the .vstemplate XML file. We will look at this in step 3. Defining Custom ParametersIn addition to the aforementioned Visual Studio parameters, you can define your own custom parameters to be passed to your templates. The process is similar to using the reserved template parameters. You first define the parameters using the $parameter$ syntax in your code as follows: string myCustomValue = "$CustomParameter1$"; You then edit the .vstemplate XML to include a <CustomParameters> node in which you define your replacements. We will look at this XML in more detail in the next major section; however, the following defines a custom parameter in the .vstemplate file: <TemplateContent> ... <CustomParameters> <CustomParameter Name="$CustomParameter1$" Value="Some Custom Value"/> </CustomParameters> </TemplateContent> Visual Studio will replace the content of the custom parameter when a user creates a new instance of the project template. In the preceding example, the value of the variable myCustomValue will be set to Some Custom Value. Note The Export Template Wizard does not recognize custom parameters. You will have to edit the .vstemplate XML manually to include the CustomParameters node. Step 3: Export Your TemplateNow that you have defined your template and decided on template parameters, the next step is to run the Export Template Wizard. This wizard is used for both project and item templates. You access it from the File menu. Figure 12.26 shows the first step in the wizard. Here, you are asked to choose the template type (project or item). You then must select a project from within the current, open Visual Studio solution. This project will serve as the basis for your template. Figure 12.26. Export Template Wizard.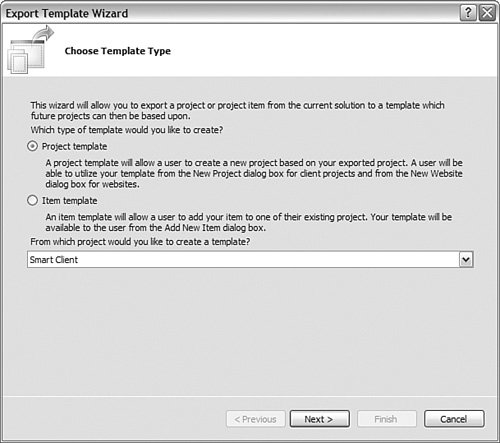 The next step in the Export Template Wizard allows you to define a few additional parameters for your template. You can set an icon for the template, you can indicate a name and description that show up in the New Project dialog box, and you can also choose the location where your template will be placed. Figure 12.27 shows an example of this dialog box. Figure 12.27. Export template options.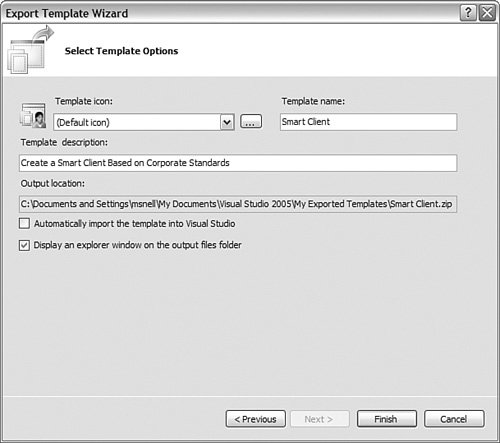 Notice that in the dialog box shown in Figure 12.27 the option Automatically Import the Template into Visual Studio is not checked. This is for two reasons. First, you want to edit the .vstemplate file the wizard generates, and second, you want to package the template for installation (we will look at this topic in the next major section). By default, the template is created in the My Exported Templates directory inside \My Document\Visual Studio 2005. The file is created as a .zip file (as are all Visual Studio templates). Step 4: (Optional) Edit the .vstemplate XMLA fourth, optional, step in the process is to edit the .vstemplate XML. The Export Template Wizard generates a default .vstemplate for you. You can open the .zip file, edit the XML, rezip (compress) the file, and place it either directly into the template folder or package for installation. Listing 12.1 shows a sample .vstemplate file. Listing 12.1. A Sample .vstemplate File
Notice that the wizard added the ReplaceParameters attribute to the ProjectItem node and set its value to TRue. This setting indicates to Visual Studio that it should swap any parameters in the target file during project creation. In the example, Framework.cs is the target file containing the parameters ($safeprojectname$). Tip You can actually create templates that contain multiple projects. To do so, you still create a .vstemplate file for each project in the solution. You then create a .vstemplate root file that describes the multiproject template. The data inside this XML is used by the New Project dialog box. The file also contains pointers to each individual project's .vstemplate file. Installing the TemplateFinally, all that is left to do is to package the template into a .vsi file (see the next section) for sharing. You can then install it. Figure 12.28 shows an example of a newly installed template under the My Templates subsection. Also, notice that the item should be installed for C#, Windows applications. This is done through the .vsi file. Again, we will cover this topic in the following section. Figure 12.28. The installed template in the New Project dialog box.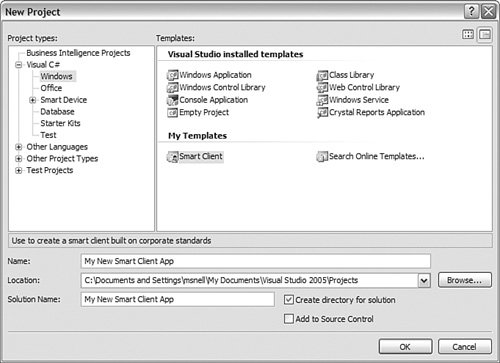 Finally, when the project is generated, Visual Studio inserts the safe filename for the project namespace. Recall this was the reserved parameter you had set. The following code is inserted into Framework.cs: namespace My_New_Smart_Client_App { class Framework {Creating Item TemplatesItem templates represent the various items or files you can add to Visual Studio projects. Selecting Add New Item opens a dialog box that allows you to select from the various Visual Studio items. You can also create your own items. Custom items could be time-saving devices that stub out the shell of a class or a specific type of class, for instance. Figure 12.29 shows the Add New Item dialog box. Notice the My Templates section, which is where custom templates appear in the list. Figure 12.29. The My Templates section of the Add New Item dialog box.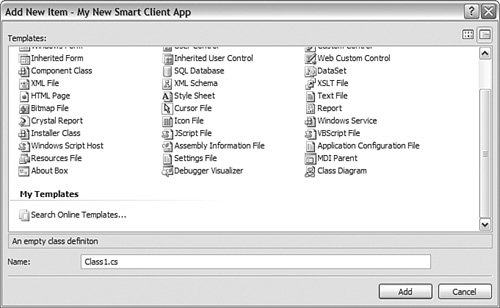 The good news is that you create item templates the same way you create project templates. You start with an existing item, edit it, and then use the Export Template Wizard to create a template from the item. You can also define the same set of parameters for items that you can for projects. Packaging Your CreationAs mentioned previously, Visual Studio 2005 provides a tool called the Visual Studio Content Installer. The role of this tool is to help developers install content that is targeted at the Visual Studio IDE. This content takes the form of Visual Studio content files (with the .vsi extension). After you've bundled your creation inside one of these files, the tool can easily install the content into the IDE. The good news is that creating these files is a relatively straightforward process. Of course, the first step is to define and debug your creation (see Chapter 10, "The Visual Studio Automation Object Model," and Chapter 11, "Writing Macros, Add-ins, and Wizards," for more information on extending Visual Studio). Creations such as project and item templates, add-ins, macros, and code snippets can all be bundled as .vsi files. When you are ready to share your creation, you need to follow these steps (we will elaborate on them later):
This process is the same no matter the content type. You follow the same steps for macros, add-ins, and snippets. The install tool gets its information regarding your contents through the settings of your .VSContent XML file. Now let's explore this file in detail. The Elements of a VSContent FileThe VSContent file is an XML structure that contains elements for all pertinent items needed by the Visual Studio Content Installer. Your content is defined by a Content node (or element). This element is meant to define a single item of content you want to share (such as a macro file or control defined in a .dll file). Listing 12.2 presents the high-level structure of the VSContent file. This is neither a real example nor the official XSD. Rather, it serves to present the elements and their relations to one other. Listing 12.2. The Structure of a .VSContent File
Tip The actual XSD that defines the structure of a VSContent file is a bit lengthy to reprint here. However, if you would like to examine the XSD file that defines the structure for valid VSContent XML, you can do so. The file is stored at C:\Program Files\Microsoft Visual Studio 8\Xml\Schemas\1033\ and is named vscontent.xsd. You can point to multiple content types and their associated files using a single .vsi file. You do so by creating multiple instances of the Content element, one for each item you want to share. For example, a single .vsi file could contain a Content node that installs a code snippet and another Content node that points to a .vsmacro file containing macros. Each element inside Listing 12.2 is covered in depth in Table 12.4. We will walk through an actual example of creating and using a VSContent file in the following section.
Using Attributes to Define VSTemplates and Code SnippetsThe Attribute element inside the VSContent file provides the Visual Studio Content Installer additional information for content types that include project templates, item templates, and code snippets. The Attributes node is not used for the content types Addin, Macro Project, and Toolbox Control. The Attribute element consists of a name/value pair. You set the name and value of the element using XML attributes in the following format: <Attribute name="" value=""/> Both the name and the value attributes are defined with enumerated values. These enumerated values define the possible setting combinations you can define for code snippets and templates. For code snippets, only the value lang is applicable for the name attribute. Setting the lang attribute on code snippets allows you to indicate the development language to which the snippet applies. Possible entries for the value attribute when defined with lang include csharp, jsharp, vb, and xml. For example, if your code snippet is meant to work with Visual Basic, you would define your attribute as follows: <Attribute name="lang" value="vb"/> When defining content of type VSTemplate, you can use the following enumerated items for the name attribute:
Recall the Smart Client project template you created in the previous section. Listing 12.3 represents the VSContent file used to define the installation for the Smart Client. Notice the three attribute definitions. This combination allows for the configuration shown in Figure 12.28 (the New Project dialog box). Listing 12.3. The VSContent File for the Smart Client Example
An Example: Packaging a MacroAs with most things, the best way to understand the Visual Studio content packaging process is to work through a real example. In this case, we will take a few of the macros defined in Chapter 10 and bundle them for sharing with the community. Step 1: Create the VSContent FileAfter you've debugged and tested your creation, the first step in packaging it is to define the VSContent file. For this example, we've created a macro file that contains a few macros from previous chapters, including the InsertTemplateFlowerbox macro that places common comment structure above the Visual Basic Subs and Functions, the ResizeIDE macro, and others. The name of the macro file is VS2005_Unleashed.vsmacros. Any easy way to define the VSContent file is to open the Visual Studio IDE, select File, New, and then select New File. In the resulting dialog box, select XML File. Remember, the VSContent file is nothing more than an XML file with a special extension in the filename (VSContent). In this way, you can create and edit your VSContent file directly in Visual Studio. You will have to edit the filename from .xml to VSContent. However, using Visual Studio allows you to take advantage of the built-in XML editor that includes IntelliSense. The first step in defining the content of this file is to set the XML namespace (xmlns) to the proper schema. You do this by adding the following root node to the file: <VSContent xmlns="http://schemas.microsoft.com/developer/vscontent/2005"> After you've done this, Visual Studio will recognize the intended structure for the XML and guide you through defining additional elements. Figure 12.30 shows an example of creating the VSContent file inside the IDE. Note that for the example, you define the FileName element to point to the macro file. You also must set the FileContentType to the enumerated value Macro Project. This ensures that the example is installed in the proper location for macros. Figure 12.30. Defining the VSContent file inside the IDE.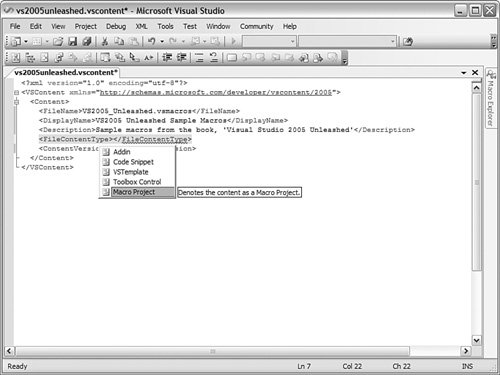 Step 2: Gather Files That Define Your CreationThe next step is to place all your files into a single directory where they can easily find each other. You need to include in your bundle any files that are called out in the VSContent file (.vsmacros, .dll, .addin) and the VSContent file itself. For some files and projects, you may have to dig a little. For this macro project, the .vsmacros file created as a new macro project is stored in the VSMacros80 folder. This folder exists inside the path \My Documents\Visual Studio 2005\Projects\. In this example, you create a folder named VS2005 Unleashed Macros. In it, you place the macro file named VS2005_Unleashed.vsmacros and the VSContent file named VS2005_Unleashed.vsmacros. Tip If you are creating a macro project and want to include it in a .vsi file, you will first need to find it! By default, Visual Studio stores custom macro projects in the folder \My Documents\Visual Studio 2005\Projects\VSMacros80. Step 3: Compress (Zip) FilesThe process of compressing the files should be familiar to all developers. You can use Window's built-in capability to compress files, or you can use a compression tool. In this example use the Windows compression tool. You select the .vsmacros and VSContent files, right-click, and then choose Send To, Compressed (Zipped) Folder. Step 4: Rename the .zip File to .vsiThe result of step 3 was the creation of a file named vs2005unleashed.zip. Now you're ready for the easiest step. Right-click the .zip file and choose Rename from the context menu. Remove the .zip extension and replace it with .vsi. That's it. If you are on a machine with Visual Studio installed, the new file will take on the .vsi icon (used for both .vsi and VSContent files). Figure 12.31 shows an example of these files and their icons. Figure 12.31. The packaged files.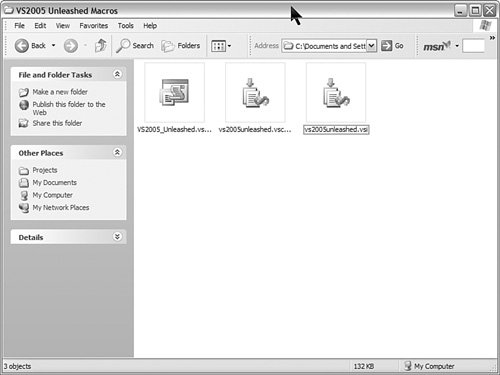 Installing the Sample ContentAll that remains is to distribute the .vsi file to the intended audience. Of course, it would be prudent to do a couple of test installations first. Let's look at the Visual Studio Content Installer tool in action. First, in Figure 12.31, notice that both the .vsi and the VSContent files are Visual Studio Content Installer (VSContentInstaller.exe) files. They have the same icon. The reason is that both can be used to install the content. There are some differences between the two, however. The .vsi file is fully self-contained. It does not require additional files for installation, whereas the VSContent file must exist in a directory that also contains the related content files. In addition, when you run the VSContent file, you are not warned about the lack of a signature (if one is lacking). Therefore, you might think that there is a bug or that these files are more appropriate for internal installations. The .vsi file, on the other hand, prompts you with a security warning dialog box if the content is not signed by a publisher. This, along with the single file and compression factor, seems to make the .vsi file ideal in larger, distributed scenarios. Let's examine the installation process for the .vsi file. First, you double-click the file to invoke the Visual Studio Content Installer. Figure 12.32 shows the example loaded in the tool. Figure 12.32. The Visual Studio Content Installer.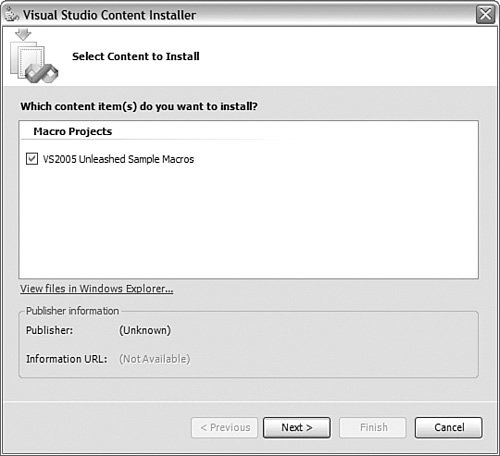 From this screen, you can select View Files in Windows Explorer to examine the files that will be installed by the .vsi. Also, notice that the Publisher Information section is blank. The reason is that the bundle is not signed. When you click the Next button, the tool prompts you with a warning regarding the lack of signature. Figure 12.33 shows this warning. Again, this warning is not shown if you are installing from the VSContent file directly. For now, click Yes and move on. In the sidebar, we will discuss signing your work. Figure 12.33. No Signature Found warning.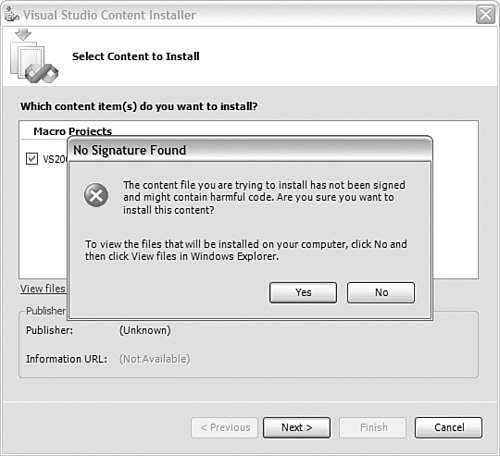 Signing Your Work To sign your .vsi files with Authenticode, you must get a valid software publisher certificate (.spc) from a certificate authority (CA). Of course, this requires that you have a company set up and that you fill out an application as such. Visual Studio does have a few test tools to help developers understand the process prior to working with a CA. These tools include the following:
The vision for these tools is as follows: You use the MakeZipExe.exe tool to convert your .zip file to an .exe file (because code signing requires an .exe or .dll). You then use the SignTool.exe to sign the resulting .exe. You then convert this file into a .vsi file for publication. If you do not have a valid certificate from a CA, you can create a test certificate (not to be used for publishing) with the MakeCert.exe tool. You then must convert this certificate into a software publisher certificate (.spc) using the Cert2spc.exe. Be aware that the shipping version of MakeZipExe.exe contains a bug! Therefore, none of this currently works. Look for Microsoft to post a fix soon. There are also some good blog entries out there with possible workarounds. Next, the installer prepares you to finish the installation. Figure 12.34 shows an example. When you click the Finish button, the installer writes the files to the appropriate folders based on content type. If the given file already exists, the installer prompts you to find out whether you want it left as is or overwritten. Figure 12.34. Finishing the installation.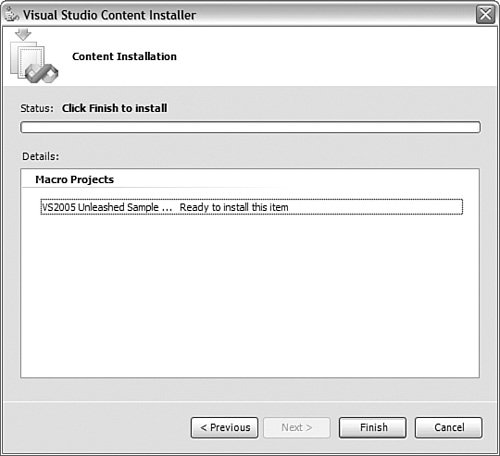 When you click Finish, the installer finishes its job and reports back. Figure 12.35 shows a successful installation. Figure 12.35. A successful installation.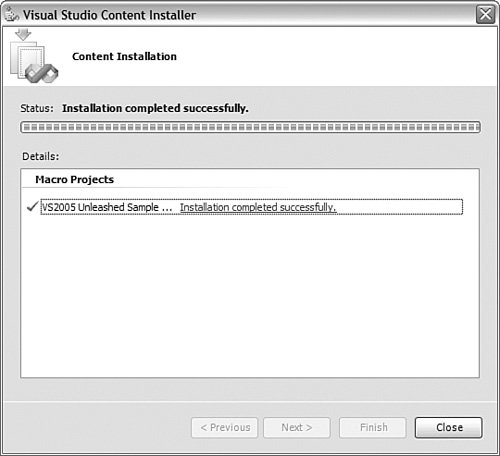 Tip To help streamline the creation of .vsi files, a GotDotNet workspace (http://www.gotdotnet.com/workspaces/) was created. If you navigate to the site and search for "Visual Studio Content Installer Power Toys," you will be able to find the workspace. This wizard tool has some related files that aid in the creation of the .vsi files. Publishing Your CreationYou can publish your .vsi files to your coworkers, friends, team, or to other developers. You also can post them on a network share, email them, or drop them on a content-sharing website such as www.gotdotnet.com or similar community sites. |
EAN: 2147483647
Pages: 195