Understanding Solutions
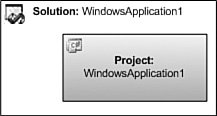
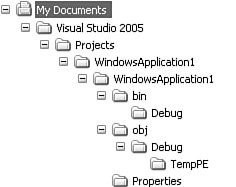
| From a programming perspective, everything that you do within Visual Studio will take place within the context of a solution. As we mentioned in this chapter's introduction, solutions in and of themselves don't do anything other than serve as higher-level containers for other items. Projects are the most obvious items that can be placed inside solutions, but solutions can also contain miscellaneous files that may be germane to the solution itself, such as "read me" documents and design diagrams. Really, any file type can be added to a solution. Solutions can't, however, contain other solutions. In addition, Visual Studio will load only one solution at a time. If you need to work on more than one solution concurrently, you need to launch another instance of Visual Studio. So what do solutions contribute to the development experience? Solutions are useful because they allow you to treat various different projects as one cohesive unit of work. By grouping multiple projects under a solution, you can work against those projects from within one instance of Visual Studio. In addition, a solution simplifies certain configuration tasks by allowing you to apply settings across all of the solution's child projects. You can also "build" a solution. As mentioned previously, solutions themselves aren't compiled, per se, but their constituent projects can be built using a single build command issued against the solution. And, solutions are also a vehicle for physical file management: Because many items that show up in a solution are physical files located on disk, Visual Studio can manage those files in various ways (delete them, rename them, move them). So, it turns out that solutions are very useful constructs within Visual Studio. The easiest way to explore solution capabilities and attributes is to create a solution in the IDE. Creating a SolutionTo create a solution, you first create a project. Because projects can't be loaded independent of a solution within Visual Studio, creating a project will cause a solution to be created at the same time. Note There actually is a way to create a blank, or empty, solution without also creating a project. If you expand the Other Project Types node that appears in the Project types list, you will see an option for Visual Studio Solutions. This contains a Blank Solution template. Blank solutions are useful when you are creating a new solution to house a series of already-existing projects; the blank solution obviates the need to worry about extra, unneeded projects being created on disk. Launch the New Project dialog box by using the File menu and selecting the New, Project option (shown in Figure 4.1) or by using the Ctrl+Shift+N keyboard shortcut. Figure 4.1. The File, New, Project menu.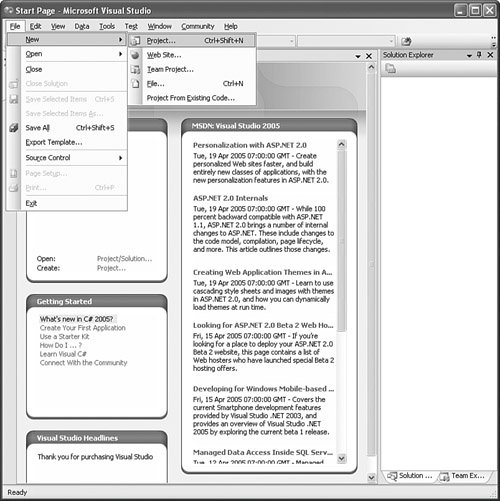 The New Project dialog box will be displayed with defaults for the project name, location, and solution name (see Figure 4.2). We'll take a detailed look at the various project types offered there when we discuss projects later in this chapter. Notice that at the bottom of the dialog box, a Solution Name field is displayed. This field allows you to customize the name of your solution prior to creating the solution. Just clicking OK at this point will do two things: A project of the indicated type and name will be created on disk (at the location specified), and a solution, with links to the project, will also be created on disk using the provided name. Figure 4.2. The New Project dialog box.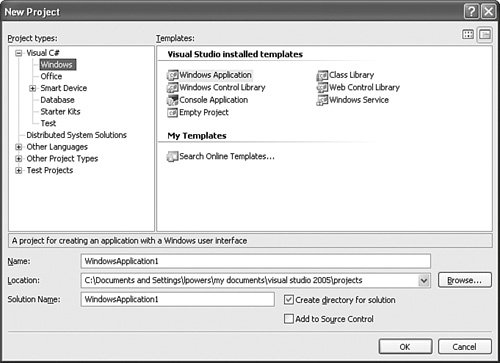 Assuming that you have selected something other than the Blank Solution project type, Visual Studio will now display the newly created solution and project in the Solution Explorer window (we cover the Solution Explorer in depth in Chapter 5, "Browsers and Explorers"). In effect, Visual Studio has created the solution hierarchy shown in Figure 4.3. Figure 4.3. A simple solution hierarchy. Assuming that you have accepted the default locations and left the Create Directory for Solution box checked, the physical directory/file structure is created as shown in Figure 4.4. Figure 4.4. The solution file hierarchy. In this example, the first WindowsApplication1 folder holds the solution file and has a subfolder for each project. The second WindowsApplication1 folder contains the new Windows forms project. The source files are placed in the root of this folder, and any compiled output files sit underneath the bin directory and then under the specific build configuration (for example, Debug or Release). Caution By default, the solution is named after the project. There is potential for confusion here because you now have two folders/entities named WindowsApplication1. One refers to the solution; the other, the project. This is not an ideal way to physically organize your code on disk. It is recommended that you give the solution itself a unique name during the project creation process by simply overriding the default name given in the Solution Name field (refer to Figure 4.2). The Solution Definition FileVisual Studio stores solution information inside two separate files: a solution definition file and a solution user options file. For the preceding example, Visual Studio created the solution definition file WindowsApplication1.sln and the solution user options file WindowsApplication1.suo in the indicated folder. The solution definition file is responsible for actually describing any project relationships in the solution and for storing the various solution-level attributes that can be set. The solution user options file persists any customizations or changes that you, as a Visual Studio user, might have made to the way the solution is displayed within the IDE (such as whether the solution is expanded). In addition, certain source control settings and other IDE configuration data are stored here. The solution user options file is, by default, marked as a hidden file, and its content is actually binary. Because its internal structure is not publicly documented, we won't attempt to dissect it here. The solution definition file, however, is simply a text file. Listing 4.1 shows the file content for a fairly complex sample solution. Listing 4.1. Sample Solution File
At the beginning of the file are references to the projects that belong to the solution. The references contain the project's name, its GUID, and a relative path to the project file itself (more on project files in a bit). You can also see some of the various configuration attributes applied to the solution: The Debug and Release settings, for instance, show up here. Note that this project contains several solution folders: Architecture Models, Class Libraries, Controls, and Forms. They are represented in the solution file in much the same way as projects. In fact, the only difference is that they do not have a relative file path associated with them. Working with SolutionsAfter you have created a solution, the primary vehicle is in place for interacting with your code base. In essence, this boils down to controlling the way that its constituent projects and files are built and deployed. Solutions also provide functionality outside the scope of projects. The primary tool for manipulating solutions and projects is the Solution Explorer. This tool is discussed in depth in Chapter 5. Here, we will look at the general procedures used to manage solutions by using the menu system in Visual Studio; keep in mind that most of the commands and actions discussed here can be initiated from the Solution Explorer. Solution ItemsIn practice, the content you will add most often to a solution is project related. But items can be added directly to a solution as well. Collectively, the term solution items refers to any nonproject file that is attached to a solution. Because we know that solutions can't be compiled, it stands to reason that files added at the solution level serve no practical purpose from a compilation perspective. There are a variety of reasons, however, that you may want to add solution items to your solution. For instance, this is a convenient way to store documentation that applies to the solution as a whole. Because you can add any type of file to a solution, this could take the form of documents, notes to other developers, design specifications, or even source code files from other solutions that may have some impact or bearing on the work at hand. By default, Visual Studio supports a few different types of solution items that can be created directly from within the IDE. They are grouped within four different categories. Within each category are various different file types that can be generated by Visual Studio. Table 4.1 shows the supported types.
Note Keep in mind that you are in no way limited as to the type of file you can add to a solution. Even though Visual Studio supports only a limited number of file types that can be created within the IDE, you always have the option of creating a file outside the IDE and then adding it to a solution by using the Add Existing Item command. Figure 4.5 shows the Add New Item Solution Items dialog box that appears when you try to add a new item to a solution. Figure 4.5. Adding a new solution item.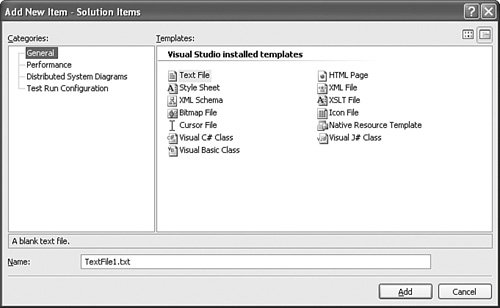 Solution FoldersTo assist in organizing the various files in your solution, you can use solution folders. They are virtual folders implemented entirely within Visual Studio and do not cause physical file folders to be created on disk, and they exist solely to provide another grouping level within the solution. Solution folders can be nested and are especially useful in large solutions that contain many different projects and miscellaneous files. For example, you may want to group all of your web service projects under a single solution folder called Services, while grouping the Windows forms elements of your solution under a UI folder. Files added to a virtual folder are actually physically stored within the root of the solution directory structure. Beyond providing a visual grouping element, solution folders also allow you to apply certain commands against all of the projects contained within an individual folder. For example, you can "unload" all of the projects within a virtual folder by issuing the unload command against the virtual folder. Solution PropertiesSeveral solution-level properties can be set from within the IDE. The Solution Property Pages dialog box gives you direct access to these properties and allows you to
You launch this dialog box from the View menu or with the keyboard shortcut Shift+F4. Specifying the Startup ProjectFigure 4.6 shows the Startup Project property page. The property page categories are represented in a tree view to the left; expanding a tree node reveals the individual property pages available. Figure 4.6. The Startup Project property page.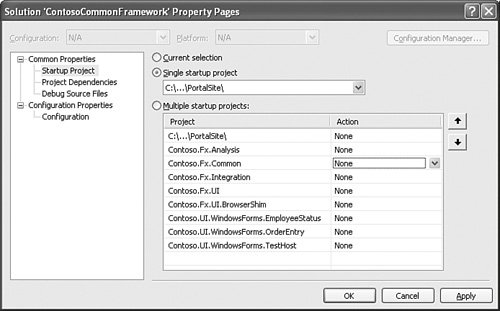 The Startup Project property page indicates whether the startup project should be the currently selected project, a single project, or multiple projects. The default, and most typically used option, is to specify a single startup project. The project to run is specified in the drop-down box. If Current Selection is selected, the project that currently has focus in the Solution Explorer will be considered the startup project. You also can launch multiple projects when the debugger is started. Each project currently loaded in the solution will appear in the list box with a default action of None. Projects set to None will not be executed by the debugger. You can also choose from the actions Start and Start Without Debugging. As their names suggest, the Start action will cause the indicated project to run within the debugger; Start Without Debugging will cause the project to run, but it will not be debugged. Setting Project DependenciesIf a solution has projects that depend on one anotherthat is, one project relies on the types exposed by another projectVisual Studio will need to have a build order of precedence established among the projects. As an example, consider a Windows application project that consumes types that are exposed by a class library project. The build process will fail if the class library is not built first within the build sequence. Most of the time, Visual Studio is able to determine the correct sequence. Sometimes, you may need to manually indicate that a project is dependent on other, specific projects. To supply this information, you use the Project Dependencies property page (see Figure 4.7). By selecting a project in the drop-down, you can indicate which other solutions it depends on by placing a check mark on any of the projects shown in the Depends On list. Figure 4.7. Project dependencies.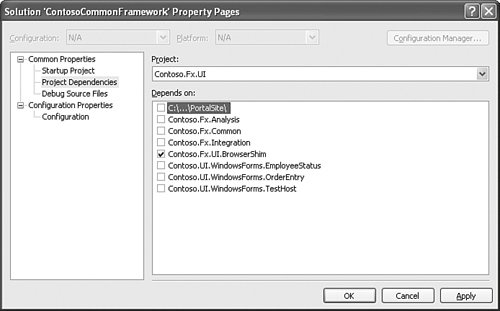 Source File Location for DebuggingIn certain situations, you may need to explicitly point the Visual Studio debugger at source files to use when the debugger executes. One such scenario occurs when you are trying to debug a solution that references an object on a remote machine. If the source is not available locally for that remote object, you can explicitly point Visual Studio at the source files. The Debug Source Files property page (see Figure 4.8) has two different list boxes. The top box contains a list of folders that hold source code specific to your debugging scenario. The bottom list box allows you to indicate specific files that the debugger should ignore (that is, should not load) when debugging. Figure 4.8. Source file locations.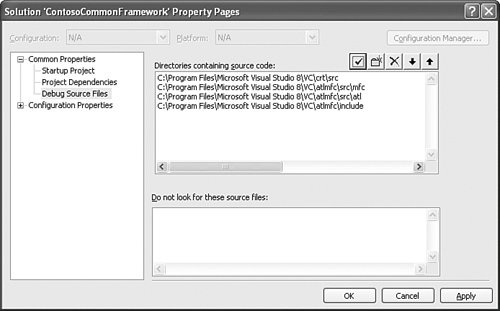 To add an entry to either box, first place your cursor within the box and then click on the New Line button (top right of the dialog box). This will allow you to enter a fully qualified path to the desired folder. You remove an entry by selecting the item and then clicking on the Cut Line button. The Check Entries button allows you to double-check that all entries point to valid, reachable folder paths. If the loaded solution has any Visual C++ projects, you will probably see several items already added into the Directories Containing Source Code list box. Build Configuration PropertiesBuild configurations are covered in depth in Chapter 9, "Automation and Macros." On the Build Configuration property page (see Figure 4.9), you indicate how Visual Studio will build the projects contained within the solution. For each project, you can set a configuration and platform value. In addition, a check box allows you to indicate whether to build a particular project. Figure 4.9. Build configuration properties.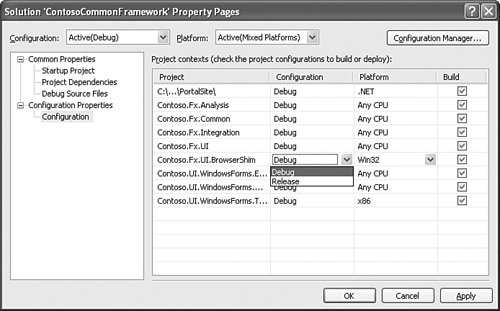 See Chapter 9 for information on how to effectively use build configurations in your development. Now that we have covered the concept of a solution in depth, let's examine how projects function within Visual Studio. |
EAN: 2147483647
Pages: 195
- Step 1.1 Install OpenSSH to Replace the Remote Access Protocols with Encrypted Versions
- Step 1.2 Install SSH Windows Clients to Access Remote Machines Securely
- Step 3.1 Use PuTTY as a Graphical Replacement for telnet and rlogin
- Step 3.3 Use WinSCP as a Graphical Replacement for FTP and RCP
- Step 4.4 How to Generate a Key Using PuTTY