Customizing Work Items
| You can customize and extend the features of Team Systems in a number of places. Customizing is the process of taking the existing functionality and tweaking it to fit your needs. This is the typical scenario for most development shops. Extending involves using the Team System API and report engine to write new functionality into Team Systems. The following are all possible customization and extension points:
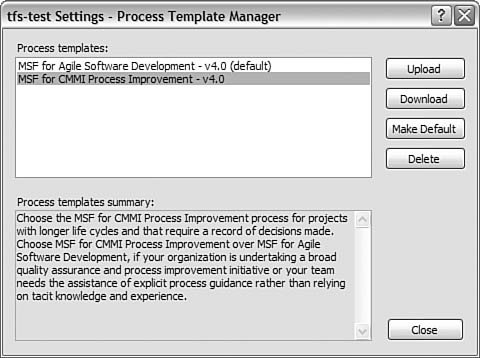
We cannot cover all these extension points here. Instead, we will look at three common scenarios related to work items: seeding your process with standard work items for a project, customizing an existing work item, and creating a new, custom work item. Seeding the Process with Work ItemsWhen you create a new project based on one of the MSF methodologies, the team server is seeded with an initial set of work items. These items represent common tasks that are required for the execution of the project. A number of these tasks involve starting the project moving (such as creating a project plan and master schedule). This initial set of work items is part of the overall methodology. A common request is to seed your own tasks (work items) into an existing methodology. Let's look at how this is done. Note You can apply this process of adding work items to a methodology to extend the methodology in a number of other directions as well. You can even use it as a basis for writing your own methodology. Downloading (Exporting) a MethodologyMethodologies in Team Systems are defined as process templates. A process template is a set of files that Team Systems can use to define a given process or methodology. As we have discussed, Team Systems ships with two process templates: MSF for Agile and MSF for CMMI. As you tweak your process, you will want to tweak these templates to stay in tune. You use the Process Template Manager to modify a process template. This tool lets you export a process, tweak it, and then re-import it. You can access this tool from Team Explorer. Figure 20.34 shows the menu structure for accessing the tool. Figure 20.34. Accessing the Process Template Manager.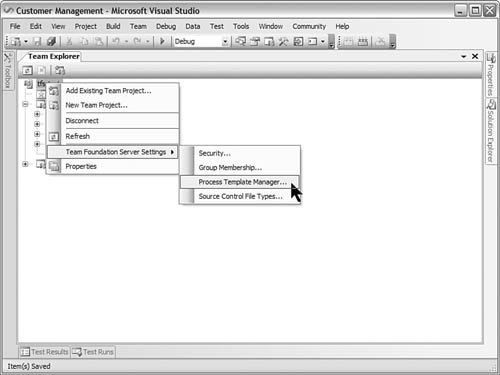 The Process Template Manager presents the process templates installed on your TFS. From here, you can export (download), import (upload), set one process as the default, and even delete a process if needed. Figure 20.35 shows this dialog box. Figure 20.35. The Process Template Manager. For this example, you will export the MSF for CMMI process template. You will then add a few custom work items to this template and re-import. The Process Template Manager saves all the files that define the process to a folder upon download. This folder contains XML files that define a lot of the process. It also contains the default documents, queries, and process guidance associated with the methodology. Figure 20.36 shows the folder structure that defines the CMMI process. Figure 20.36. The exported process template.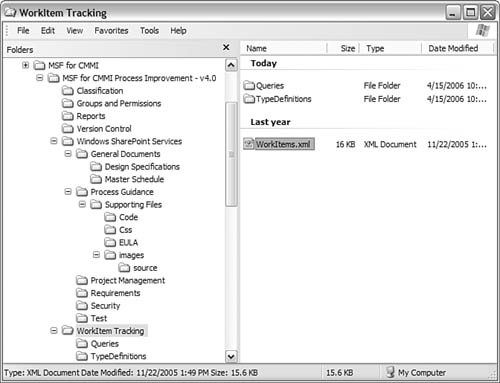 Notice that the file you will be working with in this example, WorkItems.xml, has been highlighted. You will edit this file in Visual Studio. Figure 20.37 shows the file open in the IDE. Figure 20.37. The WorkItems.xml file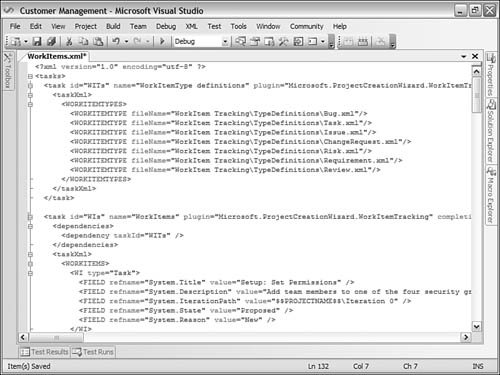 There are three sections to this file: work item type definitions, work items, and queries. The type definitions section indicates the location of the XML files used to describe each work item. The work items section identifies the set of seed work items to be loaded at project creation (this is the focus). The query section lists the location of each query file to be loaded as part of the methodology. Adding Work Items to the MethodologyAgain, the focus in this example is the set of work items to be seeded for the project. If you look at an existing work item, you can understand its structure. This will help you create a few new tasks and tweak existing ones. The following represents the task titled Setup: Set Permissions (we've truncated the description): <WI type="Task"> <FIELD refname="System.Title" value="Setup: Set Permissions" /> <FIELD refname="System.Description" value="Add team members to ... " /> <FIELD refname="System.IterationPath" value="$$PROJECTNAME$$\Iteration 0" /> <FIELD refname="System.State" value="Proposed" /> <FIELD refname="System.Reason" value="New" /> </WI> You can see that to seed the methodology with additional work items you need to define a type, title, description, state, and so on. Now you can add the work items as defined in Listing 20.1. Listing 20.1. New Tasks to Be Seeded
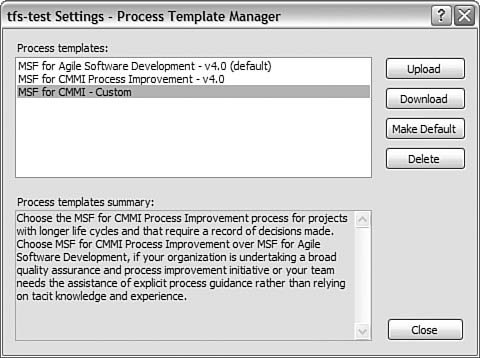
Uploading (Importing) the MethodologyThe next step is to import the refined methodology. To do so, you return to the Process Template Manager and choose Upload. You are then presented with a folder selection screen. You use this screen to navigate to the folder that contains the updated methodology. The process template name is very important. If the name matches the name of an existing process template, then the Template Manager will ask to overwrite the existing template. This is great if it is your intention. However, if you want to keep the Visual Studio core templates, then you should rename your process template before uploading. You rename the process template at the top of the ProcessTemplate.xml file found in the root folder for the template. You can also use this file to change the process template description that shows up in the Template Manager. Figure 20.38 shows the uploaded process template. Figure 20.38. The newly uploaded process template. Note If you choose to overwrite an existing process, this will not affect projects that are already defined by this process. Instead, these projects use a copy of this core methodology. What you will overwrite is the core that drives new projects. You can now use your newly customized process to create new projects. You can use this same process of export, tweak, and import to make all kinds of modifications to team systems. You can also use the import to load third-party processes. Figure 20.39 shows the results of this work: a new project with a new set of seed work items. Figure 20.39. The new tasks in a new project.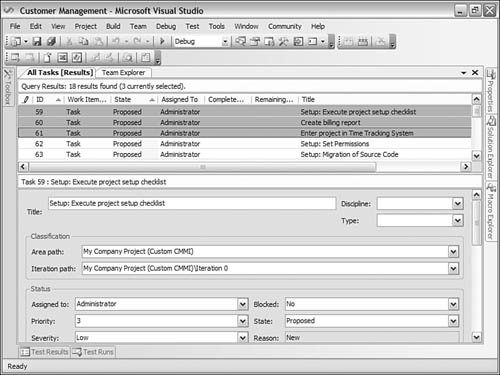 Customizing an Existing Work ItemYou can customize the definition for an existing work item by using the same steps we outlined in the preceding section: export, tweak, and import. Customizing existing work items is probably the most common Team System customization. Let's look at an example. Suppose you want to customize the Bug work item. You want to add a field to indicate bug type. This will allow the person triaging bugs to categorize them. You can then report and prioritize bugs that are of type error versus cosmetic and the like. To make your edits, you again would export a methodology. For this example, use the one you exported previously (CMMI). You then navigate to the work item type definitions (\WorkItem Tracking\TypeDefinitions). This folder contains definitions for each work item defined by the process. Of course, you are interested in the Bug.xml file. This definition file contains the core fields defined for bugs as well as common fields that apply to most work items. The definition is long and does not bear repeating here. You will add your new field to the core fields area in this XML. Listing 20.2 represents the new field. Listing 20.2. A New Field Inside Bug.xml
This field is added to the Fields section of the XML. Notice that you restrict the values that can be entered in this field by using the AllowedValues node. This will tell Team Systems to display this field as a drop-down list for users. This field is also marked as required (<REQUIRED/>) and has a default value set using the Default element. Finally, the field definition indicates that the field is reportable. This tells Team System to include this field when doing analysis for reports. You must also define how the field should appear on the form. You do this inside the Form section of the XML. You want the field to appear at the top of the form to the right of the Title field. To accomplish this, you add a column to the Group element that contains the Title field. Listing 20.3 illustrates adding the Bug Type field to this group. Listing 20.3. Adding the Field to the Form
Finally, you upload the new process template. Figure 20.40 shows the results of this work. Figure 20.40. The new bug type field in action.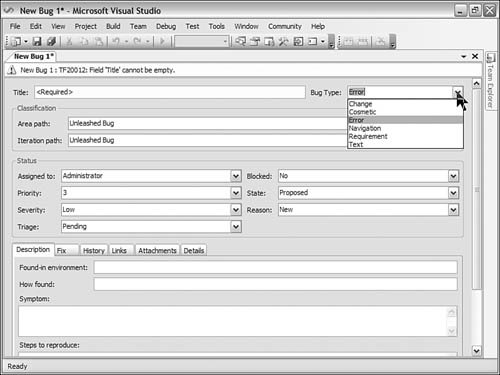 Note You can also make changes to existing work items (without exporting and importing) on a project that is in progress. Microsoft has created the Visual Studio Team System Extensibility Kit to allow for greater customizations of VSTS. This tool ships separately from the product. It does require you to become an affiliate member of the Microsoft Visual Studio Integrator Program (VSIP). You can start the download process at http://msdn.microsoft.com/vstudio/extend/default.aspx. This SDK ships with examples of work item customizations. It also provides detailed documentation of the work item type definitions. This is a must-read for creating your own work items. |
EAN: 2147483647
Pages: 195