Understanding Team Role Perspectives
| As we've discussed, work items are the key collaborative element that connect all team members on the project. They are used to communicate tasks, status, issues, risks, and so on. They also emit status information and define metrics for reporting. Work items touch the entire team. Therefore, in the following sections, we will cover how some of the key roles across the SDLC interact with work items. We will present a few common activities per role and then demonstrate how those activities are realized through work items. The roles we will discuss include project manager, business analyst, developer, and tester. There are many more roles defined for most processes (including MSF). However, in general, these roles tend to interact the most with work items on any given software project. Note Only the roles of architect, developer, and tester are assumed to have an installed version of a Visual Studio team client. Other team members (such as business analysts, project managers, and customers) will connect to the project using tools such as Excel and Project. They can also view reports and information via the project team site (portal). Of course, each of these team members should have a client access license (CAL) for Team Foundation Server. One question we are always asked is "Can a customer (or someone who does not have access to Visual Studio) update or view a work item through a browser?" The answer is no; the feature does not come out of the box. You can allow these people to integrate using Excel or Project. You can also write custom code to extend Team Systems for this purpose. Project VisionIt is helpful to discuss each role's interaction with work items in the context of an actual project. So for this section, we will assume the following as the parameters and vision that define the sample project:
We will use this as the basis for describing how various roles work on this project through work items. Let's first look at the project manager's role. Note MSF defines actual workstreams to group activities by role. It is recommended you become familiar with these workstreams, their activities, and their associated roles. In addition, MSF illustrates how a work item is used inside each workstream. Our approach is simpler: We want to show common activities by role and illustrate how work items come into play and how those work items are reflected in Visual Studio and Team Explorer. Project ManagerFor this example, assume you are the project manager (PM) who is the leader in charge of the project. It is therefore your responsibility to set up the project in Team Systems, select a methodology, control security, and so on. Given that many PMs have little experience with Visual Studio, you may want to assign a technical lead to aid with these tasks. We will not cover these project setup tasks here. Instead, assume a project has been defined with the MSF for CMMI methodology, security is in place for each role, and the iterations and areas have been defined similar to those found in Figures 20.3 and 20.4. We will now focus on a few common tasks the PM will execute involving work items. Identifying the PM's Work ItemsIn general, project managers focus on tasks, risks, and issues on a day-to-day basis. Many are also occasionally concerned with requirements, reviews, and bugs. For this example, we will discuss the former set and cover the latter with other, more pertinent roles. Using ExcelAs the PM, you may have a copy of Team Explorer (this is recommended). From here, you can query and update work items as we have discussed. Many project managers, however, also like to work with lists of information in both Excel and Project. Team Explorer has support for two-way integration with these products, as we introduced in Chapter 18. You therefore can view, create, and update work items using these common Office tools. Of course, this feature is not limited to project managers; we simply will walk through a few of scenarios pertinent to their role. Viewing Open IssuesFor this example, assume that you, as the project manager, want to view the list of active issues on the project, update them, and then publish this list back to server. To start, you launch Excel. Provided you have installed the Team Explorer tools, you will have a Team toolbar inside Excel. This toolbar provides interaction with a team server. From this toolbar, you click New List to launch the Connect to Team Foundation Server dialog box. This allows you to select a TFS server and a project on that server. Tip Work item lists can also be opened in Excel directly from Team Explorer. To do so, run a query. Then, in the results window, select the Open Selection in Excel toolbar item. Next, you are presented with the New List dialog box. From here, you can indicate whether you want to query for work items or create an input list. Query allows you to get back a list, work with the list items, and then update the server. We will look at the Input list in a moment. Recall that you want to work with the current issues on this project. For this reason, you will select Query List and choose the Issues List from the Query drop-down (which includes the list of both team and private queries). Figure 20.19 shows this interaction. Figure 20.19. Opening a list in Excel.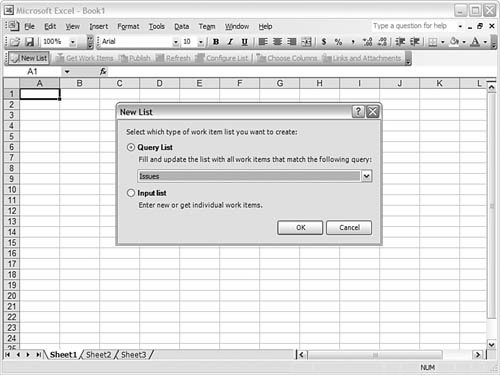 When the query runs, you are then presented with all open issues on the project. Using the features of Excel, you can filter and sort this list. Figure 20.20 shows the results of the query. Figure 20.20. The list of issue work items in Excel.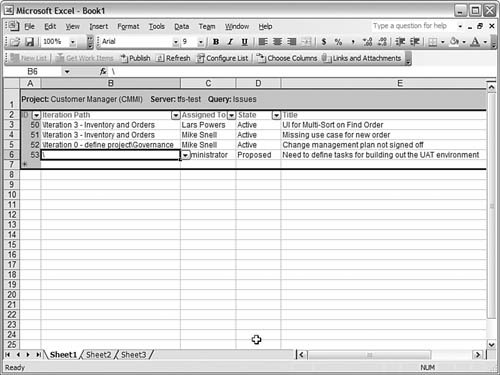 Notice the Team toolbar now has many more active buttons. From here, you can publish changes you make to the list, refresh the list from the server, configure the list, determine which columns you want to view, and manage links and attachments to the various work items in the list. Let's suppose you, as the project manager, need to update the Escalation field and the Target resolution date for these items. To do so, you click the Choose Columns item from the toolbar to bring up the related dialog box. This dialog box allows you to determine which fields are displayed in the Excel sheet. Figure 20.21 shows this task in action. Figure 20.21. Selecting work item fields to display in Excel.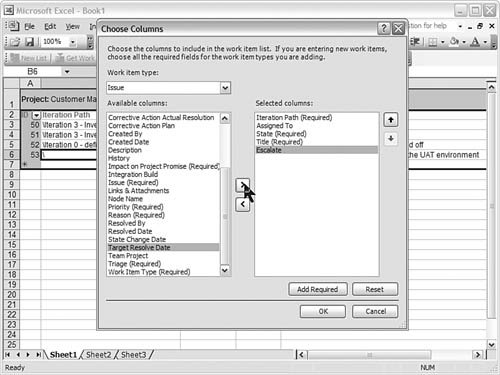 The next step is to update the data for the work items. The good news is that Excel provides drop-downs for data entry that match the work item drop-downs in Team Explorer. This ensures the data conforms to the right business rules and eases the data entry. For changes, assume that you updated the escalation fields and target resolution dates and changed the status of the Proposed work item to Active (and assigned it). You also have to enter a new issue. You can do so at the bottom of the list. When entering a new issue to the list, you will go to the Choose Columns dialog box, select the work item type, and then click the Add Required button. This will push all the required fields to the form. Tip Because you work with multiple types of work items in Excel, one of the required fields is Work Item Type. It is important to set this field first when entering a new work item. This way, all other fields in the row will be updated as to allowed values. You will then get the correct data entry experience. Now that you are finished doing updates and have even added a new issue to the list, the next step is to publish these items to the server. To do so, you click the Publish button on the toolbar. This will start the synchronization process. Note that you may run into errors when publishing. If problems are detected, you will be presented with the Work Item Publishing Errors dialog box. This dialog box lists the results of the operation and shows the work items that have errors. Figure 20.22 shows the work items that did not successfully publish. Figure 20.22. Publishing errors.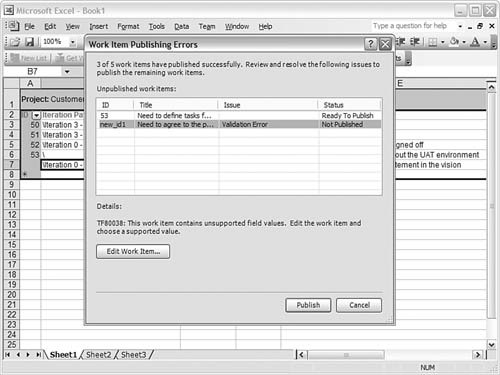 You can click the Edit Work Item button to resolve the errors for each item. Clicking this button brings up the work item in the standard view (not Excel). The errors are listed at the top of the form, and the fields in error are also highlighted. From here, you can make your fixes and then click the Close button. Figure 20.23 shows an error with the State field being fixed. A new work item must start in the state Proposed, and not Active. You will click the Publish button on the Work Item Publishing Errors dialog box after each error is fixed. Figure 20.23. Resolving a publishing error.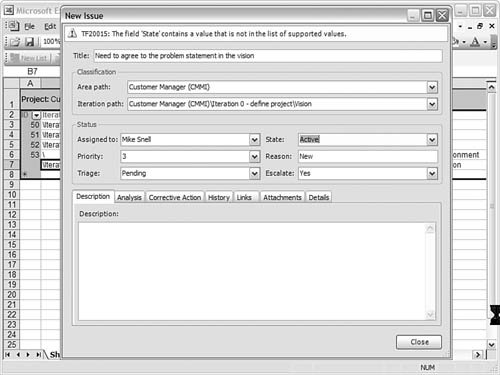 Note You can add links and attachments to work items from Excel. The interface is similar to that of Team Explorer's. However, you can only do so after a work item is published. Therefore, if you create a new work item in Excel, you will need to publish before adding attachments and links. After the item is published, you can make your additions. You will then have to republish to post those additions. Creating a Risk ListFor the next example, suppose you, as the PM, want to create a project risk list in Excel. Each risk will be entered in a blank worksheet and then published to the Team Foundation Server. The steps involved in this task are not unlike what we discussed previously. To create a risk list in Excel, follow these steps:
These steps allow any team member to create work items in Excel and then publish them to the server. Tip You may want to save your Excel workbooks after they're created. Doing this can be a great way to get team members to use work items in Excel. You define a workbook for risks, for instance, and then publish that workbook to the project portal. Team members can now simply open the workbook, add or edit the given item, and then publish to the server. The MSF for Agile project portal has a couple examples of this. Using ProjectWork items can also be viewed, edited, created, and scheduled using Microsoft Project. The integration of work items and Project is nearly identical to that of Excel. As an example, suppose you, as the PM, need to schedule the tasks on the project. First, you may run a query inside Team Explorer. Next, you select the Open Selection in Project item from the toolbar. Selecting this item will open a new project file and feed it the selected tasks from the query. Within Project, you are free to do project-related tasks. This includes rolling up tasks under a group name, defining the hours for a task and its predecessors, and so on. Figure 20.24 shows an example of the sample project's task work items being scheduled in Project. Figure 20.24. Working with task work items in Project.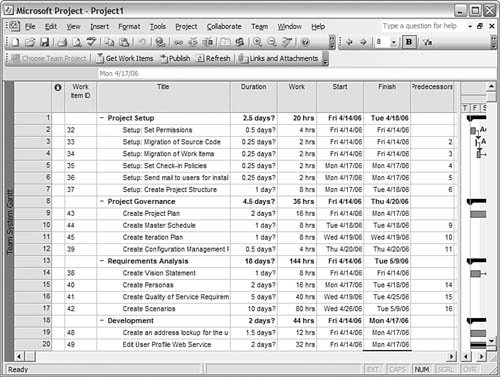 You then click the Publish button after scheduling is complete. This will update the team server. The synchronization will attempt to push all lines in the project into new work items. For categories and the like in Project, you can simply choose to ignore these errors. The schedule information for each task is now available inside each work item. For example, if developers open a development task work item, they can click on the Details tab to see the remaining work and scheduled start and end dates. Figure 20.25 shows an example. Project managers can save their schedules and use them as a basis to receive updates to tasks. This way, they can handle work items with the tool they're most comfortable using. Figure 20.25. A scheduled work item. Business AnalystA business analyst's (BA's) primary interaction with work items will be to define requirements and user scenarios. These items will represent the interaction with the system that a user must have to consider the project a success. Therefore, these scenarios are typically defined at the beginning of an iteration. The scenarios drive other work items such as development tasks. Let's look at a standard method that a BA might follow with respect to work items and a project. For this example, imagine you are now the business analyst. Your first step is to meet with stakeholders and brainstorm possible user scenarios. Suppose this meeting defined 25 possible scenarios. The first step would be to create Requirement work items of type Scenario for each of these 25 possible scenarios. This will allow for the work items to be named, assigned, and tracked. In addition, the PM can now track these work items on the schedule as you estimate the time required to complete each scenario. Next, you begin to write the various scenarios. You may query the set of scenarios to determine which are of the highest priority and do those first. When writing a simple scenario, you may use the Description tab on the work item. You may write longer, more complex scenarios using a Word document. Let's look at an example of the latter. Suppose that you have a work item for the scenario titled Login Scenario. When you write this scenario, you use a scenario Word template for the project. You then upload this scenario to the project. You can do so using the project portal or through Team Explorer. Suppose that you used Team Explorer. From here, you expand the Documents folder and then right-click the Requirements folder. You then choose Upload Document to navigate to the document and upload it to the server. This document is uploaded to the same library used by the project portal. There are simply two views: one from Team Explorer and one from the portal. Figure 20.26 shows the scenario document in both views. Figure 20.26. A requirements document viewed from Team Explorer and the portal.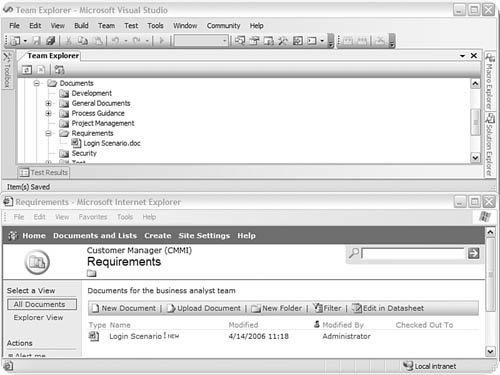 Finally, you will want to link the scenario document to the work item. It may seem intuitive for you, as the BA, to use the Link tab for this work. However, this is not the case. Instead, this link is made through the Attachment tab. You add an attachment and navigate to the document stored on the portal (see Figure 20.27). Adding this attachment actually defines a link between the work item and the file. This way, if the file is updated from the portal, the updates are reflected when the file is opened from the work item. Figure 20.27. Linking to a scenario document on the project portal.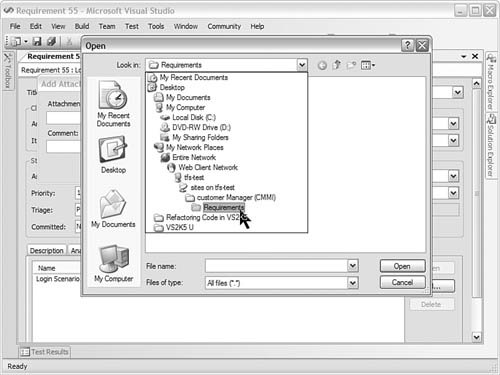 DeveloperDevelopers get their task lists from the work items database. In addition, they use work items to get clarification on requirements, user scenarios, bugs, and so on. Developers are probably the prime consumers of work items in Team Systems. We have already discussed the majority of these scenarios. Therefore, we will focus on one primary activity of the developer: associating code to work items. Associating work items and code provides vital statistics to Team Foundation Server. It allows for reporting on code churn, task progress, and bug status. In addition, it provides a vital link when going back over code and doing maintenance. The capability to look at a piece of code and then read the associated requirements, tasks, and scenarios is extremely helpful. Tip It is often a best practice to create a check-in policy that forces developers to associate all check-ins with one or more work items. This ensures that development work is properly tracked (and therefore can be reported on). Associating Code and Work Items Through Check-InThe principal means for a developer to associate code with a work item is to do so during the source control check-in procedure. We cover source control in Chapter 19. However, it is important to illustrate this process here from the perspective of work items. As an example, suppose you are the project's technical lead and have been assigned the task for generating the skeletal structure of the application. Of course, this task would be a work item. Your activity as the tech lead might include creating the solution and the projects and scripting out code stubs for many of the items in the project. When the code is complete, you would check in the entire code structure. During the check-in process, you would associate the check-in to the task for generating the code structure. You would do so by selecting the Work Items icon on the Check In dialog box. Selecting this option will open a window that allows you to query and search for work items to associate to code. Figure 20.28 shows this example in progress. Figure 20.28. Linking a changeset to a work item.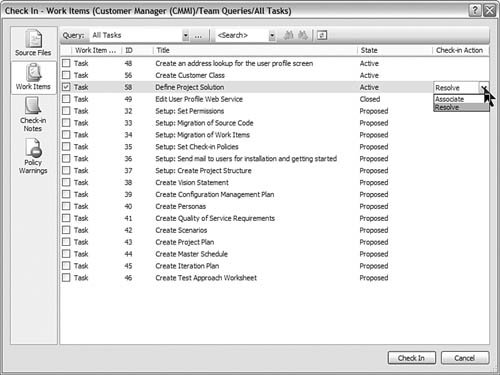 After you find the task, you click the check box to make the association. In addition you can indicate whether the check-in resolves the given task. You do this by setting the Check-In Action (far right of figure). This indication automatically marks the task's status as Resolved. Finally, this process also creates a link back to the work item. When you open the work item and click the Links tab, you will see the changeset that was checked in as part of the previous process. This linked changeset represents the history of what code was resolved or checked in relative to this work item. Figure 20.29 shows this link and the open changeset. Figure 20.29. The changeset link on the work item. Tip You will most often link check-ins to multiple work items. This capability is fully supported and a best practice. For instance, if your check-in resolves a bug, is related to a requirement, and resolves a task that was created to fix the bug, you will want to relate to all three work items. Linking Code to Work ItemsYou can also associate code to a work item through the Link tab on the work item. This capability can be useful if you want to make the association outside a check-in (or you forget). To link the code this way, navigate to the work item and select the Links tab. Click the Add button to bring up the Add Link dialog box. In this dialog box, select Versioned Item from the Link type field. Then, next to the Item field, click the Browse button. Figure 20.30 shows an example. Figure 20.30. Adding a versioned item link to a work item.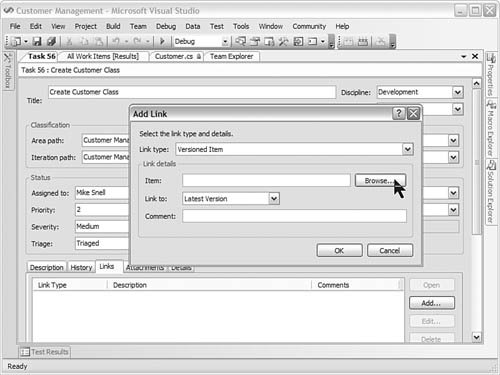 For this example, your task is to create a Customer class. The class is created and checked in. It now needs to be manually associated with the work item. After clicking the Browse button, you can now navigate the source tree to find the correct code files with which to associate the item. Figure 20.31 shows this process in action. After making a selection, you can then indicate whether the link should always point to the latest version or a changeset. Figure 20.31. Selecting the versioned item to link to a work item.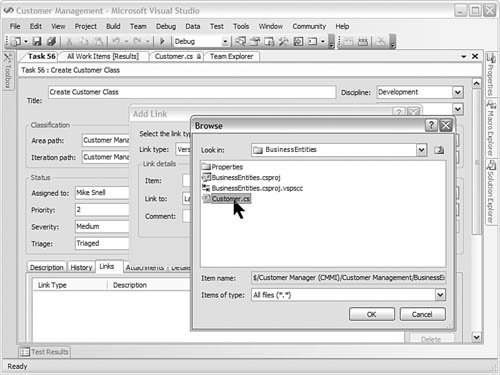 TesterA tester interacts with work items by writing and tracking bugs and issues for the project. You have seen examples of these tasks. What we want to discuss here is how a tester might associate a test to work items. As a simple example, let's look at the requirement work item. Each requirement in the system should be verified by someone representing the user. This is referred to as a user acceptance test (UAT). The Details tab of the Requirement work item has a space to track the UAT status. Figure 20.32 shows an example. In this way, the team knows which requirements have made it all the way through UAT (and are thus ready to ship). Figure 20.32. Setting the UAT results for a requirement.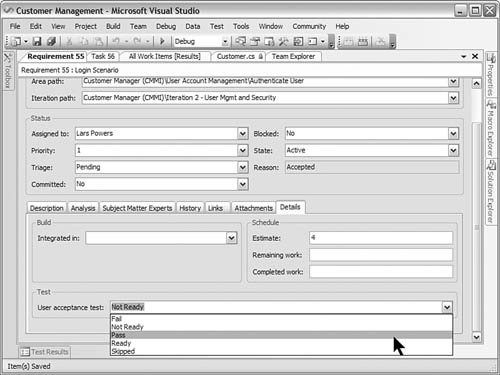 Testers may also be asked to indicate what test satisfies a given requirement or task. For example, suppose you, as the tester, have a development task to create the Customer class. This work item might indicate on the Details tab that a test is required before the item can be resolved. In this case, the item's test details must be filled out. You add test details to a task work item in the Test group on the Details tab. Unfortunately, there is no way to associate tests and work items from within the IDE. Instead, this is currently a manual process. The test information you need to enter includes the name of the test, its ID, and a path to the test. This information is available from the Test Manager screen. Figure 20.33 shows a horizontal split between the Test Manager and the details of a given work item. Figure 20.33. Filling in the Test Details for a Task.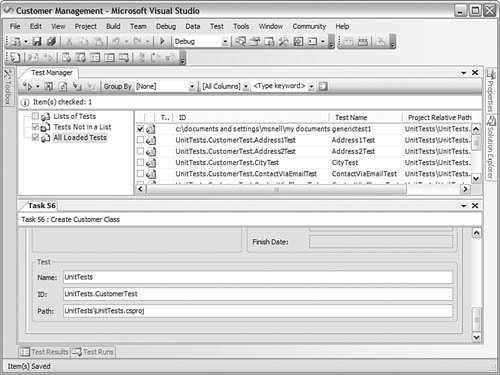 |
EAN: 2147483647
Pages: 195