Using Team Explorer to Manage Work Items
| If you install one of the Team editions of Visual Studio, you have the right license to connect to Team Foundation Server. However, you may not have the tools. You need to install the Team Explorer client tools. You can find this install on the Team Foundation Server media. These tools are the principal means for interacting with work items using Visual Studio. The following sections cover the basic functionality of these tools. Following this discussion, we will illustrate how various project roles work using these same tools. Creating a New Work ItemYou can create a new work item through Team Explorer or the Team menu. When you do so, you must choose the work item type. Again, the types available for your project are dependent on methodology and customizations that might have been made. Figure 20.12 shows how to create a new task work item using the Team menu. Figure 20.12. Creating a new work item. When you select the work item type, you are presented with a screen to define the work item. From here, you can define the work item's title, assign the work item, enter a description, add attachments, and so on. Figure 20.13 shows the definition of a new task work item. Notice the task work item's Discipline field. Here, you can indicate if this is a development task, business analysis, test, and so on. Figure 20.13. New work item dialog box.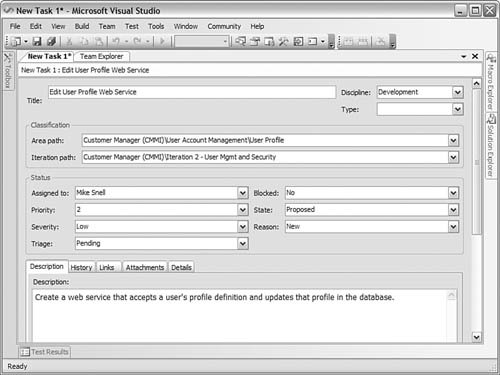 Note the Details tab on the work item. It contains some key functionality that we have not yet discussed. Most of these features apply to all work items. Features include scheduling the task, identifying its related build, indicating it requires review, and associating it to a test. Figure 20.14 shows the Details tab. Figure 20.14. Work item details.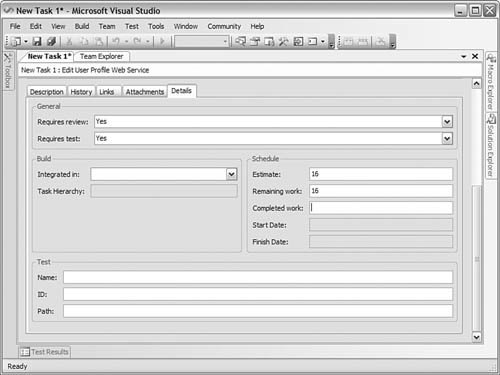 A work item task is scheduled through estimation. You indicate the number of hours estimated and the number of hours completed; then you estimate the number of hours remaining. This information is used by Project and other applications to show scheduling. The start and finish dates are entered as tasks are started and finished. Finding and Filtering Work ItemsYou often need to find the work item or work item set with which you want to work. For doing so, Team Explorer provides a query engine. Each query is run against the work item database and returns a subset of information. In this way, you can quickly zero in on your next task. A number of default queries ship out of the box (dependent on chosen methodology). You can find them under the folder heading Team Queries. Figure 20.15 illustrates a set of queries for an MSF for CMMI project. Figure 20.15. Work item team queries.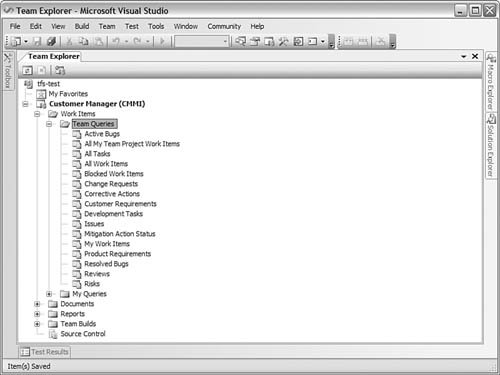 Team queries are shared across project team members. That is, each team member sees the list of team queries. If you have proper credentials, you can define a new team query. In this way, you can write queries of which everyone can take advantage. You also have a folder to store your personnel set of queries. This folder is aptly named My Queries. It is useful for storing queries that are pertinent to you. For instance, you may create queries that are associated with your user ID, or you might simply write a few queries that are specific to your job function. Running a Query and Viewing ResultsTo run a query, you select it in the Team Explorer tree and choose Run Query from the Team menu (or press F5). You can also right-click the query and choose View Results or Open. There is also a toolbar for work item queries. You can run a query from here by clicking the Run Query button. The results of your query are displayed in a list that includes the work item's ID, its type, state, and title. As you scroll through items in this list, the selected work item's details are displayed at the bottom of the screen. You have full interaction with a work item from this screen. Figure 20.16 shows a sample result set. Figure 20.16. View query results.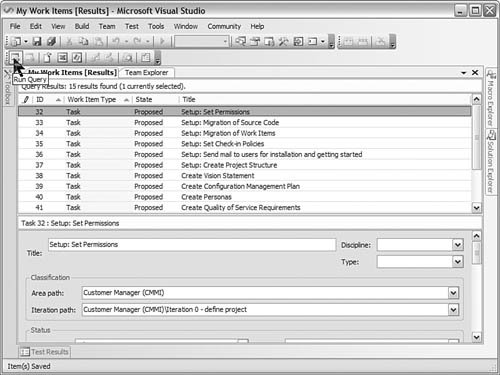 You can customize the list that is returned as a result of the query. To do so, you click the Column Options toolbar item (far right) or select this option from the context menu to bring up the Column Options dialog box. With it, you can determine which fields you want in the list and each field's width using the Fields tab. You can even define a multicolumn sort from here by using the Sorting tab. Figure 20.17 shows this dialog box. Figure 20.17. Customizing query results.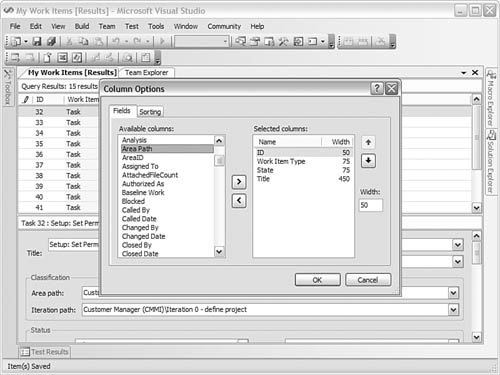 Tip The changes you make in the Column Options dialog box can be saved back to the query definition. Creating a Custom QueryYou can create custom queries for Team Explorer. These queries can be created for the entire team (Team Queries) or just yourself (My Queries). To create a custom query, you select the Add Query menu option from either the Team menu or from the context menu for the given folder under which you want to store the new query. Selecting this option brings up the query view. From here, you define filter clauses that allow you to narrow your query to just those items for which you are searching. Each clause in your query defines a field, an operator, and a value (think WHERE clause in SQL). In addition, you can relate clauses to one another using AND and OR conditions. Let's look at an example Suppose that you have been identified to triage all bugs that are proposed. This makes you the central person for determining who should work on a bug, whether the bug requires more research, whether the bug is actually a bug, and so on. To do this work, you might want to define a query in your My Queries that allows you to view all proposed bugs. When setting the filter for this query, you define two clauses. The first is for the Work Item Type field. You are interested only in bugs, so you set the operator to = and the Value field to Bug. This will return all work items whose type is a bug. You then add another clause to your filter for the state of the bug. You need to see only bugs that are in the state of Proposed. This clause is inclusive, so you set the And/Or field to And. Figure 20.18 shows this filter example using the tool. Figure 20.18. Defining a new query.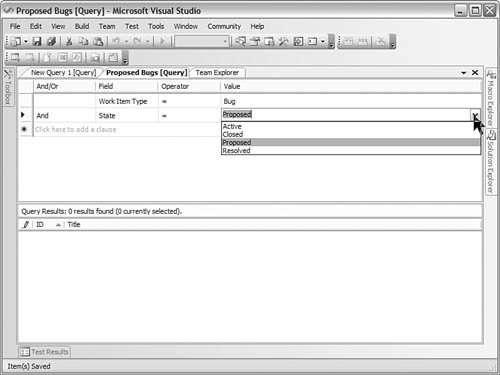 Next, to select the fields that are shown as a result of your query, you use the Column Options dialog box, which also allows you to indicate a sort order. This is the same dialog box we discussed previously (refer to Figure 20.17). You can then run your query and test the results. When you're happy, you can name it and save it for future use. Note You edit queries using the save interface. To open a query for edit, select the View Query option from the context menu for the given query. |
EAN: 2147483647
Pages: 195
- Integration Strategies and Tactics for Information Technology Governance
- Assessing Business-IT Alignment Maturity
- Linking the IT Balanced Scorecard to the Business Objectives at a Major Canadian Financial Group
- Technical Issues Related to IT Governance Tactics: Product Metrics, Measurements and Process Control
- Governance Structures for IT in the Health Care Industry