Understanding Work Items
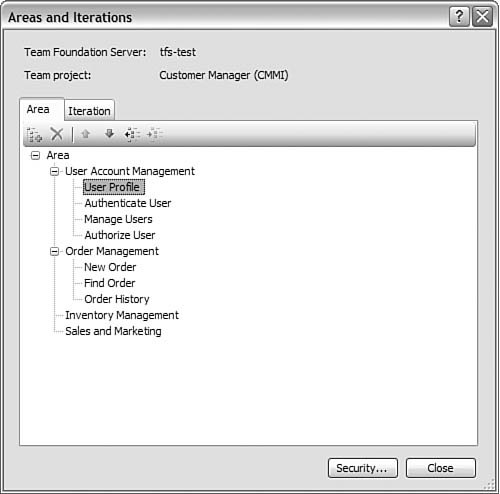
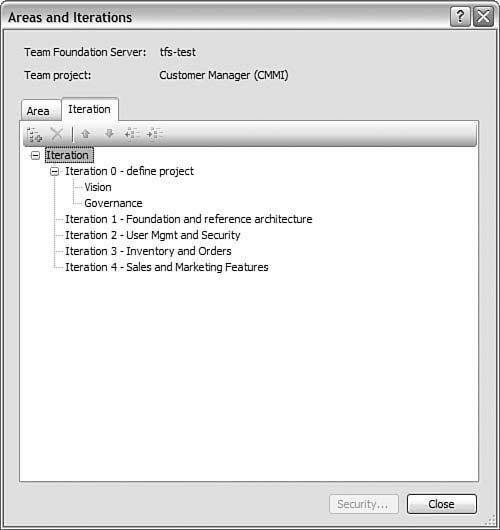
| A work item in Visual Studio Team System is just what it sounds like: a definition of work for a development project. A work item is responsible for recording that work, allowing the work to be assigned, tracked, related to other work, and reported on. Like a project task, a work item may have a title and description of the work to be done, a current owner, a history, related information, an associated life cycle, and a current state. The difference, however, is that unlike a simple project task, all the work item information is maintained in a central server and is at once accessible to all team members as work happens. It is for this reason that work items are the fundamental driver behind the power of communication and collaboration in Team System. Understanding the Role of Work Items and the SDLCThe actual work items themselves can be defined to represent the wide variety of work that is executed on any given project. Work items can be created for project requirements, tasks, change requests, code reviews, bugs, and so on. Work items provide enough customization to cover the entire SDLC and its associated roles. They can be created by, assigned to, and worked on by developers, architects, business analysts, testers, and project managers. For these reasons, work items are the core nugget for driving a software project. All work can be done through and tracked by a work item. Picking the Work Item Set for Your ProjectMost projects that leverage Team Systems will use a set of predefined work items. Each work item set covers the SDLC for a given development methodology. You can create custom work items and even custom methodologies for Team Systems (more on these later). However, the most common scenario is to define a project based on one of the methodologies that ship with Team Systems: MSF for Agile Software Development and MSF for CMMI Process Improvement (both discussed in Chapter 17). Team system generates a set of work item definitions for your project when you choose the methodology you want to employ on your new project. The actual work items associated with a methodology are based on the driving principles behind the given methodology. These work items define the fields, states, and transitions of the work that will be done on the project. In addition, they generate the metrics for reports that let team members know the state of the project at any given time. Let's explore these core work items across both methodologies that ship with TFS. MSF for Agile Work ItemsThe MSF Agile methodology is driven by scenarios and the tasks that are derived from them. It also defines various service-level requirements for performance and security, for example. It is meant to get the team working together with customers on a common vision while staying flexible with respect to change. For these reasons, the MSF Agile methodology defines the following work items: scenario, quality of service requirement, task, bug, and risk. Let's look at each of these items in more depth. Scenario Work ItemA scenario defines a user's interaction with the system to complete a specific goal or task. If you have ever created or worked with use cases, then scenarios will seem very familiar. Typically, a scenario will define a common, successful path to achieve a user's goal. In addition, it may relate to alternate scenarios that define alternative (sometimes unsuccessful) paths through the system. MSF process guidance suggests that the team initially brainstorm the list of possible scenarios for the system. Of course, these scenarios should relate to the overall vision of the project. Each scenario is then assigned to a business analyst (or customer/subject matter expert) to define and describe. Ultimately, the scenarios will be broken down into tasks that the team members can complete to realize the given scenario (and thus the project's vision). Some of the key fields defined for a scenario include its description, history, rank, integration build, and rough order of magnitude. The description field provides a high-level overview of the given scenario. However, MSF Agile recommends the actual scenario be created as a Word document (a template is provided for this inside the project portal). The history field tracks the scenario as changes are made. Rank is used to indicate priority relative to other scenarios in the system. Integration build indicates the actual build where the scenario is implemented. Finally, the rough order of magnitude is used to indicate the relative complexity of the scenario. Quality of Service (QoS) Requirement Work ItemA QoS requirement defines how a given system should operate after it is complete. These work items come in the form of load, performance, platform, stress, security requirements, and the ubiquitous "other" category. Their purpose is to get the team on the same page with respect to what is expected overall for the system. For instance, a QoS requirement might define that all user interaction in the user interface can be performed in less than a second. This requirement may dictate that the team creates a SmartClient application rather than a browser-based client. The fields used to define a QoS requirement are nearly identical to that of a scenario. The MSF Agile process guidance suggests that the QoS requirement is fully defined inside the work item (there is no need to create a separate document like a scenario). Task Work ItemA task work item is just what it sounds like as well: a project task that signals a team member to execute some work on the project. Like other work items, tasks are assigned to team members. However, task items are typically the work items that make the project schedule. For example, there may be a task to create a new scenario. This task might be assigned to a business analyst on the team. When you define a task, you select the discipline to which the task belongs. Disciplines are similar to the roles on the project; they include architecture, development, project management, release management, requirements, and testing. These disciplines help to imply meaning behind the state (closed), which describes the current progress of a task (more on this in a moment). Bug Work ItemA bug work item is used to report a problem with the system. These work items allow for defect management and tracking in Team Systems. A few key fields related to a bug include priority, found in build, resolved in build, test name, test path, and triage. Priority indicates whether the bug is a show-stopper or something minor. The build fields allow you to indicate which version of the code the bug was originally found in and where it was fixed. The test fields allow you to indicate which actual tests were used to produce the bug. This information can help a developer reproduce the bug. Finally, the triage field is used to indicate whether the bug has been approved to work on or requires further investigation. Risk Work ItemA risk work item allows the team to proactively track and manage project risk. Risks to a project represent anything that might have a negative impact on the project in terms of quality, cost, schedule, and so on. You define a risk by indicating its description (and related fields). Some additional key fields include severity and rank. Severity indicates the likelihood of the risk to occur along with the impact of that risk. Severity is defined as critical, high, medium, or low. MSF for CMMI Work ItemsThe MSF for CMMI methodology is not unlike that of MSF Agile. In fact, they share some of the same core principles and ideas around quality, customers, and adaptation to change. The CMMI methodology, however, allows development teams to be assessed by a third party in terms of their commitment to process and continuous improvement. It is not meant to be a larger or more complex process. It, too, should be lightweight and right-sized to the project. The work items that drive MSF for CMMI are also similar to those found in the MSF for Agile method. For example, MSF for CMMI also drives a project through requirements and tasks. The full set of work items for MSF for CMMI includes requirement, task, change request, risk, review, bug, and issue. Let's examine each of these items in turn. Requirement Work ItemWe've discussed how MSF for Agile defines two work items for defining requirements (scenario and QoS). MSF for CMMI, on the other hand, defines a single requirement work item. When you create a new requirement work item under MSF for CMMI, you define the requirement's type. You can then delineate between a scenario or QoS requirement. In fact, the requirement work item for CMMI has seven types by default: functional, interface, operational, quality of service, safety, scenario, and security. Some additional fields of note for the requirement work item include subject matter experts, impact assessment, and user acceptance test. The subject matter experts section allows you to choose up to three people who can provide additional expert-level information with respect to the given requirement. The impact assessment allows you to indicate the overall impact of the given requirement if it is not realized or implemented. Finally, the user acceptance test (UAT) field allows you to track whether the requirement is ready for UAT or has passed/failed UAT. Task Work ItemThe task work item is meant to trigger a team member to execute work and to track that work. For example, an architect may break down a scenario into a number of developer implementation tasks. These tasks are assigned and tracked by the project manager. Tasks can be assigned to all roles on the project. Change Request Work ItemThe change request work item allows you to track and manage the inevitable on all software projects: change. Some projects might simply roll with the changes. Other, more formal projects will require documentation of the change and an assessment of its impact. This change will then be presented to a change control board for a decision. When the decision is made to accept the change, a new set of task work items will result, altering the baseline schedule and costs. Typically, a business analyst (or similar) creates the change request work items and obtains impact and analysis relative to the request. This information is stored in a few key areas on the work item: description, justification, and analysis. The description field is used to describe the request. Justification tells readers why the request is being logged and the value it brings to the overall project. The analysis section of the work item lets you address the impact of the request across five key project elements: architecture, user experience, test, development, and technical documentation. Risk Work ItemThe risk work item allows team members to log items that have a potential to impact the project in a negative way. The MSF for CMMI risk work item allows users to enter a mitigation plan along with events that might trigger that plan. In addition, users document a contingency plan that describes what to do in the event the risk actually presents itself on the project. Review Work ItemThe review work item allows you to document the outcome of a given code or document review. A best practice on most development projects is to do a review of scenarios, requirements, design, and code. These reviews may be offline or done as a meeting. In addition, these reviews may be iterative in that they continue to occur until the item passes the review. All of this can be tracked by the review work item. The review work item has a type field to indicate whether the review was a meeting or done offline. In addition, there are fields to indicate who did the review (or attended the meeting). These fields allow for up to eight iterations through a given review. The results of the review are tracked via the minutes field. This is where a reviewer might document requested action items relative to the review. Bug Work ItemA bug work item allows team members to indicate perceived problems with the system. These bugs are documented, triaged, prioritized, and categorized by severity. Issue Work ItemThe issue work item allows team members to log issues that are blocking progress on the project. These are not risks. Rather, issues are real things that require actions (not potential risks). After an issue is identified, a set of tasks should be created to resolve the issue. The issue work item allows for the definition of priority, impact to project, escalation, and corrective action. Priority indicates the order in which issues should be dealt with. The impact of the issue is defined in terms of critical, medium, high, or low. The escalate field indicates whether the issue should be escalated because it is blocking the project in some manner. Finally, corrective action allows you to define the agreed-to plan for solving the issue. Identifying Work Item CommonalitiesYou should now have a basic understanding of the many work items defined by both MSF methodologies. Again, you choose a single methodology for your project and inherit the work item set associated with your choice. By examining all work items across both methodologies, you've seen that there are many similarities between the two. In fact, work items in general have a lot in common with one another. Work item commonalities are not an accident. The term work item itself is a generic abstraction, the concrete implementation of which are the various work items we've been discussing (bug, task, risk, and so on). Work items are created and managed by a work item framework. Therefore, when you understand how a work item works in that framework, you will essentially understand how they all work. The following sections define and discuss those commonalities. Note For the remainder of this chapter, we will discuss and present sample work items from the MSF for CMMI methodology. Everything we discuss is still applicable to MSF for Agile. However, focusing on a single methodology will simplify discussion. In addition, you should find it easy to move from the MSF for CMMI to MSF for Agile if required. Work Item Areas and IterationsWork item areas and iterations allow you to categorize and group work and define when that work will be executed. This information is defined for your entire project (typically by the project manager). Areas and iterations are typically project-specific and are therefore not predefined by the methodology. Each work item is then classified in terms of its area and iteration. Although we covered the basics of areas and iterations in Chapter 18, "Managing and Working with Team Projects," let's dig deeper and see how they directly relate to work items and project management. You define areas and iterations through the Areas and Iterations dialog box, which you can access from Team Explorer. To open it, you right-click the team project you want to define and then choose Team Project Settings, Areas and Iterations. Figure 20.1 provides an example of accessing this dialog box. Figure 20.1. Accessing the Areas and Iterations dialog box.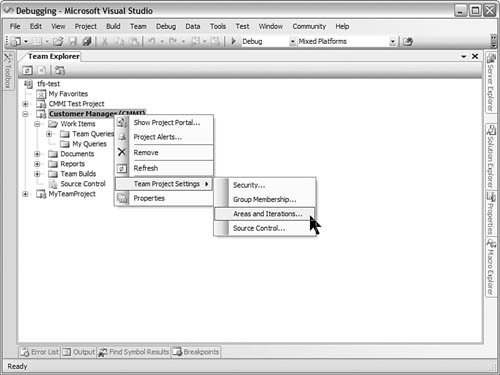 AreasAn area represents a category used to group work. Many times this is referred to as a module or feature set. For example, a project may break down work by defining a user account profile module, an order entry module, an order history module, or an inventory module. These modules or areas are used to group tasks and other work items in the system. This capability is useful for reporting and tracking. Areas can also be defined in a hierarchical structure. This allows for the definition of subareas and the like. You create areas using Visual Studio Team Explorer and the Areas and Iterations dialog box. You've already seen how to access this dialog box. Figure 20.2 shows the dialog box along with a definition of a few areas (modules) for a sample project. Figure 20.2. Defining the areas for a project. Notice that you can define areas in a hierarchy. This allows for the creation of areas and subareas (modules and submodules). The toolbar in this dialog box allows you to position each item in the correct order and hierarchy. Notice the Security button at the bottom of the dialog box. It allows you to configure the security associated with this area. For example, you can indicate who on the team is allowed to create, edit, and view work items associated with a given area. Clicking the Security button brings up the User Profile Node Security dialog box. It is important to note that this dialog box is specific to the actual node (area) you have selected. For example, if you select the User Profile node and click this button, you will be defining security for the area, User Profile. Figure 20.3 shows this dialog box and the permissions that can be set. Figure 20.3. The User Profile Node Security dialog box. IterationsAn iteration represents a time period on the project in which you will execute some portion of the work. The intent of an iteration is to time-box some set of work items that will be delivered in a specific window of time. You may define 30-day sprints, for example. In addition, iterations may overlap one another for various reasons. Typically, this is the result of a hand-off between team members or groups on the project. For example, suppose you define four iterations for your project. Each iteration may be defined as a 30-day time-box. You would go through the full life cycle of development for a subset of functionality during each of these iterations. You might define two to four areas or modules to be developed during each iteration. Suppose you start the first iteration by doing architecture and design for the first two modules. After those modules are designed, the iteration might continue with the designers passing the specification off to the development team. The designers might then begin working on the next iteration. When the first iteration is developed and unit-tested, it might be passed to a quality assurance team. At this time, the developers might begin working on coding the design for the second iteration. This process would continue through the iterations. Notice how each iteration overlaps the others. Clearly, this process requires a mature team and toolset to work smoothly. In addition, there can be many variations on these cycles. Team Systems allows you to define the iterations for your project and then classify work items in terms of their iteration. Figure 20.4 shows the Iteration tab on the Areas and Iterations dialog box. Figure 20.4. Defining the iterations for a project. Notice that you can define subiterations under a given iteration. This capability can be helpful for certain reporting purposes. However, we've discovered that most teams find it sufficient to have four to six top-level iterations for the project. Each might be time-boxed into eight-week increments: two weeks for design, four weeks for development, and two more weeks for integration and user acceptance testing. Tip If you modify areas or iterations, you will have to execute a refresh in Team Explorer before these changes are reflected in the work item definitions. Work Item States and TransitionsWork items are tracked through the State and Reason fields. Together, these fields define the state in which a work item exists at any given time, the state to which it can transition (move), and the reason the work item might move from one state to another. This seemingly simple process is used to track all work items in Team Systems. Let's look at an example of how this works. For this example, we will look at the states of a bug work item. Figure 20.5 shows the state diagram for a bug (from the process guidance). Figure 20.5. The Bug States and Transitions diagram from the MSF for CMMI process guidance. The boxes on the state diagram indicate the states in which a bug can exist. The arrows represent the transitions between the states. An arrow from one state to another indicates a possible transition. The verbiage associated with the transition represents the reason behind the transition. As an example, suppose you have a bug in the Active state. This bug could be transitioned back to the Proposed state or on to Resolved or Closed. Moving the bug back to Proposed would be valid only when the bug was moved to Active for the purpose of doing more investigation. When that investigation is complete, it would move back to Proposed so that it could be triaged. If the bug is moved to Resolved, it was either fixed or determined not to be a bug (as designed). If the bug is moved to Closed from Active, the possible reasons include that it was deferred, was a duplicate item, was not really a bug, or cannot be reproduced. All work items in Team Systems work in this manner. Again, the work item State and Reason fields make this workflow easy to manage. In fact, the work item editor inside Team Explorer enforces these transitions and reasons. It will allow a work item to move only to a valid state and the transition reasons are also enforced. Figure 20.6 demonstrates this through a bug work item moving from the Active state to Closed. Figure 20.6. Moving a bug from Active to Closed. Tracking Work Item HistoryAs a work item is changed, Team System automatically logs the history of that change. You can review an item's history through the History tab on the given work item. Each change is stored in an entry. The entries are categorized by date and time of change, along with the name of the person who executed the change. Figure 20.7 shows a bug work item's history. Figure 20.7. Tracking history for a work item.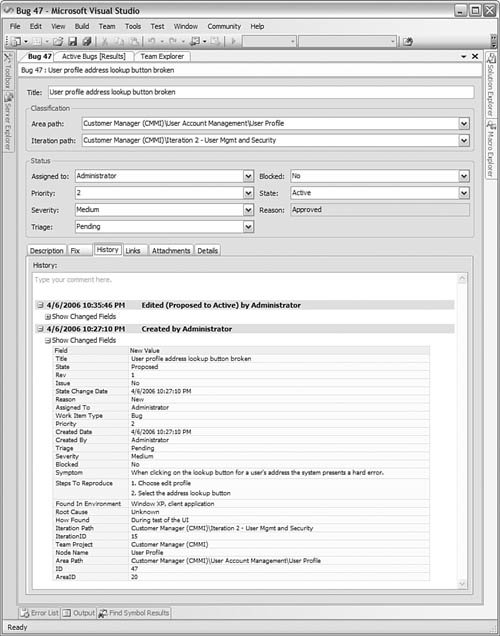 Notice that in Figure 20.7 you can determine what fields changed between work item history records. In addition, users can enter their comments in this tab (Type your comment here). These comments are embedded in the work item history. This allows for a recorded discussion relative to the given work item. Figure 20.8 shows another history record for the same item. This record was the result of moving the bug from Active to Resolved. Note the comment in the history record. Also notice that only the fields that are changed are tracked in the history. Figure 20.8. User comments stored as history.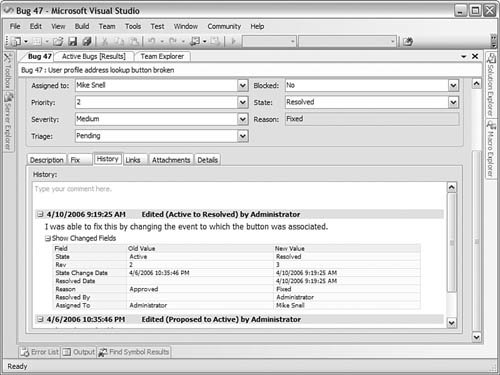 Linking Work ItemsOften you will need to link work items together. Linking these items helps provide a better understanding of the system and the work that is being created. It keeps people on the same page and facilitates better reporting. As an example, suppose you write a user scenario. It would be good to know which requirements were created as a result of the scenario. You might also like to know which tasks were generated from each requirement. If you take this example even further, you might want to link issues and change requests to tasks and/or requirements. Ultimately, you can then use metrics to determine the success of a given requirement or scenario. A scenario that resulted in no change requests and fewer issues means that the scenario was well written, understood, and agreed to by the team. Whereas a scenario that ended up spawning many issues and change requests could mean the scenario was either not understood, agreed to, or poorly written. As another example, if you have a task that is blocked because of an issue or risk, you might want to link that task to the work items that were created to unblock the task. You define a work item link using the Links tab for the given work item. This tab presents the various links already established for the work item. You can view, edit, and delete an existing link. You can also establish a new link from here. Figure 20.9 shows the Add Link dialog box. Figure 20.9. Adding a link to a work item.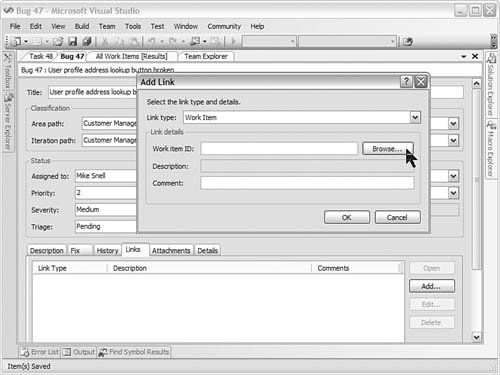 Notice that when adding a link to a work item, you are asked to browse to that work item. Clicking the Browse button will bring up the Choose Related Work Item dialog box, which is shown in Figure 20.10. From here, you can search the work item database and find those items you want to link. In the example used for these dialog boxes, a bug is being linked to a related development task. Figure 20.10. Finding the work item to link.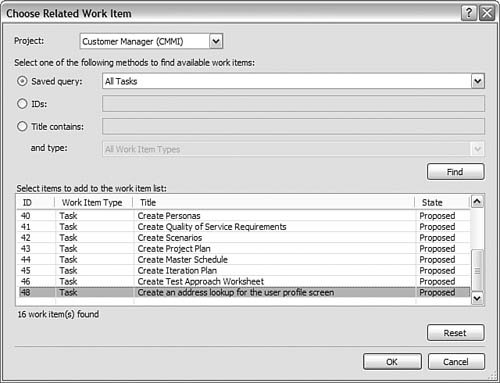 After you've selected the link and clicked OK, you are returned to the Add Link dialog box (see Figure 20.11). The work item ID and description are populated for you. You can add a comment to the link and then click OK to establish your link. Figure 20.11. Adding a work item link. Not all links are between two work items. You can establish a link from a work item to other things, too. This includes linking a work item to a web page (hyperlink), a changeset, a versioned item, or a test result. You use a similar set of dialog boxes for each of these additional items. Attaching FilesYou can also attach files directly to work items. This capability is useful if, for example, you want to attach a screenshot to a bug or perhaps a portion of a design document to a task. The interface for attaching files is similar to that of establishing links. An Attachments tab lists all attachments. From here, you can add, delete, view, and update file attachments to work items. |


EAN: 2147483647
Pages: 195