Getting Started with Team Foundation Source Control
| You will use two primary tools within Visual Studio to perform both basic and advanced source control tasks: Solution Explorer (a tool that we have discussed in many of the chapters in this book) and the Source Control Explorer tool. Solution Explorer can be used to directly manage solution and project items under source control. Source Control Explorer provides many of the same functions and also allows you to browse the Team Foundation Source Control items that are stored in the TFS data tier. Before you can use either of these tools, however, or use any of the Visual Studio source controlspecific features, you have to ensure that Visual Studio is configured for use with Team Foundation Server. Configuring Visual StudioVisual Studio source control settings are configured from the Options dialog box. Select Tools, then Options, and then navigate to the Source Control page. From there, you use the drop-down to select the source control system that you want to use; Visual Studio Team Foundation Server is one option in this list (see Figure 19.2) and, in this case, is the option to select. Figure 19.2. Selecting the source control system in Visual Studio.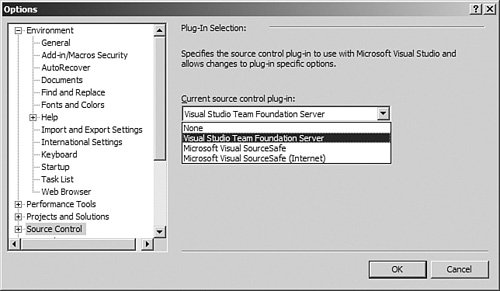 With TFS selected as the source control provider, you automatically can use VS as a source control client whenever you connect to a Team Foundation Server. From within Visual Studio, you can
We'll cover all these actions and more a bit later in this chapter. For now, it's time to get comfortable with the Source Control Explorer user interface. Using the Source Control Explorer WindowFigure 19.3 shows the Source Control Explorer (SCE) window open in Visual Studio. You can see that the SCE is hosted as a document window (as opposed to a tool window), that it has several different panes in which source control information is visible, and that these panes are arranged so that the window looks similar to the Windows File Explorer window. Figure 19.3. The Source Control Explorer window.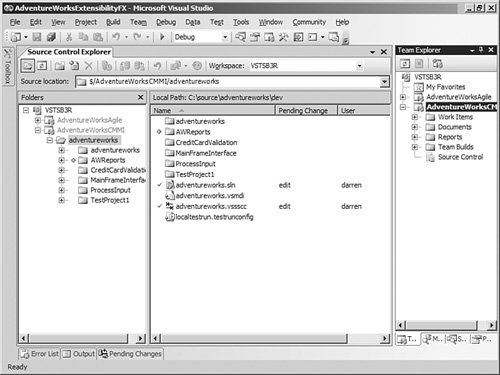 The ToolbarThe toolbar on the SCE window provides easy access to common activities; moving left to right, these buttons allow you to
The toolbar also has two drop-downs that you can use to change the workspace that you are working in (more on workspaces in a bit) or change your location within the source control tree. The Folders PaneThe folders pane contains a hierarchical view of the server source control "folders" in the selected workspace. If you are familiar with Visual Source Safe terminology, a workspace is analogous to a working folder; it is a local working area on your hard drive that is mapped to a specific source control project on the server. When you retrieve files from the server, they are placed in the local folder that you have associated with the workspace. Because workspaces map onto your local file system, and because projects are naturally organized in a hierarchical fashion in terms of the artifacts they generate, it is natural that the view you use to look into a workspace is a folder/file view even though the files are actually stored in a set of tables in a SQL Server database. The Files PaneEach time you select a folder in the folders pane, the files pane will refresh to show you any files (or subfolders) that exist in that workspace/folder. Notice that the files pane uses specific icon overlays to indicate the status of a particular file. For instance, a red checkmark is used to indicate a file that you have already checked out, whereas a yellow plus indicates a file or folder that is waiting to be added to the source repository on the server. These same icons are used by the Solution Explorer window. So that you can readily identify a given file's status, the overlay graphics for the more common statuses have been reproduced for you in Table 19.2. For the complete list, consult the MSDN documentation (search for "Identify Source Control Item Status in Source Control Explorer").
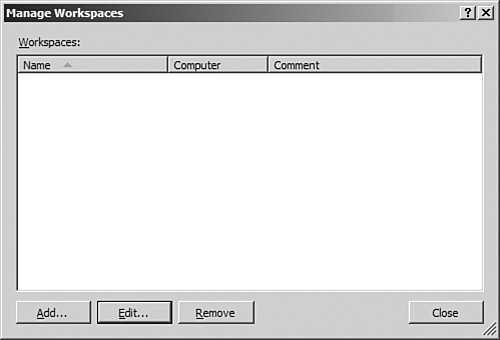
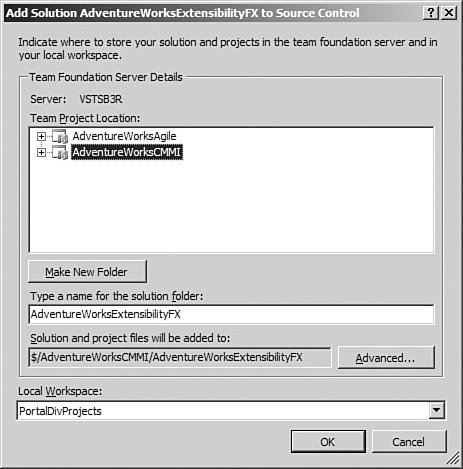
Managing WorkspacesAs we have mentioned, workspaces are areas in your local file system. Any local copies of files under source control are stored in a workspace. Local copies of files are created the first time you connect to a source repository. From then on, your local files become your working set; whenever you modify one of the local files, the changes that you have made are marked as pending within the workspace, and not committed to the TFSC server until you explicitly elect to do so during a check-in. Put another way, a workspace is like a sandbox. You can do anything you want to the files in your workspace without worrying about affecting other team members or damaging the viability of the project. Note Workspaces can be owned by only one user on the local machine. This means that if there are multiple user accounts on one machine, and each of those accounts participates in a TFS Team Project, each would have its own workspaces. Creating a WorkspaceBesides having Visual Studio configured for source control, the other requisite step for interacting with the source control server is to create a workspace on your computer. Without one, you won't be able to retrieve any files from the source repository, and therefore you won't be able to view those files or make changes to themwhich is the whole point of being a team member in the first place. To create a new workspace, select File, Source Control, Workspaces. This will start the Manage Workspaces dialog box (see Figure 19.4). Figure 19.4. Managing workspaces. From here, click on the Add button to open the Add Workspace dialog box (see Figure 19.5). In this dialog box, you provide the required information about the workspace and map the server-side source to a client-side folder. Figure 19.5. Creating a workspace. After giving the workspace a name and indicating the owner and local machine name for it, you need to map a local folder to the source tree on the server. In the Working Folders table at the bottom of the dialog box, click in the Source Control Folder column on the line "Click here to enter a new working folder." This will create a new line in the table; you will now need to click on the ellipses button in the Source Control Folder column and select the source control project folder from the server that you want to mirror within your workspace (see Figure 19.6). Figure 19.6. Selecting the server source project. Note Don't get confused about the concept of project folders on the source control server. Although source control is implemented with a relational database, and not the file system, you still interact with the TFSC's repository as if it were a hierarchical folder-like store of the various projects and items stored in the source control system. The last step is to select a folder from your file system that will function as the root level for your new workspace. Click in the Local Folder column, click on the ellipses button, and then select the local folder to link to the server source repository (see Figure 19.7). Clicking OK will bring you back to the Add Workspace dialog box. Figure 19.7. Selecting the local folder. Click OK on the Add Workspace dialog box to actually create the workspace. With the workspace established, you can now view the workspace using the Source Control Explorer. To open it, on the View menu, select Other Windows and then select Source Control Explorer. Every workspace will initially be empty. If a file exists on the server but not locally, its filename will be grayed out. Figure 19.8 shows the workspace immediately after creation; all the files are grayed out, indicating that these are server-only copies at this point. Figure 19.8. Server-side files in the Source Control Explorer.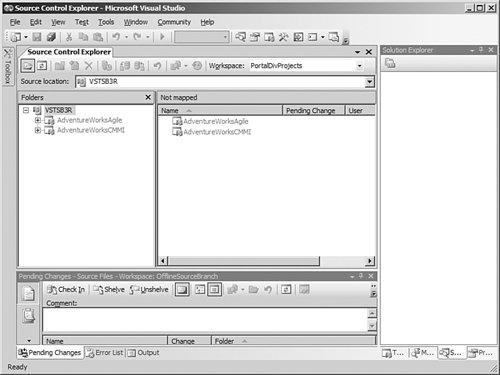 To actually populate the local workspace with the files from the Team Foundation source repository, you need to execute a Get Latest command. To do this, make sure you have the right workspace selected in the SCE's workspace drop-down (refer to Figure 19.3), select the server project folder in the folders pane, and then click on the Get Latest (Recursive) button in the SCE's toolbar (again, see Figure 19.3). Adding Files to Source ControlOf course, you might be the one tasked with initially placing the source code files under source control. Suppose, for instance, that you have an existing Visual Studio solution that you need to place under source control. The same steps apply in terms of creating a workspace, but there won't be any files on the server yetthey will all be local. The source control system won't know anything about them, even though you may have mapped your local workspace folder onto the folder containing your solution files. In this case, you need to take the local files and add them to the server. The Solution Explorer is the tool used to do this: Right-click on the solution node in the Solution Explorer window and select Add Solution to Source Control. The resulting dialog box (see Figure 19.9) allows you to select a Team Project folder in the source repository or create a new one. Visual Studio will attempt a default mapping of the solution projects into folders based on the project name. If you want to manually control this, you can click on the Advanced button and specify different folder names. Figure 19.9. Adding solution projects to source control. At this point, the files will be placed into the pending changes list as adds. This means that the next time you perform a check-in, you will have the option of completing the operation and physically adding the files to the server. After the adds have been committed, the files will be available for check-out. Using the Solution Explorer is the easiest way to add solutions and projects en masse to the source control system, but you can also use the Source Control Explorer to place files under source control. This is the preferred way to handle nonproject-related items. To add a file with the Source Control Explorer, follow these steps:
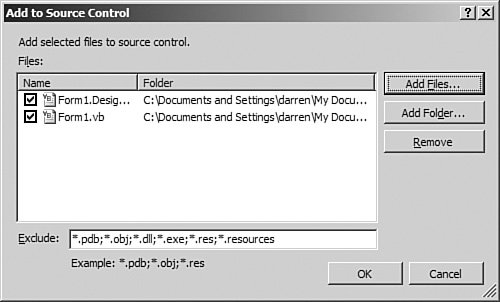
Figure 19.10 shows the Add to Source Control dialog box. Figure 19.10. Adding files using the Source Control Explorer. Again, as with the Solution Explorer, this procedure really only flags the file or files as pending adds. You must complete the operation by checking in the files. In the next section, we'll examine the check-in process and tool support from beginning to end. |


EAN: 2147483647
Pages: 195