Using the Properties and Property Attributes
| I l @ ve RuBoard |
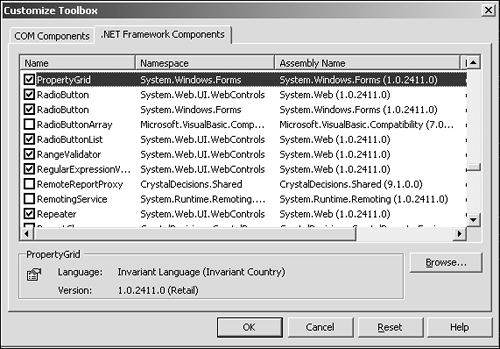
| The simple class shown in Listing 3.6.1 has properties. Listing 3.6.1 The SimpleObject Class 1: public class SimpleObject 2: { 3: private int _int; 4: private string _string; 5: private Color _color; 6: 7: public SimpleObject() 8: { 9: // 10: // TODO: Add constructor logic here 11: // 12: } 13: 14: public int TheInteger 15: { 16: get 17: { 18: return _int; 19: } 20: set 21: { 22: _int=value; 23: } 24: } 25: 26: public string TheString 27: { 28: get 29: { 30: return _string; 31: } 32: set 33: { 34: _string=value; 35: } 36: } 37: 38: public Color TheColor 39: { 40: get 41: { 42: return _color; 43: } 44: set 45: { 46: _color=value; 47: } 48: } 49: } You can see that the class has three private data members n integer, a string, and a color. These all have public accessor properties TheInteger , TheString , and TheColor . This is a good strategy from a design perspective because it isolates the encapsulated data and gives a clear and unambiguous interface. Using our object in an application is fairly simple. What follows is a walk-through sequence for Visual Studio.NET. Create a new C# Windows application project. NOTE It's interesting to note that one of the most useful components in the toolboxthe property gridisn't shown by default, you have to add it to the list manually. To update the toolbox, right-click it and select Customize Toolbox, you'll see the dialog shown in Figure 3.6.1. Figure 3.6.1. Customizing the toolbox. Under the .NET Framework Components tab, select the Property Grid and ensure that its box is checked. Returning to the application, it's time to place some controls.
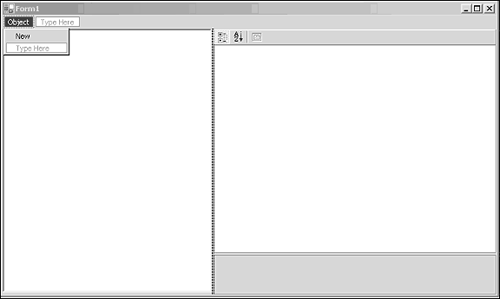
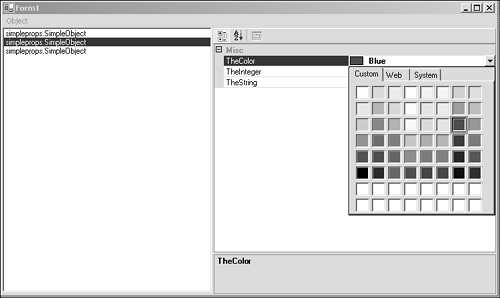
At this point, you should have a form that looks like the one seen in Figure 3.6.2. Figure 3.6.2. The newly created Object form with Listbox , Splitter , and PropertyGrid . Go to the project in the Solution Explorer. Right-click it and select Add New Item. Select C# class from the wizard menu (indicated by the following icon). Create the SimpleObject class, as shown in Listing 3.6.1. Be sure to duplicate it exactly as shown. Now, to add a handler for the Object, New menu item, double-click the menu entry in the form designer, right where it says New. You'll be taken to the place in the code where the editor has added a handler for you. Fill out the handler as shown in Listing 3.6.2 Listing 3.6.2 The New Object Menu Item Handler 1: private void menuItem2_Click(object sender, System.EventArgs e) 2: { 3: SimpleObject o=new SimpleObject(); 4: this.listBox1.Items.Add(o); 5: } Finally, create a handler for the ListBox 's SelectedIndexChanged event by selecting the ListBox in the Designer, clicking the Events icon in the Property Browser, and clicking the SelectedIndexChanged entry. Again, you'll be taken to the code where a handler entry will have been provided. Edit this handler entry so that it's the same as shown in Listing 3.6.3 Listing 3.6.3 The SelectedIndexChanged Handler 1: private void listBox1_SelectedIndexChanged(object sender, System.EventArgs e) 2: { 3: this.propertyGrid1.SelectedObject=this.listBox1.SelectedItem; 4: } Now you're ready to run the program. Press F5 and wait for compilation to complete. You can add as many SimpleObjects to the list box as you want using the menu entry. After added, selecting a menu entry in the list box will display its properties in the PropertyGrid control to the right of the form. Notice how the property grid assists you in editing the properties. The Color property is especially interesting because it allows you to select from a palette of colors, enter a known color name (for example, Red), or type in the discrete values for the red, green and blue components, such as 90,180,240. Figure 3.6.3 shows the application in action. Figure 3.6.3. The Property browser application. For such a small amount of work, this is a powerful application indeed. Enhancing the Property ExperienceIf you look carefully at the image in Figure 3.6.3, you'll see a couple of interesting things provided by the framework and the property grid. First, the feedback box at the bottom of the property grid has some text in it. This is feedback to help the user understand what they're doing. Second, the list of properties in the panel is grouped into a category called Misc. If you look at vs.NET or other Windows Forms applications, you might see other categories, such as Behavior or Appearance. You can arrange your properties into categories and make them provide feedback by using the attributes provided by the framework. The particular classes used are CategoryAttribute and the DescriptionAttribute . When used in your code, the name is shortened to Category or Description . The compiler will add the Attribute part for you. Let's revisit the original SimpleObject class again. The snippet of code that follows shows these attributes added to one of the properties. [Category("Appearance")] [Description("controls the color of your moods")] public Color TheColor { get { return _color; } set { _color=value; } } When this property is viewed in the Property Grid, it will be sorted into the Appearance category, and the description will be displayed in the feedback panel at the bottom of the Property Grid pane. The class can also have attributes that help you set up the Property Grid. The [DefaultProperty("propertyname")] attribute selects which of the properties is displayed first in the Property Grid. For example, see line 12 of Listing 3.6.4. Listing 3.6.4 Adding Attributes to SimpleObject 1: using System; 2: using System.Drawing; 3: using System.Drawing.Drawing2D; 4: using System.Windows.Forms.Design; 5: using System.ComponentModel; 6: 7: namespace simpleprops 8: { 9: /// <summary> 10: /// Summary description for SimpleObject. 11: /// </summary> 12: [DefaultProperty("TheInteger")] 13: public class SimpleObject 14: { 15: private int _int; 16: private string _string; 17: private Color _color; 18: 19: public SimpleObject() 20: { 21: // 22: // TODO: Add constructor logic here 23: // 24: } 25: 26: 27: [Category("Nothing Special")] 28: [Description("Yes guy's 'n gal's, its an integer")] 29: public int TheInteger 30: { 31: get 32: { 33: return _int; 34: } 35: set 36: { 37: _int=value; 38: } 39: } 40: 41: [Category("A peice of string")] 42: [Description("This string does absolutely nothing but tie up your time")] 43: public string TheString 44: { 45: get 46: { 47: return _string; 48: } 49: set 50: { 51: _string=value; 52: } 53: } 54: 55: [Category("Appearance")] 56: [Description("controls the color of your moods")] 57: public Color TheColor 58: { 59: get 60: { 61: return _color; 62: } 63: set 64: { 65: _color=value; 66: } 67: } 68: } 69: } Attributes can also be used to prevent the property from being seen in the browser. This is useful if you want to declare a public property for the programmer but keep it from the user. To do this, use the [Browsable(false)] attribute. Other attributes for properties are only useful if you're writing controls to be used in a design environment, such as VS.NET. The creation of such controls is not within the scope of this book. |
| I l @ ve RuBoard |
EAN: 2147483647
Pages: 204


