Taking Advantage of Advanced OWA Features
| < Day Day Up > |
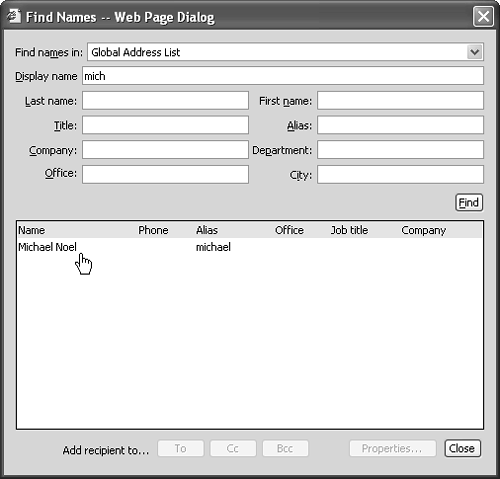
| There are many advanced features in OWA that make finding users and user information and manipulating messages easier than previous versions of OWA. Many of the features listed in this section are not available in the basic mode. To check whether the feature is available, see Table 26.1 in the beginning of this chapter. Moving Email Messages to FoldersYou have the same visual folder view in OWA available in Outlook 2003, meaning that all your folders are available in OWA that are available in Outlook 2003. To move a message, click the message once to highlight it and drag it into the folder. There will be no confirmation message that the message moved successfully. However, clicking the folder to view the contents can be used to confirm the message was moved into the folder properly. Using the Address BookThe Address Book is a search Address Book feature, which is new to OWA 2003. The Address Book is reached by clicking the open book icon in the Infobar. After clicking the icon, the Find Names dialog box appears. You can enter searches by many different criteria:
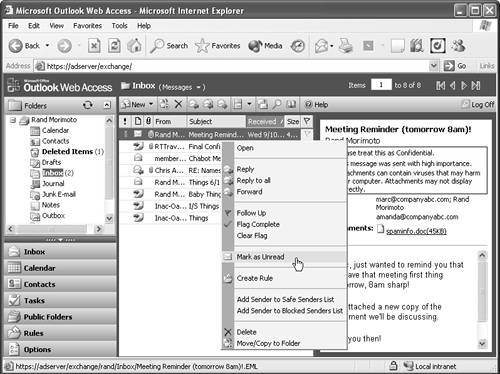
When you input information in any of the search fields and click Find, as shown in Figure 26.11, OWA searches whatever list is configured in the Find Names In box atop the dialog box and returns all the matches to the search found in the list. Figure 26.11. Finding a name in Outlook Web Access. To search a contact list or other list in the GAL, click the drop-down menu next to Find Names In and choose the list from which to search. To see the properties of a user, click the user and click the Properties button. To begin an email message to the user directly out of a user found in the Address Book, click the New Message button also at the bottom of the dialog box. When completed, click Close. Marking Messages Read/UnreadTo mark a message read/unread (bold/not bold), right-click the message once to highlight it and choose Mark as Unread, or Mark as Read, as shown in Figure 26.12. Figure 26.12. Marking a message as unread. Viewing User Property SheetsYou can view a great deal of information about user entries in the GAL by accessing the user property sheets. Limited information is also available for senders from other organizations via the same method. To view property sheets, a username must be visually apparent. This can be done by opening an email message so the sender or recipients are displayed in the window or by finding the user in the Address Book. This functionality is not available by viewing a user through the reading pane. In the Address book, click the name of the user to view and choose Properties. If the user is in an email message, double-click the username in the sender or recipients list. The Properties page opens, which lists the following information about the user:
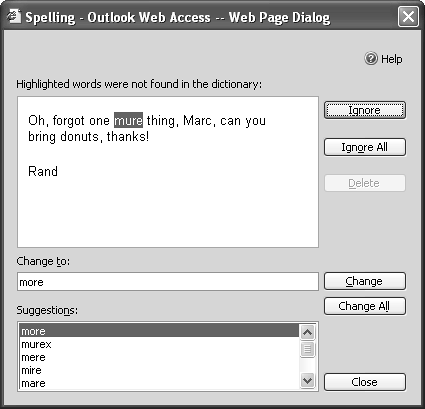
This data is pulled from Active Directory if the user is in the GAL. If the user is viewing a user object in his Contacts list, the data is pulled from the Contact list. Note that user information in the Contacts list can be modified by clicking the Add to Contacts button while the properties sheet is open. Clicking Add to Contacts opens an Untitled Contact sheet, which enables the user to add/change any additional information. Click Save and Close when completed. When the contact closes , the Properties box must be closed by clicking Close. When completed, click Close again. Using the OWA/2003 Spell CheckerOne of the most anticipated features of the new OWA 2003 is the Spell Check feature. It is very similar to the spell checker feature in all Microsoft products, and should feel very familiar to users:
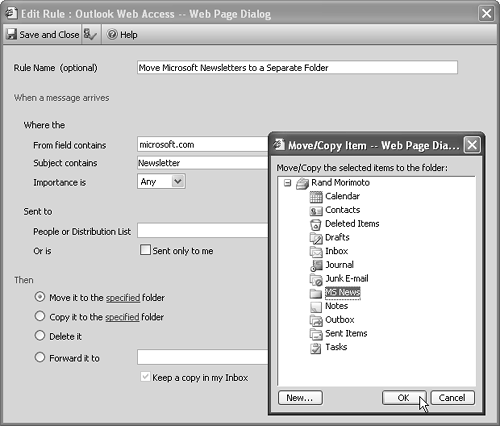
Specific configuration options are available regarding the functionality of the Spell Check feature (for example, configuring Spell Check to automatically occur before sending a message). Those options are discussed in the section "Customizing OWA Options/Spell Options," later in this chapter. Configuring Rules Using the Rules EditorOWA now enables the configuration of server-based rules to improve mail management. Whatever rules are created in OWA also appear in Outlook 2003, and vice versa. To create a rule, click the Rules button in the shortcut bar. The Rules Pane appears in the right pane. Any existing rules are listed in the Rules pane. The rules are applied from top down, in the order in which they reside in the list. Sometimes the effectiveness of the rule depends on its place in the list; therefore, move the rules up and down the list by clicking the Move Up or Move Down buttons to the right of the list of rules. Click the New button to create a new rule. The Edit Rule dialog box appears, as shown in Figure 26.14. There are many criteria available to complete a rule. Figure 26.14. Edit Rule dialog. Specifying Rule CriteriaThe first section in the Edit Rule dialog box specifies the criteria used to put a rule into effect. When you configure one of the options in the When a message arrives section, the rule parses all incoming email messages to look for the criteria. If the criteria match the rule, the actions in the Then section are put into effect. In the Where The area, specify a specific sender of the email message. If an email comes from that sender, the rule goes into effect. In the Subject Contains area, specify any specific text to search for. However, the text must match exactly or the rule won't consider it a match. The Importance setting can also be configured as a criterion. In the Sent To area, the rule searches names or lists in the recipients list. If the Sent only to me choice is selected, the rule looks for messages sent only to the user, not to a distribution list or an email sent to the user if there are other recipients in the email. The Then section is the crux of the rule. It specifies what to do with the messages that are found via the criteria listed previously:
As always, when completed, click Save and Close; the new rule is then added to the list of rules in the Rules pane. Displaying Context MenusMessage context menus are a new feature in OWA 2003. The context menus are available by right-clicking a message in the message list in the middle pane. The context list then provides the following choices:
When you move the mouse over the choice desired and click once, the action is then taken. Each of these options is discussed in this chapter. There also are folder context menu items available, which appear when the user right-clicks on a folder in the folder list. The choices presented to the user are
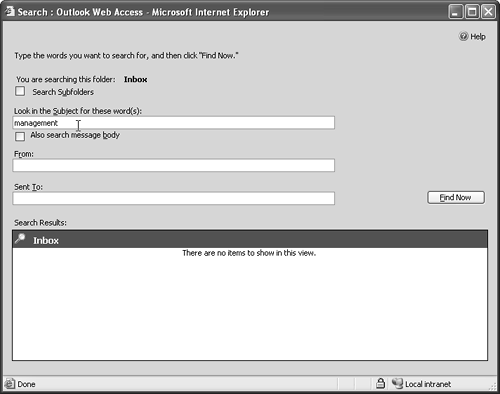
Enabling Quick Flags for Easier RemindersQuick flags are an easy way to configure reminders to follow up on emails and specify the importance of them, by using one of six flag colors. The flags can also be cleared and marked Complete. Quick flags can be configured on email messages in two methods . The first method is by accessing the context menu by right-clicking a message and choosing Follow Up. The other is to double-click the flag icon to the right of a message displayed in the middle-pane message list (under the word Received). When a flag is configured on, right-clicking the flag gives you color options. Choose what color flag to apply to the specific message by highlighting a flag on the list and clicking it. In a full mailbox, this feature can be very helpful to identify follow-up emails and emails you need to track. Additionally, when you click the flag icon at the top of the message list, the messages are arranged by flag color making finding them even easier. NOTE The colors used for flags have no assigned significance within Outlook. Each organization can choose to designate certain colors for different levels of importance or priority. The color flags merely designate similarities or differences between messages, not specific priority. When a flagged message no longer needs to be flagged, right-click the message and choose Clear Flag, which returns it to a grayed out flag, or Flag Complete, which displays it as a check mark. Performing Searches with OutlookOutlook 2003 makes it possible to save frequently used searches so the user doesn't have to re-input all the search criteria multiple times. The searches are saved in a folder in the folder list called Search Folder. However, the search folders and searches must be created in Outlook 2003 (not OWA) for users of OWA to be able to use them. To use already created searches, go to the folder list, click the Search Folder, and access the previously used searches to run them again. Search functionality is available in OWA throughout the whole mailboxin every folderthe searches just can't be saved in OWA. To search, follow these steps:
You cannot save a search in OWA. Click on the X in the upper-right corner when completed, which deletes the search. Using Keyboard Shortcuts to Save TimeA significant improvement, which makes many sophisticated typists happy, is that now many of the familiar keyboard shortcuts used in Office now work while in OWA. Table 26.2 lists the keyboard shortcuts that can now be used in the OWA client. Table 26.2. Keyboard Shortcuts Available in the OWA Client
Understanding the Deferred View UpdateTo improve the speed of OWA, the new version includes a feature called Deferred View Update. This feature specifies how many changes to the window are enabled before the full OWA window refreshes. Changes can be things such as moving, copying, or deleting a message. In OWA 2003, the refresh is deferred until 20% of the window has changed. Until that threshold has been reached, the removed or moved items disappear but no additional or new items appear. The 20% is based not on the number of messages in the inbox, but on the number of items set to display per page (which is configured in the Options area and discussed in the section "Configuring Items per Page," later in the chapter). If you don't refresh the entire screen with every change, the bandwidth and expense of OWA decreases. | ||||||||||||||||||||||||||||||||||||||||||||||||
| < Day Day Up > |
EAN: 2147483647
Pages: 393