Using OWA Mail Features
| < Day Day Up > |
| Although there are many features available in OWA, the primary reason people use it is for the ability to access their email quickly and efficiently via the Internet. The new version of OWA makes using the email functionality portion of OWA easier and more robust than it has been. The next sections cover how to create and send email messages, including new features in OWA 2003 and advanced features dealing with sending and receiving email. Creating an EmailThere are many different methods for creating a new email. The first is by clicking the drop-down arrow next to New and choosing Message. The second is available while you are in the Inbox or other mail folder in the folder list. Click the envelope icon with the word New next to it. This pulls up a New Message window, used to create email messages. Addressing an EmailThere are also many methods to addressing an OWA email message. When the message is open , the To, CC, and BCC boxes appear and are blank. The recipient names go in these areas. Primary recipients' names go into the To box. Secondary recipientsthose to whom the message is not primarily targeted go in the CC (carbon copy) box. BCC box stands for blind carbon copy, which means that the BCC recipient is invisible to all other recipients. Additionally, if you reply to all, the recipient in the BCC box will not receive the reply. To address an email, type a name (for example, Jane Doe ) or an email address (for example, jdoe@companyabc.com ) into one of the three boxes. Note that multiple names should be separated by a semicolon ( ; ). NOTE When a name is entered and before it has been checked by Exchange and verified , it appears as a single line of text and not underlined . After Exchange has checked the nameeither against the Global Address List or contact listor has confirmed that it is a legitimate formatted email address, the name becomes underlined and the box in which the name resides becomes a double-lined box. Any subsequent unchecked names go into the bottom of the box until they are checked, and then they are placed in the upper box. Alternatively, use Find Names:
The final method is to use the Address Book (see the section "Using the Address Book," later in this chapter). Removing a User from the TO, CC, or BCC Field in a MessageOWA 2003 makes it easier to remove a user from the address list in a message. To remove a user, right-click the recipient name or email address that needs to be removed and click Remove. There is no confirmation pop-up box; the name is immediately removed. Adding AttachmentsAttachments can be added to emails sent via OWA. To add an attachment, the email being composed must be open:
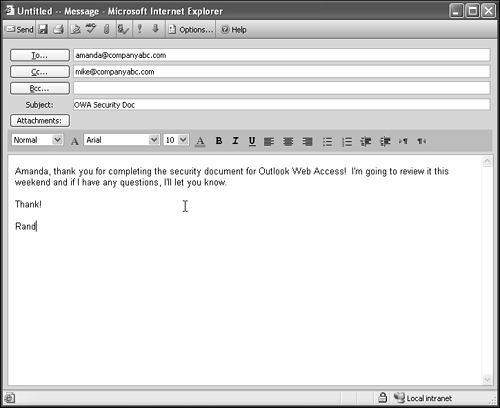
As shown in Figure 26.7, notice that all the attachments are listed below the Subject line, and the word Attachments is shown as an icon and the attachment name. Figure 26.7. Attachments in Outlook Web Access. Sending an EmailTo send the email, click the Send button with the envelope on it. At this time, if there are any issues with the names in the To, CC, or BCC boxes, OWA presents a dialog box highlighting the problem addressee. You can either Delete this recipient from the list or choose a different user from a list by clicking Change to. If neither option is helpful, click Cancel and remove the user manually, using the method listed previously for removing a user from the address list in a message. When the changes are made, click OK and the message is immediately sent. Reading an EmailWhen an inbox receives a new email message, a notification box appears in two places. A message window appears in the lower-right of the screen, and a message box appears in the Shortcut menu. Both contain the message You have new mail. To force OWA to look for new email, click the Send/Receive email button in the Infobar. To read an email, double-click the message in the message list. This opens the email message in its own window, enabling you to view the contents. Reading AttachmentsIf there is an attachment to the email, it is indicated in numerous placesin the message list, as a paper clip. In the reading pane or in an opened email, an attachment will be listed below the Subject line and below the word "Attachment." The attachment will be underlined. To read the attachment, there are three options:
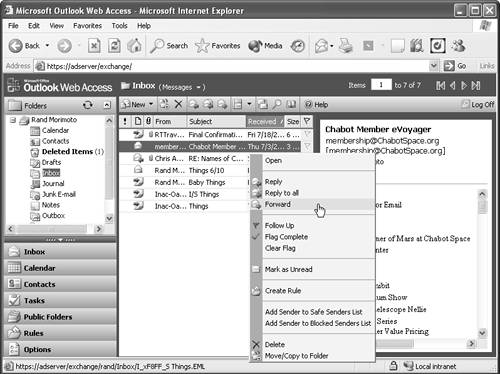
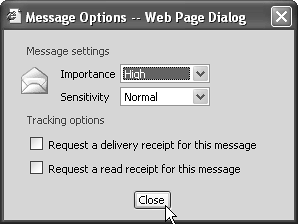
Some attachments that are at a high risk of containing viruses (such as executables) must be saved to a hard drive first, and cannot be opened directly from OWA. This is a security feature built into OWA to keep users from inadvertently opening a spamming virus that uses OWA/Outlook to send viruses to all entries in the user's Address Book. Saving the file to disk provides another level of virus protection, because generally , saving a file to a hard disk brings the machine's antivirus software into play, providing yet another assurance that the attachment isn't a virus. If the attachment is considered a high risk, OWA notifies the user that the attachment cannot be opened directly. The user then has to choose Save target as. Replying or Forwarding an EmailJust as in the full Outlook 2003 client, OWA provides many options for emails to be replied to or forwarded. There are three methods to choose to reply or forward an email. When a message is open, three buttons are available in the message dialog box toolbar. To reply to just the sender, click Reply to sender and then click OK. To reply to all the recipients in the list, click Reply to all. Note that this will not reply to any recipient in the BCC box. To forward the message to a different user not in the current recipient list, click Forward, and then enter the new recipient in the To box, using one of the addressing methods listed previously for addressing an email. When the message is properly addressed, click Send. Another option is to right-click a message in the message list and choose Reply, Reply to all, or Forward from the context menu list, as shown in Figure 26.8. Figure 26.8. Reply, Reply to all, and Forward menu options. The final method is to click a message once in the message list to highlight it and click one of the three envelope icons in the Infobar. The left button is the Reply option, the middle is the Reply to All option, and the right button is the Forward button. Deleting EmailTo delete a message while it's not open, highlight the email to be deleted and either press the Delete key or click the black X button in the toolbar. To delete more than one message at a time, hold the Ctrl key down and click with the mouse on each message to be deleted to highlight it. After all are chosen , click the X button or press Delete. To choose multiple messages in a row, hold down the Shift key and click the top message; while still holding down the Shift key, click the bottom message of the group . When all are highlighted, delete the message, using one of the two methods listed previously. To delete an email while it's open, click the black X button in the email dialog box. Configuring Message Options: Importance, Sensitivity, and Tracking OptionsCertain options are available that can be applied to the current email message being created. To access the options while the message is open, click the Options button in the toolbar of the message. The Options dialog box appears, as shown in Figure 26.9. Here, message sensitivity and tracking options for this particular message can be configured. Click Close when the options for the message are completed. Figure 26.9. Message Options box. ImportanceImportance can be configured as low, medium, or high. By default, messages are marked as Medium. Configuring a message as low importance causes a downward-pointing blue arrow to appear to the left of the message when the recipient receives it. Configuring an email message as high importance attaches a red exclamation mark (!) to the message that appears in the message list when the user receives the message. These choices don't actually speed up the delivery of the message, but provide a visual clue as to the message importance. SensitivitySetting sensitivity adds no security to the email message. A visual clue appears at the top of the message (above the To and From boxes), suggesting the extra security assigned by the sender. The sensitivity setting also appears in the reading pane when the message is highlighted and is displayed in the Infobar when highlighted. The choices for sensitivity settings are Normal, Personal, Private, and Confidential:
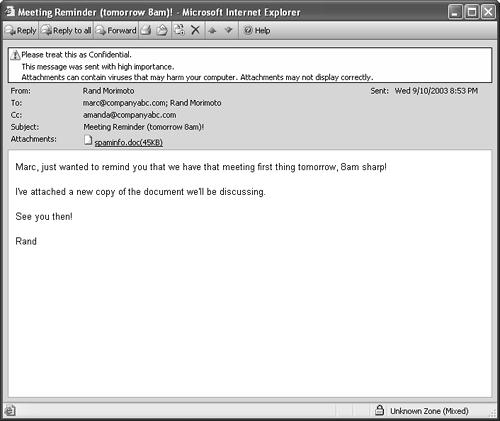
Figure 26.10 is an example of a message that was marked Confidential and received. Figure 26.10. Treat-as-confidential notice on an email message. Tracking OptionsTracking options enable you to track when the message has been delivered to a mailbox (which usually happens immediately) and request a read receipt when the recipient(s) has read the message. If you enable these options, you receive a message when each recipient receives and/or opens the message. However, the recipient has the choice of whether to send a read receipt confirmation message. If the recipient chooses not to send the receipt, you do not receive a notification. Additionally, if the recipient deletes an email configured with a read receipt without opening it, you receive a message stating that the message was deleted without being read. Changing the Look of the Text in an Email MessageThe look of the text in an email can be easily changed and formatted. The choices for manipulating text include changing the font, font size, and font color ; applying formatting, such as spacing, indentation and bullets, paragraph left/right, show paragraph markers, indent, and underline; and applying styles, such as headers and address. To manipulate the text while the create message box is open, highlight the text to be changed. Choose any of the options in the formatting toolbar below the Attachments area. There is no need to click an Apply or OK buttonthe changes are immediately made. |
| < Day Day Up > |
EAN: 2147483647
Pages: 393