| When Exchange 2003 started to ship, the Pocket PC 2003 operating system also just started to become available on the market. If an organization has the choice of the Pocket PC 2002 or the Pocket PC 2003 operating system, it should select the Pocket PC 2003 operating system and gain the following advantages: -
Exchange 2003 initiates a sync of information when information becomes available on the Exchange server, such as a new email message or calendar appointment request. NOTE The Pocket PC 2002 operation does not support the Exchange 2003 SMS initiation of a synchronization, so Pocket PC 2002 users need to either initiate the sync themselves each time they want to update their information, or schedule the update to occur on a regular basis. Dependent on the frequency of the sync and the service plan with the mobile Internet provider, this continuous synchronization of information can either wear down the battery of the unit or incur connection charges with the Internet provider.
-
The Pocket PC 2003 operating system supports the ability to synchronize information without SSL for organizations that might choose to run synchronization unencrypted. The default on the Pocket PC 2002 is always SSL-encrypted. -
The Pocket PC 2003 operating system provides better support for instant messenger, Microsoft Passports, and other network and security functions that are frequently leveraged in mobile communication environments. The installation and configuration of the Pocket PC 2003enabled device is similar to that of the Pocket PC 2002 device. Some of the configuration options are slightly different, however, so the following sections cover the installation, configuration, and synchronization specific to Pocket PC 2003 devices. For network or Exchange administrators who want to test the functionality of Pocket PC 2003 mobility to Exchange, a Pocket PC 2003 emulator is freely downloadable from Microsoft that has all of the functions of the standard Pocket PC 2003 device. The emulator helps an administrator get familiar with setup and configuration without having to actually buy a device or work through unique driver download configurations for mobile connections or wireless adapters. NOTE The eMbedded Visual C++ 4.0 for the Pocket PC 2003 emulator and the eMbedded Visual Tools 3.0 used for the Pocket PC 2002 emulator conflict with each other. Effectively, the 4.0 tool overwrites key components of the 3.0 tool that run the Pocket PC 2002 emulator, and the Pocket PC 2002 emulator will not run with the 4.0 tools installed. If you plan to test both Pocket PC 2002 and Pocket PC 2003 emulation, install the eMbedded tools and emulators on separate systems.
Installing the Pocket PC 2003 Emulator For administrators who want to test the functionality of Pocket PC 2003 emulation, this section focuses on the download and installation of the emulator on a standard Windows workstation. When installed on a Windows workstation, the emulator can then be configured and tested against the Exchange 2003 environment. Downloading the Pocket PC 2003 Emulator The Pocket PC 2003 emulator is a free download from Microsoft. Go to http://www.microsoft.com, search on the words Pocket 2003 SDK , and download the ppc2003_sdk.exe file (86MB). In addition to downloading the Pocket PC 2003 emulator, you also need to download a copy of the eMbedded Visual C++ 4.0 and the eMbedded Visual C++ 4.0 Service Pack 2 or higher. The eMbedded Visual C++ 4.0 and Service Pack need to be installed before the SDK emulator to provide the core driver and libraries needed to run the SDK. The eMbedded Visual C++ 4.0 and Service Pack can be found at http://msdn.microsoft.com/vstudio/device/embedded/download.aspx The file eVC4.exe is 333MB, and evc4sp2.exe (Service Pack 2) is 42MB. Requirements to Run the Pocket PC 2003 Emulator To install eMbedded Visual C++ 4.0, Microsoft states its requirement is a system running Windows 2000 or Windows XP, a 450MHz or faster Pentium-II class system, 128192MB or more of available memory, 200MB of available disk space, network adapter, VGA video, and a mouse. The host workstation needs a network adapter connected to a network connection that will access the Exchange 2003 server. It is typically recommended to first test the Pocket PC emulation on an internal backbone segment to make sure the connection to the Exchange server is not blocked by external firewalls, routers, or other external perimeter devices. The host workstation needs network connectivity, and although it's not a requirement to run the Pocket PC 2003 emulator, the system should be able to connect to the Exchange server using Outlook Web Access or from an Outlook client. This ensures that the host workstation has the appropriate network connectivity for the emulator to connect to the server. NOTE The Pocket PC 2003 emulator does not require its own IP address on the network and there is no network connectivity configuration required on the emulator. The emulator simply passes through the existing LAN connection of the host workstation. If the workstation has connectivity to Exchange for Outlook or Outlook Web Access, that same connection is used by the emulator.
Installing eMbedded Visual C++ 4.0 After downloading the eMbedded Visual C++ 4.0 and Pocket PC 2003 SDK, the two applications should be installed. To do so, use the following steps: -
Launch the eVC4.exe executable for the eMbedded Visual C++ 4.0 to install it on the host workstation. This extracts the files to a temporary directory (for example, c:\evc4\ ) and launches the installation wizard. -
Go into the temporary directory and run setup.exe . The installation wizard displays a welcome screen; click Next to continue. -
After reading the end- user license agreement and agreeing to the information, click I accept the agreement and then click Next. -
When prompted for the product license number and user ID, enter the evaluation ID that is noted on the main Web page where you downloaded the eMbedded Visual Tools. The product ID noted is TRT7H-KD36T-FRH8D-6QH8P-VFJHQ. -
When prompted, select to install all the eMbedded tools and then click Next. NOTE Unlike with the eMbedded Visual Tools 3.0 that also installed the Pocket PC 2002 and the Smartphone 2002 SDKs, the eMbedded Visual C++ 4.0 installs only the eMbedded Visual C++ 4.0 tools. Install the Pocket PC 2003 emulator and the Smartphone 2003 emulators separately. -
Choose a folder you want to install the software in (the default is c:\Windows CE Tools ) and then click Next. The Windows CE Platform Manager 4.0 will begin to install. -
Click OK at the eMbedded tools setup product ID information screen. -
Click on Continue when prompted to confirm the installation of the eMbedded Visual C++ 4.0 Setup that includes the eMbedded Visual C++ 4.0 and Common Components. -
After the installation of the eMbedded Visual C++ 4.0 tools, click OK when the setup notes it was completed successfully. -
The installation wizard for the Standard SDK for Windows CE .NET setup begins to extract and install. Click on Next at the welcome page, and then read and accept the license agreement. Click on Next. -
Enter your name and company name and then click on Next. -
Select to have a Complete Install and click on Next. -
Choose to install in the default destination folder and click on Next. -
Click on Install to complete the installation of the Standard SDK for Windows CE .NET. -
When the installation of the Standard SDK for Windows CE .NET has completed its installation, click on Finish. After the base eMbedded Visual C++ 4.0 has been installed, install eMbedded Visual C++ 4.0 Service Pack 2 or higher. Use the following steps: -
Run evc4sp2.exe . Choose a directory where you want to expand the files (for example, c:\evcsp2\ ). -
Go to the directory you selected, open the DISK1 directory, and run the setup.exe program. -
At the eMbedded Visual C++ 4.0 SP2 setup welcome screen, click Next. -
Read and accept the end-user license agreement and click on Next. -
Click on Install to begin the installation of the Service Pack. -
When the Service Pack has completed installation, click on Finish. Installing the Pocket PC 2003 Emulator After the eMbedded Visual C++ 4.0 and Service Pack have been installed, install the Pocket PC 2003 SDK. Use the following steps: -
Launch the Microsoft Pocket PC 2003 SDK.MSI script that you downloaded, which will begin the installation process on your host workstation. -
At the welcome screen, click on Next. -
Read the license agreement, select I accept the terms in the License Agreement, and click on Next. -
Confirm your customer information (name and organization name) and then click Next. -
Select a Complete Installation and then click Next. -
Click on Next to choose the default destination folders. -
Click on Install to begin the installation of the Pocket PC 2003 SDK. -
Click on Finish when completed. Launching the Pocket PC 2003 Emulator After the installation has been completed, the Pocket PC 2003 emulator can now be launched. To launch the Pocket PC 2003 emulator, select Start, Programs, Microsoft Pocket PC 2003 SDK, Pocket PC 2003 Emulator. NOTE When you select Start, Programs, Microsoft Pocket PC 2003 SDK, and you do not see a Pocket PC 2003 Emulator icon, as shown in Figure 24.7, confirm that you installed the eMbedded Visual C++ 4.0 Service Pack before installing the Pocket PC 2003 SDK. Missing that step is a common problem with all of the downloads that need to be installed. If the icon does not exist, uninstall the Pocket PC 2003 SDK (from the Start, Settings, Control Panel, Add/Remove Programs tool), reinstall the eMbedded Visual C++ 4.0 Service Pack 2 or higher, and then reinstall the Pocket PC 2003 SDK. Figure 24.7. Choosing the Pocket PC. 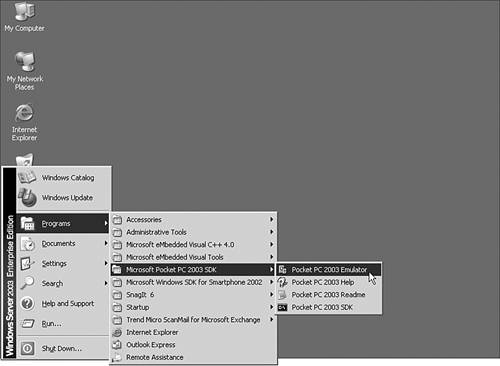
Wait a few seconds and the Pocket PC 2003 emulator will automatically start. The Pocket PC 2003 emulator is now ready to be configured. Configuring a Pocket PC 2003 Device for Network Connectivity After the Pocket PC 2003 emulator has been installed, or for administrators that have a Pocket PC device in front of them, the first thing to do is configure the device for network connectivity. Network connectivity comes in a variety of forms, including: -
Pocket PC with an Ethernet adapter or Wireless adapter -
Pocket PC with a mobile phone connection to the Internet -
Pocket PC emulator connected to a host workstation Each configuration is slightly different and is individually highlighted in the next section. Configuring a Pocket PC 2003 Device with an Internal Network Adapter To configure a Pocket PC 2003 device with an internal Ethernet or wireless network adapter, follow these steps: -
On the Pocket PC device, select Start, Settings, Connections. Click on the Connections Icon and then on the Advanced tab. -
Click on the Network Card button and choose the network adapter you want to configure. -
Select Use server-assigned IP address if DHCP is available on the network that this device will be connecting to, or choose Use specific IP address and enter a static IP address for the device. -
If the device is DHCP-configured, skip to step 5; otherwise , click on the Name Servers tab and enter the address for the DNS (and optionally the WINS) servers on the network. -
Click on OK in the upper-right corner and a notice appears notifying you that the adapter will be used. Remove and reinsert the adapter to activate it with the new settings. Click OK after reading the notice. -
Click OK and then click on the X in the upper-right corner to complete the network adapter setting. After the hardware settings on the network adapter have been selected, select the adapter as the default outbound connection. To choose the adapter as the default, use the following steps: -
Select Start, Settings, Connections. Click on the Connections icon, on Advanced, and on the Select Networks button. -
Make sure that the first option, Programs that automatically connect to the Internet should connect using, is set to My Work Network. Additionally, make sure the option Programs that automatically connect to a private network should connect using is set to My Work Network. -
If a proxy server is used, click on the Edit button under the first My Work Network option to open the My Work Network page. -
Click on the Proxy Settings tab and then on the This network uses a proxy server to connect to the Internet check box. Then enter the name of the proxy server. -
Click on OK three times, and then on X in the upper-right corner. The Pocket PC 2003 device is now configured for network connectivity. To test whether the Pocket PC 2003 device is working properly, launch Pocket Internet Explorer and confirm whether network connectivity to the Internet is available. To test Internet Explorer, use the following steps: -
Select Start, Internet Explorer. -
On the main Internet Explorer home screen, click on the PocketPC.com graphic. -
Internet Explorer should traverse the network and provide a Windows Mobile page, assuming the host computer had connectivity to the Internet. If the network segment that the Pocket PC device is on does not have connectivity to the Internet, the Pocket PC device will also not have Internet connectivity. Possibly choose an Internet Intranet Web server or other system to check whether the device is communicating properly on the network segment it is connected. Configuring a Pocket PC 2003 Device with a Mobile Phone Connection If the Pocket PC 2003 device is a Pocket PC enabled mobile phone, the service provider of the phone will typically have a GSM or GPRS Internet connection service included with the phone. Follow the instructions provided with the phone to connect the phone to the Internet so that you can effectively surf the Internet with the mobile phone. Usually the process is as follows : -
Select Start, Settings, Connections. Click on the Connections icon, on the Advanced tab, and on the Select Networks button. -
The first option, Programs that automatically connect to the Internet should connect using, usually has a pull-down box that says ISP Connection, Internet Provider, or GPRS Provider. This varies between mobile phone providers; however, it likely notes that the connection is to the Internet. The option commonly refers to using the mobile phone Internet service connection. -
Click on OK, and then on OK again. Click on X and again on X in the upper-right corner. The Pocket PC 2003 device is now configured for network connectivity. To test whether the Pocket PC 2003enabled mobile phone is working properly, launch Pocket Internet Explorer and confirm whether network connectivity to the Internet is available. To test Internet Explorer, use the following steps: -
Select Start, Internet Explorer. -
On the main Internet Explorer home screen, click on the PocketPC.com graphic. -
Internet Explorer should traverse the network and provide a Windows Mobile page, assuming the host computer had connectivity to the Internet. If the Pocket PCenabled mobile phone does not have connectivity to the Internet, check the manual or contact the technical support for the mobile phone to get assistance on connecting the mobile phone to the Internet. Configuring a Pocket PC 2003 Emulator To configure the Pocket PC 2003 emulator for network connectivity, because the device uses the IP settings built in to the host computer, as long as the host computer has network connectivity, the emulator will have network connectivity. To validate the configuration, use the following steps: -
Select Start, Settings, Connections. Click on the Connections icon, on the Advanced tab, and then on the Select Networks button. -
Make sure that the first option, Programs that automatically connect to the Internet should connect using, is set to My Work Network. Additionally, make sure the option Programs that automatically connect to a private network should connect using is set to My Work Network, as shown in Figure 24.8. Figure 24.8. Configuring the network settings for connectivity. 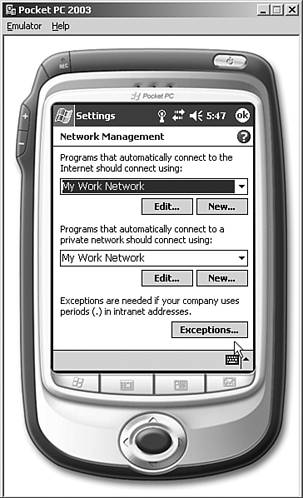 NOTE No proxy settings should be set on the Pocket PC 2003 emulator, because any proxy settings, DNS settings, or other hardware device settings are taken directly from the host workstation. -
Click on OK, again on OK, and then on the X in the upper-right corner. The Pocket PC 2003 emulator is now configured for network connectivity. To test whether the Pocket PC 2003 emulator is working properly, launch Pocket Internet Explorer and confirm whether network connectivity to the Internet is available. To test Internet Explorer, use the following steps: -
Select Start, Internet Explorer. -
On the main Internet Explorer home screen, click on the PocketPC.com graphic. -
Internet Explorer should traverse the network and provide a Windows Mobile page assuming the host computer had connectivity to the Internet. If the host computer does not have network connectivity to the Internet, the Pocket PC emulator will not have Internet connectivity either. Possibly choose an Internet Intranet Web server or other system to check whether the device is communicating properly on the network segment to which it is connected. Establishing a Connection Between the Pocket PC 2003 and Exchange 2003 After the Pocket PC device has network connectivity, establish a connection between the device and the Microsoft Exchange server. To create the connection, use the following steps: -
Select Start, ActiveSync to launch the Pocket PC ActiveSync program. -
Click on Tools at the bottom of the screen and then click on Options. -
Click on the Server tab and for server, enter the DNS name or the IP address of the Exchange server. -
Click on the Options button and enter the logon name, password, and domain of the Outlook/Exchange user account that the Pocket PC device will use to synchronize information. Click to select the Save Password box as the information the password needs to be enabled. -
Click on OK to go back to the Server screen and choose the options you want to synchronizesuch as Inbox, Calendar, or Contactsby clicking on the box. -
Click on OK, and then click on the X in the upper-right corner to save the Exchange server settings. Synchronizing Data Between Pocket PC 2003 and Exchange 2003 To synchronize information between the Pocket PC 2003 device and the Exchange 2003 server, use the following steps: -
Select Start, ActiveSync to launch the ActiveSync program. -
Click on the Sync button to begin synchronization. |