Migrating to Exchange Server 2003 Using the Move Mailbox Method
| < Day Day Up > |
| As previously mentioned, the move mailbox method of migration can be ideal for organizations who require a new set of hardware for their Exchange servers or who desire to reconstruct some portions of their Exchange infrastructure. The move mailbox method is also an effective way of minimizing the risk associated with a migration to Exchange Server 2003. Deploying Exchange 2003 Servers in Advance of the Move Mailbox MigrationThe greatest advantage to the move mailbox approach lies in the ability to deploy a new system to function as an Exchange 2003 Server. The server can be set up and configured with all applicable settings and third-party utilities before a single mailbox is moved to it. Just as the in-place upgrade process (described earlier) required AD to be upgraded, the move mailbox approach has the same requirements. This process involves running the ForestPrep and DomainPrep options before the first server is deployed. After these prerequisites are satisfied, the setup of the server can begin:
All these steps are necessary to install the first Exchange Server 2003 system into an existing Exchange 2000 environment. Subsequent Exchange 2003 systems can also be set up at this point, via the postDomainPrep procedures outlined earlier. Enabling New Server "Burn-In" and Pilot TestingOne of the main advantages to the move mailbox approach is that the new systems can now be "burnt in" and tested without affecting production users. A small subset of mailboxes can also be migrated to the new system to test functionality and ensure compatibility with an organization's systems. After the pilot is complete, a full mailbox migration can then take place with less overall risk. Moving Mailboxes to the New Exchange Server 2003 DatabasesAfter all Exchange Server 2003 systems have been deployed and their configurations finalized, the actual migration process of moving mailboxes from Exchange 2000 to Exchange Server 2003 can begin. The move mailbox procedure in Exchange Server 2003 has been vastly improved over the one that was present in Exchange 2000. Features such as error detection, multiple migration streams, and scheduling enable a much-improved experience. The move mailbox procedure should be scheduled to run during off-hours, because it effectively takes a user 's mailbox out of service during the move operation. The mailbox is out of service for only the duration of the move, and is available again after the process is complete for that mailbox. Migration time varies, depending on network connectivity and hardware speed, but about 2GB/hr can be expected during the move operation. To move mailboxes from an Exchange 2000 Server to one of the new Exchange 2003 systems previously set up, perform the following tasks :
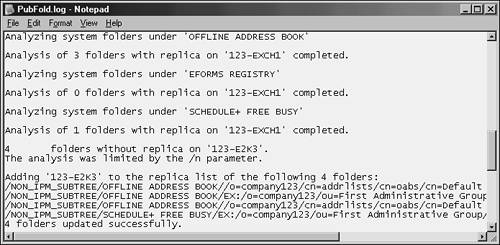
After a mailbox is migrated, a user can then access it via Outlook or other clients . The Outlook client automatically detects the change in Exchange Home Server and updates itself, connecting to the new mailbox automatically. Other functionalitysuch as OWA for Exchange Server 2003 and ActiveSync with Pocet PC devicesalso becomes available after the move and once Exchange is properly configured. NOTE Although the Outlook client will automatically update itself with the new server settings, any manually configured clients, such as POP3 and IMAP clients, should be manually reconfigured with the name of the new server. This factor also commonly affects third-party Exchange synchronization tools, such as Palm devices. Replicating Public Folders from Exchange 2000 to Exchange Server 2003Just as the mailboxes are migrated from one set of Exchange 2000 servers to another set of Exchange Server 2003 systems, the public folders should be replicated before retiring the old Exchange 2000 servers. Previously, this procedure involved a manual replication of folder hierarchy, which could prove to be a tedious process. Microsoft addressed this drawback with a new utility called PFMigrate, which is accessible via the Exchange Deployment Tools. PFMigrate can create public and system folder replicas on new systems, and remove them from old servers. The following procedure outlines how to use PFMigrate to migrate from an Exchange 2000 Server to an Exchange Server 2003 system:
TIP Become familiar with the command-line options that are available with the PFMigrate tool, because they can be useful for managing the replication of public folders across a newly deployed Exchange Server 2003 environment. Moving Connectors from Exchange 2000 to Exchange Server 2003If the eventual goal of the migration process involves retiring the Exchange 2000 infrastructure, it will be necessary to move all connectors from the Exchange 2000 servers to the new Exchange 2003 systems. The most important consideration when moving connectors is to ensure that no messages that use or flow through the connectors are lost. In some cases, Exchange 2000 might have been deployed with specific SMTP connectors to provide outgoing mail flow through specific servers. These types of connectors should be rerouted to pass through Exchange 2003 systems and ensure the proper flow of outgoing mail. As previously mentioned, there are some Exchange 2000 components that are not supported in Exchange Server 2003. This includes two connectors: the MS Mail connector and the cc:Mail connector. If these connectors are in use, an Exchange 2000 server must be left in the organization to support them, because they cannot be migrated over to Exchange 2003 Servers. Changing the Recipient Update Service Server from Exchange 2000 to Exchange Server 2003Before Exchange 2000 can be retired , an Exchange Server 2003 system must be designated as the Recipient Update Service (RUS) Exchange Server for the organization and for each domain. To do this, perform the following:
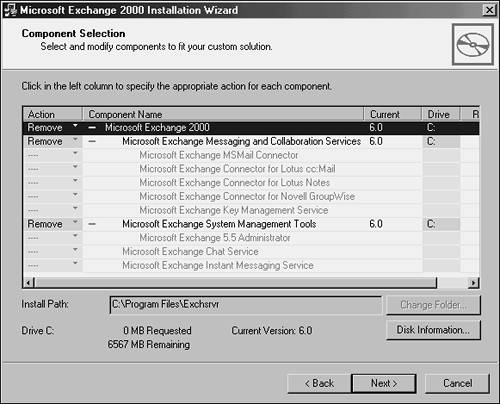
Retiring Legacy Exchange 2000 ServersAfter all mailboxes, public folder replicas, and connectors have been moved off the old Exchange 2000 infrastructure, the old Exchange servers can be retired and removed from service. The easiest and most straightforward approach to this is to uninstall the Exchange 2000 component via the Add-Remove Programs applet in Windows. To perform this operation, do the following:
Upon removal of the last Exchange 2000 system, the environment will then be completely upgraded to Exchange Server 2003, with all mailboxes, public folders, and connectors moved to the new environment. NOTE It might be wise to keep old Exchange 2000 Servers around for a few weeks after a move mailbox migration, because the old servers will be required to direct clients to their new mailbox locations. After all Outlook clients have connected to their new mailboxes, the old servers can then be safely retired. |
| < Day Day Up > |
EAN: 2147483647
Pages: 393
- A View on Knowledge Management: Utilizing a Balanced Scorecard Methodology for Analyzing Knowledge Metrics
- Measuring ROI in E-Commerce Applications: Analysis to Action
- Technical Issues Related to IT Governance Tactics: Product Metrics, Measurements and Process Control
- Governing Information Technology Through COBIT
- Governance Structures for IT in the Health Care Industry