Archiving
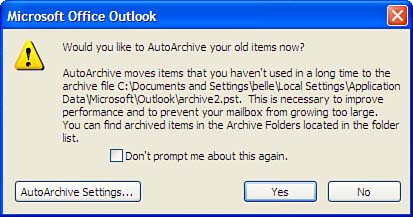
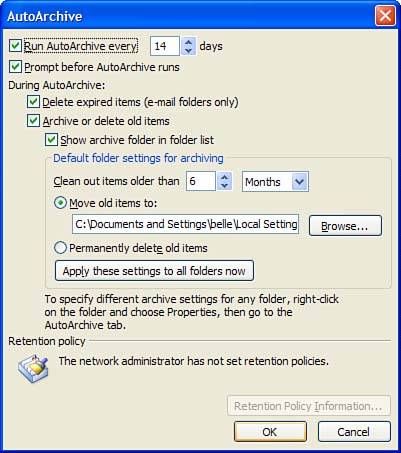
| After several months of using Outlook, you'll have a lot of older information that you no longer need in your day-to-day work, but that you don't want to delete eitheryou never know when you'll need to reference it later. It's Archive to the rescue by providing an easy, automated way to move your older items to another PST. By default, after you use Outlook for a couple of weeks, it will ask whether you want to use AutoArchive. Select the AutoArchive button to view your AutoArchive settings, choose Yes to archive or No to cancel (see Figure 19.1). Figure 19.1. AutoArchive offers to archive your old messages about two weeks after creating your account. Whether you choose Yes or No, you can choose T ools, O ptions, Other, Au t oArchive at any time and enable, disable, or change your settings (see Figure 19.2). Figure 19.2. Use the AutoArchive dialog to configure your global archive settings. Many of the settings can be set per folder by opening each folder's property sheet. Among the settings you can configure are the following:
Choose Apply These Settings to All Folders Now to set the global settings. You can change the settings for individual folders as needed. For example, you might want to keep older journal items or not archive some folders at all.
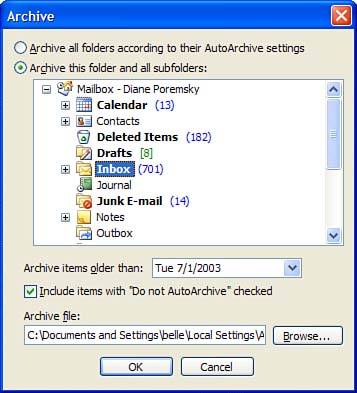
Retention policy settings are used for Exchange Server accounts only. Configured by the Exchange administrator, the retention policy controls how long messages remain in users' mailboxes. It's usually done to control mailbox sizes. After it's enabled, AutoArchive runs immediately and, in the future, on the schedule you selected. Should you want to archive one folder or archive your items between the selected archive times, you can force an AutoArchive on all folders or a selected folder at any time by choosing F ile, A rchive (see Figure 19.3). Figure 19.3. Use Archive to archive any folder or your entire message store at any time. When you select a single folder, you can choose any date for the archive.
Archive looks at the last modified date on an item and uses that to determine what to back up, based on the premise that if you haven't touched the item in months, it can safely be archived. This often causes unexpected results when you expect items to be archived and they aren't. In addition to opening or editing an item, Import and Export changes the modified date and will cause Archive to fail. Working with Archived FoldersWhen you need to read the items in your archive folder, use F ile, O pen, Outlook Data F ile to open the file in your folder tree. Don't use Importyou'll just need to archive them again, which is difficult because the modified date is the date of the import. If the archive was moved to a CD-ROM for storage, you'll have to copy it to your hard drive and remove the read-only flag by right-clicking on the archive file in Windows Explorer, choosing Properties, and then removing the check from the R ead-Only box. To remove an archive PST from your folder list, right-click it in the Navigation Pane and choose C lose from the context menu. Alternatives to AutoArchiveAlthough AutoArchive makes it easy to keep your message store compact, it might archive items you don't want archived. Plus, by default, it archives items to just one file: archive.pst .
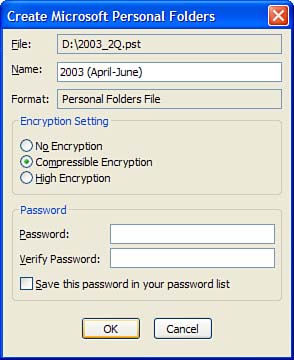
You can control the items you want to archive and choose to move them to different PSTs by moving the items yourself. Task: Create Your Own Archive PSTWhen you want to group items by project, date, or other criteria, or need to archive your HTTP or IMAP messages, you'll have to move the messages yourself. This enables you choose the messages you want to move out of the message store and put them in any PST you choose. You can use this method to store all files associated with a project, including documents from your file system, in one PST.
You can store files as well as Outlook items in the PST, including documents, spreadsheets, or graphics. This enables you to create archives by project and store all the related material together. If the PST exceeds 2GB, use the Unicode format to ensure you can store all of your files together. After you've moved all the items to the folder that you want to move, right-click on it and choose C lose to remove it from your folder list. When you need to review the items or files, use F ile, O pen, Outlook Data F ile to reconnect it to your profile.
|
EAN: 2147483647
Pages: 228