| This procedure removes all boot definitions, including swap and dump, from /dev/vg00 with lvrmboot and recreates them with lvlnboot. This needs to be done because lvol2 is the primary dump logical volume (0) and dump is the secondary dump logical volume (1). You must reboot in order for these changes to take effect. Figure 9-16 shows the steps required to complete this optional procedure. Figure 9-16. Procedure to Change Dump Priorities (Optional) 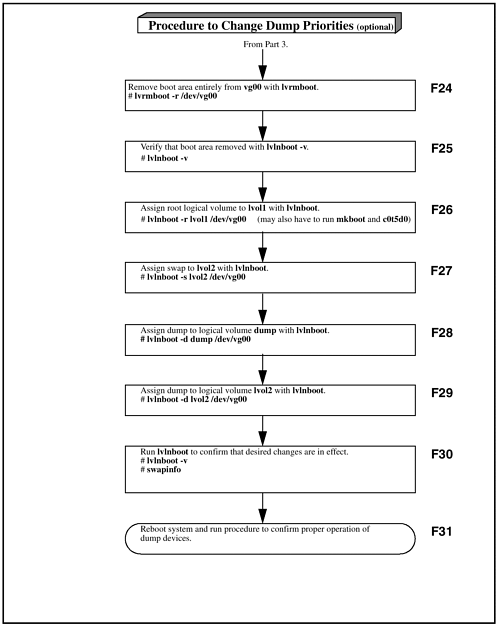 ____________________________________ F24 Remove the boot area entirely from vg00 with lvrmboot. # lvrmboot -r /dev/vg00 ____________________________________ F25 Verify that the boot area was removed with lvlnboot. # lvlnboot -v Boot Definitions for Volume Group /dev/vg00: The Boot Data Area is empty. ____________________________________ F26 Assign the root logical volume to lvol1 on /dev/vg00 with lvlnboot. # lvlnboot -r lvol1 /dev/vg00 ____________________________________ F27 Assign the swap to lvol2 on /dev/vg00. # lvlnboot -s lvol2 /dev/vg00 # swapinfo Kb Kb Kb PCT START/ Kb TYPE AVAIL USED FREE USED LIMIT RESERVE PRI NAME dev 512000 0 512000 0% 0 - 1 /dev/vg00/lvol2 reserve - 23144 -23144 memory 1671008 27324 1643684 2% ____________________________________ F28 Assign the dump to the logical volume dump on /dev/vg00. # lvlnboot -d dump /dev/vg00 ____________________________________ F29 Assign the secondary dump device as lvol2 (primary swap) on lvol2. # lvlnboot -d lvol2 /dev/vg00 ____________________________________ F30 Run lvlnboot to confirm that the dump and swap are properly configured with priority "0" on 2 GByte disk c0t5d0 and "1" on c0t6d0. # lvlnboot -v # after adding lvol2 as secondary dump Boot Definitions for Volume Group /dev/vg00: Physical Volumes belonging in Root Volume Group: /dev/dsk/c0t6d0 (10/0.6.0) -- Boot Disk /dev/dsk/c1t3d0 (10/4/4.3.0) -- Boot Disk /dev/dsk/c0t5d0 (10/0.5.0) Root: lvol1 on: /dev/dsk/c0t6d0 /dev/dsk/c1t3d0 Swap: lvol2 on: /dev/dsk/c0t6d0 /dev/dsk/c1t3d0 Dump: dump on: /dev/dsk/c0t5d0, 0 Dump: dump on: /dev/dsk/c0t6d0, 1 ____________________________________ F31 Reboot the system and run steps F21-F23 to confirm proper operation of dump devices. ____________________________________ Although this procedure to reconfigure disks is for a specific system, it is useful for illustrating the many LVM commands required to perform such tasks. LVM, and disk management in general, are the areas that I find consumes the most system administration time in mature HP-UX installations. There are many commands used in this procedure for which there is no way to "back out," so use caution whenever using LVM commands. ________________________________________________________ | 