Kernel Configuration
| Your HP-UX kernel is a vitally important part of your HP-UX system that is often overlooked by HP-UX administrators. Perhaps this is because administrators are reluctant to tinker with such a critical and sensitive part of their system. Your HP-UX kernel, however, can have a big impact on system performance, so you want to be sure that you know how it is configured. This doesn't mean that you have to make a lot of experimental changes, but you should know how your kernel is currently configured so that you can assess the possible impact that changes to the kernel may have on your system. Be sure to look at kcweb in the kernel chapter. kcweb is a web-based tool for working wtih the kernel. There are plans to make many of the system administration tools Web-based, and kcweb gives you a good idea of the type of tools being developed. SAM allows you to view and modify the four basic elements of your HP-UX kernel. There is a great deal of confusion among new HP-UX system administrators regarding these four elements. Before I get into the details of each of these four areas, I'll first give you a brief description of each.
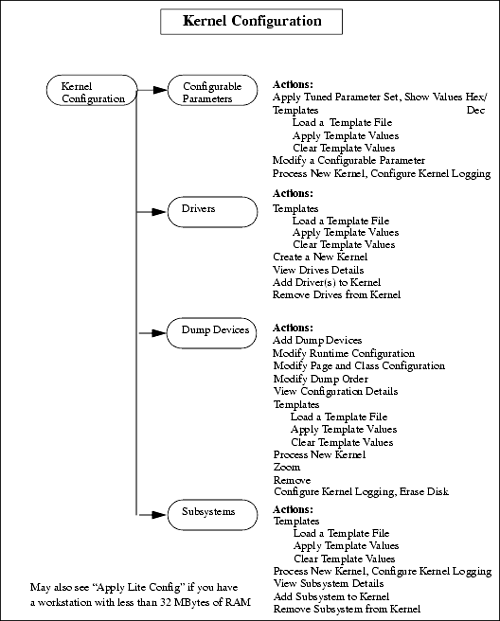
When you go into one of the four subareas described above, the configuration of your system for the respective subarea is listed for you. The first thing you should do when entering Kernel Configuration is to go into each of the subareas and review the list of information about your system in each. In Kernel Configuration is a current kernel and pending kernel. The current kernel is the one you are now running, and the pending kernel is the one for which you are making changes. Figure 10-23 shows the SAM menu hierarchy for Kernel Configuration . Figure 10-23. Kernel Configuration Menu Structure Configurable ParametersSelecting Configurable Parameters lists all your configurable kernel parameters. For each configurable parameter, the following information is listed:
You can then take a number of Actions, including the following:
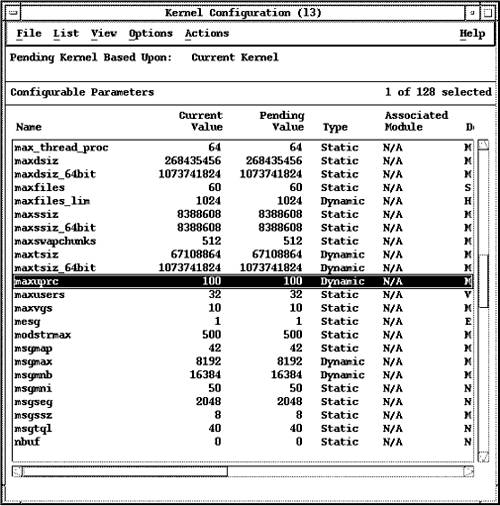
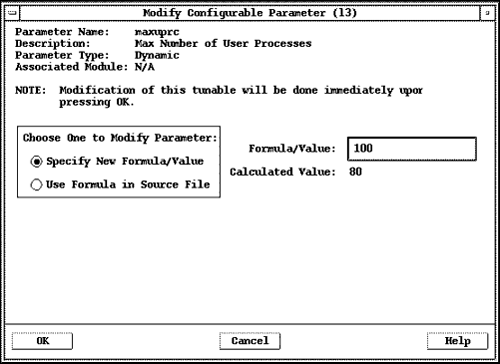
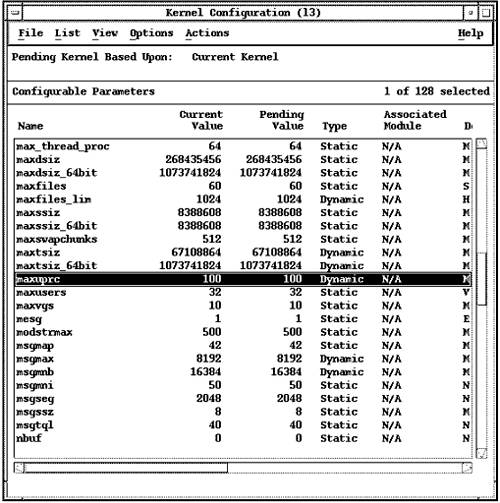
Modifying a configurable parameter is made much easier by SAM. But although the logistics of changing the parameter are easier, determining the value of the parameter is still the most important part of this process. Many applications recommend modifying one or more of these parameters for optimal performance of the application. Keep in mind, though, that many of these parameters are related ; modifying one may adversely affect another parameter. Many applications will request that you change the maxuprc to support more processes. Keep in mind that if you have more processes running, you may end up with more open files and also you may have to change the maxfiles per process. If you have a system primarily used for a single application, you can feel more comfortable in modifying these. But if you run many applications, make sure that you don't improve the performance of one application at the expense of another. When you do decide to modify the value of a configurable parameter, be careful. The range on some of these values is broad. The maxuprc (maximum number of user processes) can be reduced as low as three processes. I can't imagine what a system could be used for with this low a value, but SAM ensures that the parameter is set within supported HP-UX ranges for the parameter. "Let the administrator beware" when changing these values. You may find that you'll want to undo some of your changes. Here are some tips: Keep careful notes of the values you change, in case you have to undo a change. In addition, change as few values at a time as possible. That way, if you're not happy with the results, you know which configurable parameter caused the problem. In Chapter 4, when covering the kernel, we manually modified the maxuprc kernel parameter. Since this parameter is dynamic, there was not a reboot required in order for it to take effect. Let's now use SAM to modify this parameter and again demonstrate that since it is dynamic, no reboot is required if it is modified with SAM. Figure 10-24 shows maxuprc selected in a SAM screen shot: Figure 10-24. maxuprc Selected in SAM Window Let's now increase the value of maxuprc from 80 to 100 as shown in Figure 10-25: Figure 10-25. maxuprc from 80 to 100 Clicking OK results in changing maxuprc from 80 to 100 on the system immediately, without a reboot required, as shown in Figure 10-26: Figure 10-26. maxuprc Increase Takes Effect Immediately Figure 10-26 shows that both the Current Value and Pending Value of maxuprc are 100, without a reboot required. Dynamic configurable parameters and dynamically loadable kernel modules can be updated in this fashion without a reboot required. DriversWhen you select Drivers , the drivers for your current kernel, the template file on which your current kernel is based, and the pending kernel are listed. You'll know that the drivers displayed are for more than your current kernel because you'll see that some of the drivers listed are Out of both your current and pending kernels . The following information is listed for you when you enter the Drivers subarea:
The Current State indicates whether or not the driver selected is in /stand/vmunix. The Pending State indicates whether or not you have selected this driver to be added to or removed from the kernel. In means that the driver is part of the kernel or is pending to be part of the kernel. Out means that the driver is not part of the kernel or is pending to be removed from the kernel. Typically, drivers are added statically. In other words, they are added to the kernel and left there. However, if the driver is a specially created module for a particular purpose, then it may be configured as loadable. This means that it can be loaded and unloaded from the kernel without rebooting the system. This advanced feature is discussed in detail in the "Managing Dynamically Loadable Kernel Modules" chapter of the Managing Systems and Workgroups book from Hewlett-Packard. Using the Actions menu, you can select one of the drivers and add or remove it. You can also pick View Driver Details from the Actions menu after you select one of the drivers. You can select Process New Kernel from the Actions menu. If you have indeed modified this screen by adding or removing drivers, you want to recreate the kernel. SAM asks whether you're sure that you want to rebuild the kernel before it does this for you. The only recommendation I can make here is to be sure that you have made your selections carefully before you rebuild the kernel. Dump DevicesWhen you enter this subarea, both the Current Dump Devices and Pending Dump Devices are listed for you. A dump device is used when a serious kernel problem occurs with your system, and main memory is written to disk. This information is a core dump that can later be read from disk and used to help diagnose the kernel problem. Prior to HP-UX 11.x, memory dumps contained the entire image of physical memory. As a result, in order to get a full memory dump, you needed to create a dump area at least as large as main memory. With systems with memory size into the gigabits, a large amount of disk space was wasted just waiting around for a system panic to occur. With HP-UX 11.x comes a new, fast dump feature. This allows you to pick and choose what to dump. The fast dump feature not only prevents such things as unused memory pages and user text pages from being dumped, but it also allows you to configure what memory page classes to dump. The sizes of the dump areas can be configured somewhat smaller than main memory in your system. You can specify a disk or logical volume as a dump device (you can also specify a disk section, but I don't recommend that you use disk sections at all). The entire disk or logical volume is then reserved as a dump device. If no dump device is specified or if the size of the dump area is less than what is configured to be dumped, then the core dump is written to primary swap. At the time of system boot, the core dump is written out to a core file, usually in /var/adm/crash . This is the way most systems I have worked on operate ; that is, there is no specific dump device specified and core dumps are written to primary swap and then to /var/adm/crash . This approach has sometimes been a point of confusion; that is, primary swap may indeed be used as a dump device, but a dump device is used specifically for core dump purposes whereas primary swap fills this role in the event there is no dump device specified. As long as you don't mind the additional time it takes at boot to write the core dump in primary swap to a file, you may want to forgo adding a specific dump device to your system. Since you probably won't be allocating an entire disk as a dump device, you may be using a logical volume. You must select a logical volume in the root volume group that is unused or is used for non- file-system swap. This is done by selecting Add from the Actions menu to add a disk or logical volume to the list of dump devices. You will want to get acquainted with the View Dump Configuration Details subarea of Dump Devices . It is here where you can see what the current dump configuration is, what the current and pending kernel dump configurations are, and what the current runtime dump configuration is. SubsystemsSelecting Subsystems lists all of your subsystems. For each subsystem, the following information is listed:
You can then take a number of Actions , including the following:
After making selections, you can rebuild the kernel to include your pending changes or back out of them without making the changes. | ||||||||||||||||||||||||||||||||
EAN: 2147483647
Pages: 301