8.8. Volume Adjustments Fortunately, you can do more with your audio clips than just insert them into the Timeline Viewer. You can lengthen them or shorten them, make them fade in or out, shift them to play earlier or later in time, and even superimpose them. Best of alland here's one of the most useful features in iMovieyou can make their volume rise and fall over the length of the clip. 8.8.1. Making Whole-Clip Volume Adjustments To make a particular clip louder or quieter relative to the other tracks, click its representation in the Timeline Viewer to select it. The clip darkens to show that it's highlighted. Having selected an audio (or video) clip in this way, you can affect its overall volume level by using the "Clip:" volume pop-up menu shown in Figure 8-8. You can make it so quiet that it's absolutely silent, or you can actually make it 50 percent louder than the original. Figure 8-8. If you set the volume pop-up all the way to 0, you mute the sound completelyfor this clip only. If you drag it all the way to the top, you actually boost the volume up to 150%a terrific way to compensate for weak camcorder microphones.
In any case, adjusting the pop-up menu makes the horizontal volume-level line temporarily appear on the selected clips. 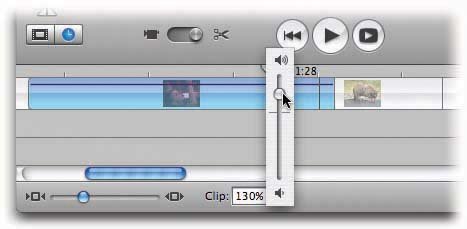
Here are some pointers in this regard: -
You can also type a percentage number into the "Clip:" text box. This isn't a feature only for the obsessively precise; it's a useful way to make sure that each of several audio clips are boosted to the same degree. -
iMovie stores your Volume pop-up menu settings independently for every audio clip. That's why the Volume setting may seem to jump around as you click different audio clips. -
If even 150 percent isn't enough of a volume boost, you can always open the audio clip in GarageBand for a quick boost. See Section 8.4.2 for details on editing iMovie soundtracks in GarageBand. 8.8.2. Volume Adjustments Within a Clip Being able to make the volume of a clip rise and fall along its length, as you can in iMovie, comes in handy in a multitude of ways: -
It's a rare documentary or news show that doesn't begin a story with a full-volume, attention-getting shot (protesters shouting, band playing, airplane landing, and so on), whose audio fades to half volume after a few seconds, just in time for the reporter to begin speaking. -
Similarly, you can "pull back" the musical soundtrack whenever somebody on camera is speaking, and then bring it back to full volume in between speeches. This technique is incredibly common in movies, TV shows, commercials, and just about every other form of professional video. -
Suppose that the last second of a clip caught the unseemly off-camera belch of a relative at the dinner table. In a flash, you can edit it out, simply by silencing the audio just before the belch. -
You can compensate for the volume drop that occurs whenever your interview subjects momentarily turn their heads away from the camera. -
If you're a parent filming small children, your footage often winds up peppered with parental instructions recorded at a very high volume level, because you're right next to the microphone. ("Honey, stand over there by your brother," or "Watch out for the car!") These parental voice-overs often ruin a clipbut you can rescue them by adjusting the original audio from the camcorder, which you can edit just as easily as imported audio. -
You can make create smooth fade-ins or fade-outs of your music (or the sound from the original video). 8.8.3. Volume "Rubber Bands" The key to this feature is the Show Clip Volume Levels command (  -Shift-L) in the View menu. (The same command appears in the shortcut menu when you Control-click or right-click an audio clip.) When you turn on Show Clip Volume Levels, a horizontal line appears on every audio and video clip, edge to edge. It's an audio-volume graph, which you can manipulate like a rubber band. Here's how it works (consider zooming in for greater control): -Shift-L) in the View menu. (The same command appears in the shortcut menu when you Control-click or right-click an audio clip.) When you turn on Show Clip Volume Levels, a horizontal line appears on every audio and video clip, edge to edge. It's an audio-volume graph, which you can manipulate like a rubber band. Here's how it works (consider zooming in for greater control): -
Click directly on the line and drag upward or downward (Figure 8-9, top). The original click produces a small spherical handle, and the drag produces a curve in the line from its original volume level. (Actually, you can simultaneously drag left or right to adjust the timing of this volume change.) Each "knot" in the line (the round handle) represents a new volume level that sticks until the end of the clip or the next volume level, whichever comes first. -
After you create such a curve, the point where the audio deviated from its original volume is denoted by a tiny square handle (Figure 8-9, third from top). To make the volume increase or decrease more or less gradually, drag that tiny square handle left or right, closer to your round adjustment handle or farther from it. -
To make the volume take another dip or swoop, click elsewhere on the volume line and drag again. You've just created a second round orange handle, which you can position independently (Figure 8-9, bottom). Figure 8-9. Top: The horizontal line represents the audio clip's standard, 100% volume level. Suppose, in this case, that it's drowning out the spoken dialog in the video track above it. (That's a pretty common occurrence when you add, say, a pop song to your movie as a soundtrack.)
Second from top: As you drag the little "knot" vertically, you have two sources of feedback on how much you've increased or decreased the volume at that spot: the height of the line segment itself (in which the purple clip itself is the piece of graph paper, from 0% to 150%), and the number in the "Clip:" percentage box.
In any case, the orange handle tells you how much volume fluctuation you've introduced, but it doesn't let you specify how gradually you want the change to occur.
Third from top: For that purpose, drag the tiny square (indicated by the cursor) in any direction to control where the volume change beginsboth when, and at what level.
Bottom: Repeat the process in reverse when you want to bring the music back up after the dialog portion is over.  -
To remove a volume change, click the orange "knot" to select it, and then press the Delete key. (Or just drag it to the original volume level.) The knot disappears, and the " rubber band" line snaps back to the previous knot, stretched tight. -
To make a volume change extremely sudden, click a knot to highlight it, and then drag the tiny square just to its left. You'll find that you can drag this little square until it's directly above or below the knotan instantaneous volume change. -
Consider making your volume adjustments while the movie plays back. Each time you make an adjustment, the Playhead jumps to that spot. As you keep clicking and adjusting, clicking and adjusting, the Playhead keeps jumping back to that spot, saving you the trouble of having to rewind and play, rewind and play, as you fine-tune the fluctuation. -
To restore the original, straight-line condition of a clip's volume, click each of the orange knots and press Delete until none of them remains.
Tip: When you're finished editing volume fluctuations, you can turn off the View  Show Clip Volume Levels command again. iMovie will remember all of the changes that youve made, and you'll still hear the volume changes on playback. But iMovie hides all of the handles and rubber-band graph lines, making it possible once again to drag clip edges to shorten them (which you can't do while volume graphs are visible). Show Clip Volume Levels command again. iMovie will remember all of the changes that youve made, and you'll still hear the volume changes on playback. But iMovie hides all of the handles and rubber-band graph lines, making it possible once again to drag clip edges to shorten them (which you can't do while volume graphs are visible).
8.8.4. Adjusting Many Clips at Once You can adjust the volume levels of more than one clip simultaneouslya technique that comes in handy more often than you might think. For example, you may decide that all of the music excerpts you've grabbed from a CD are too loud compared to the camcorder audio. In one fell swoop, you can make them all softer. You can select as many as you want, even if they're on different audio tracks. Start by selecting the clips you want to affect: -
To select several non-consecutive clips, Shift-click them in any order: clip 1, clip 3, and so on. (Actually, -clicking works, too.) -
To select several connecting clips, drag-select. That is, begin dragging in any empty part of a track. As you drag, iMovie selects any audio clip that even partly falls within the light gray rectangle you're creating. -
To select all of the clips in both audio tracks, highlight one clip there. Then choose Edit Select All. -
To unhighlight a selected clip, Shift-click or -click it. Now when you adjust the "Clip:" volume pop-up menu, you're affecting all of the highlighted clips at once. (If you've fiddled around with the clips' rubber-band volume lines, adjusting the volume slider scales the volume of the whole thing up or down proportionally, maintaining the relative sizes of the fluctuations.)
Note: When several audio clips are highlighted, the volume pop-up menu reflects whichever clip has the highest volume level.
 |