Section 8.9. Manipulating Audio Clips
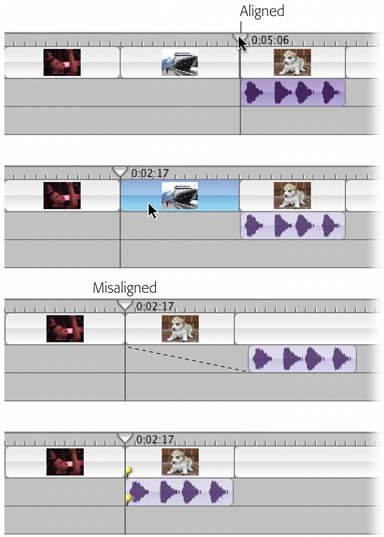
8.9. Manipulating Audio ClipsYou can have all sorts of fun with audio clips in iMovie. You can move them around, copy and paste them, synchronize them with video, scrub 'em, split 'emit's hours of fun for the whole family! 8.9.1. Locking Audio Clips to VideoFigure 8-10 illustrates a serious problem that results from trying to line up certain video moments (like Bill-Gates-getting-hit-with-a-pie footage) with particular audio moments (like a "Splat!" sound effect). In short, when you insert or delete some video footage after lining up audio clips with specific video moments, you shove everything out of alignment, sometimes without even realizing it. This syndrome can rear its ugly head in many video- editing programs. Figure 8-10. Top: You've carefully lined up a barking sound effect with the beginning of the dog clip. |
| GEM IN THE ROUGH The Invisible Audio "Shelf" |
| When you're editing video, the Clips pane provides a handy temporary working space where you can set aside clips that you haven't yet placed into the movie. If you've ever worked with a page-layout program like InDesign, you're already familiar with this " pasteboard " effect. Unfortunately, iMovie doesn't come with any pane or pasteboard where you can temporarily park audio clips. If you think it might be handy to have such a workspace as you manipulate your audio clips, the solution is simple: Drag them, or paste them, far off to the right of the Timeline Viewer, beyond the right edge of your video. Then, just drag them back into place when you're ready for them. (Just don't leave any stray audio clips there by accident . You'll look pretty silly when your movie premieres at Cannes.) |
To unlock an audio clip, highlight it and then choose Advanced  Unlock Audio Clip (or press
 ![]() -L again).
-L again).
8.9.2. Cropping an Audio Clip
As you may remember from Chapter 5, the ability to crop , or chop the ends off a video clip, is one of the key tools in video editing. As it turns out, you can adjust the beginning or ending points of any audio clip even more conveniently.
Tip: If you use the Extract Audio command described in Section 8.11, you can even crop the original camcorder audio in this way, without cropping the video clip in the process. Doing so is a convenient way to trim out an audio glitch that appears at the beginning or end of a shot without having to crop the video clip.
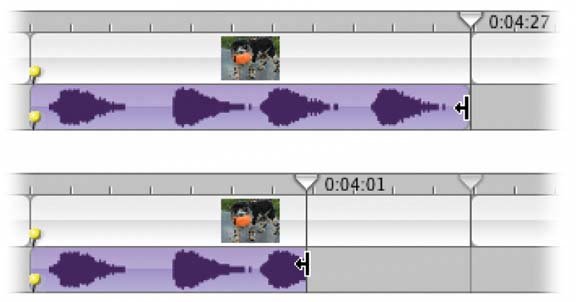
Figure 8-11. You can shorten an audio clip without actually deleting any of it, just by dragging the edges inward (shown here before and after). Does this sound familiar? It shouldyou can do the same thing with video clips.
At any time, you can restore the original length, or part of it, by dragging the edge outward again. (Note, though, that edge dragging doesn't work if Show Clip Volume Levels is turned on in the View menu.)
You can shorten one of your music or narration clips from either the beginning or the end, just by dragging the corresponding end inward, as shown in Figure 8-11.
For finer adjustments, click one of the clip ends, so that the Playhead snaps to your cursor. Then press the right or left arrow key to move the handle in one-frame increments , orif you press Shift as you do soin 10 -frame increments. You might want to zoom in, using the Zoom slider at the left side of the window, if you're finding it hard to see the effects of your cropping maneuvers.
Note: As you drag the audio-clip crop handles inward or outward, any volume fluctuations you've added remain exactly where they werewhich means that they might just wind up in nowhere-land. You might drag the end point of a clip so far to the left that you'll never hear the fluctuations you had programmed for the very end of the clip. If your volume fluctuations seem to be missing, turn on View
Show Clip Volume Levels to make your volume graph reappear. Youll see the problem right away. 8.9.3. Splitting an Audio Clip
When you drag an audio clip's ends inward, you're not actually trimming the clip. You're simply shortening the audible portion of the full-length clip. At any time in your project's lifetime, if you decide that you've overshot, you can slide the clip ends back outward again.
However, you may have good reason to make the cropped-clip arrangement permanent. First, in complex audio tracks, your clips can become cluttered and difficult to "read," thanks to the duplicate clip ends. Second, dragging the ends of clips inward doesn't reduce the amount of disk space that your audio file uses, since iMovie hangs onto the full original in case you decide to uncrop it.
There is an alternative, however. You may remember reading about the power of the Edit Split Clip at Playhead command, which uses the current Playhead location as a razor blade that chops a video clip in two. In the Timeline Viewer, the equivalent command is called Split Selected Audio Clip at Playhead. As youd expect, it breaks the audio clip beneath the Playhead into two independent clips.
Tip: If your Edit menu doesn't list a command called Split Selected Audio Clip at Playhead, it's because your Playhead isn't in the middle part of a highlighted audio clip. If no audio clip is selected, or if the Playhead's vertical insertion point isn't running through it, the command says Split Video Clip instead (and has a very different effect).
Being able to split an audio clip is useful in a number of ways. For example:
-
You can use it as another form of the Crop command. Split off the unwanted end of some imported iTunes music, for example, and then delete the segment you don't need.
-
You can separate statements in a voice-over (narration by an unseen speaker). This is an extremely common requirement in professional editing.
Suppose, for example, that you've got a voice recording of a guy recounting his days at the beginning of Apple Computer. One line goes, "We lived in a rundown tenement on the Lower East Side of Cupertino, but nobody cared. We loved what we were doing."
Now suppose you've also got a couple of terrific still photos of the original Apple building, plus a photo of the original Apple team, grinning like fools in their grungy T-shirts and beards. After using the Split Audio Clip command, you can place the first part of the recording ("We lived in a rundown tenement on the Lower East Side of Cupertino") beneath the campus photos, and then delay the second utterance ("But nobody cared. We loved what we were doing") until you're ready to introduce the group photo.
Tip: You can't split a clip and then immediately move one of the halves . After the Split command, both clips remain in position, side by side, both highlighted. Whatever you do will affect both pieces, as though you'd never split them at all. Shift-click the piece you don't want before trying to drag or cut anything.
8.9.4. Moving an Audio Clip
You can drag audio clips around in their tracks just as you would video clips, or even back and forth between the two audio tracks.
In fact, because precision is often so important in positioning audio relative to the video, iMovie harbors a few useful shortcuts.
For example, whenever you drag an audio clip, the Playhead magnetically attaches itself to the beginning of the clip. As you drag, therefore, you get to watch the video in the Monitor window, corresponding to the precise moment where the sound begins.
Once the clip is highlighted, don't forget that you can press the left and right arrow keys to move it one frame at a time, or Shift-arrow keys to slide it 10 frames at a time. Even then, you'll see your exact position in the video by watching the Monitor window.
As a matter of fact, you can combine these two tricks. Once the Playhead is aligned with either end of a clip, you can press the arrow keys, or Shift-arrow, to move the Playhead and drag the audio clip along with it. You'll feel like the audio is somehow Velcroed to the Playhead.
8.9.5. Superimposing Audio Clips
iMovie may seem to offer only two parallel audio tracks, but that doesn't mean you can't have more layers of simultaneous sound. There may be only two horizontal strips on the screen, but there's nothing to stop you from putting audio clips on top of each other . By all means, drag a sound effect onto your already-recorded narration clip, or superimpose two or more different CD music recordings, if that's the cacophonous effect you want. When playing back your project, iMovie plays all of the sound simultaneously , mixing them automatically (Figure 8-12).
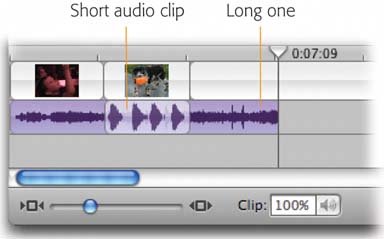
Figure 8-12. The first time you drag or paste a new audio clip onto an existing one, the situation is fairly clear, thanks to iMovie's tendency to put shorter clips on top of longer ones. It's impossible for a clip to become covered up entirely.
If you're having trouble sorting out several overlapping sound clips, consider selecting one and then choosing Edit Cut. Often, just getting one clip out of the way is enough for you to understand whats going on in its original location. Once you've got your bearings, you can choose Edit Undo to put it right back where it was.
Another tactic: When you click a clip, iMovie always selects the shortest one in the stack. If you have two overlapping audio clips, therefore, and you intend to select the longer one, click one of its visible ends.
Remember, too, to glance at the bottom of the iMovie window as you click each audio clip. You'll see its name , which is another helpful clue when clips collide.
8.9.6. Scrubbing Audio Clips
Scrubbing once meant rotating reel-to-reel tapes back and forth manually, in an effort to find a precise spot in the audio (to make a clean splice, for example). In iMovie, you can scrub by Option-dragging your mouse back and forth across an audio clip. iMovie plays the sound under your cursor.
(This technique is extremely useful, but it works best when you're zoomed in and dragging very slowly. Note that Option is called Alt on some nonU.S. keyboards.)
EAN: N/A
Pages: 203
- Step 1.1 Install OpenSSH to Replace the Remote Access Protocols with Encrypted Versions
- Step 2.1 Use the OpenSSH Tool Suite to Replace Clear-Text Programs
- Step 3.2 Use PuTTY / plink as a Command Line Replacement for telnet / rlogin
- Step 4.2 Passphrase Considerations
- Step 4.6 How to use PuTTY Passphrase Agents