5.7. The Movie Track: Your Storyboard Most of your iMovie time will be spent in the Movie Trackthe horizontal strip at the bottom of the screen. The idea is that you'll drag the edited clips out of the Clips pane and into the correct order on the Movie Track, exactly as though you're building a storyboard or timeline. As noted at the beginning of this chapter, the Movie Track offers two different views: the Clip Viewer and the Timeline Viewer. Both are illustrated in Figure 5-9. In either view, you can freely rearrange clips by dragging them. In the Clip Viewer, just drag them horizontally; in the Timeline Viewer, drag them up and over (or down and under) the adjacent clips, rather than directly to the side.
Tip: As you drag over them, the existing clips scoot out of the way, which can drive you crazy. In that case, hold down the  key until you're ready to let go of the clip you're dragging. They'll stay still. key until you're ready to let go of the clip you're dragging. They'll stay still.
Moreover, you can freely drag clips back and forth between the Clips pane and the Movie Track. Figure 5-9. Top: When you click the film strip icon (indicated by the cursor), you see your camcorder footage.
Bottom: Click the clock icon to see the Timeline Viewer, which reveals your audio tracks and shows the relative lengths of your clips. You can even rearrange your clips in the Timeline Viewer, as long as you master the knack of dragging them up (or down) and around the adjacent clips. 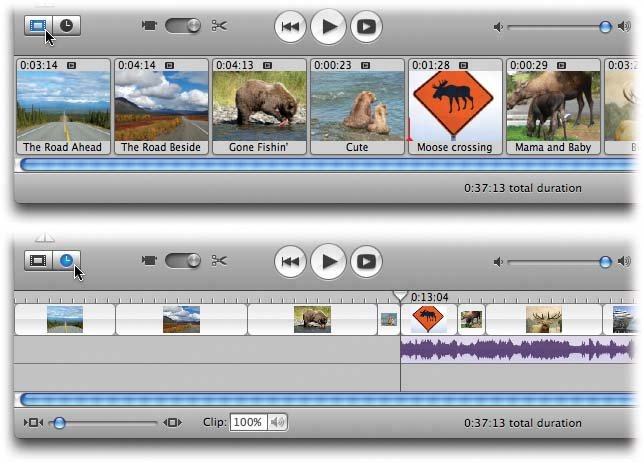
Remember, by the way, that you can switch the Movie Track between its two viewers by pressing -E. It corresponds to the second command in the View menu, which says either "Switch to Clip Viewer" or "Switch to Timeline Viewer," whichever one you're not in. 5.7.1. Readouts in the Movie Track iMovie identifies the name of your movie at the top of the window (and its format: DV-NTSC, for example, or HD-1080i-30 for "high-definition, 1080 interlaced scan lines, 30 frames per second"). At the very bottom of the window, you can see the name of the selected clip (or how many clips are selected), and how long it is relative to the whole movie.
Tip: iMovie can also tell you when a certain clip was filmed. Just double-click the clip you're wondering about. The resulting dialog box includes a line for Capture date, which lets you know when you shot that clip. It's an extremely useful little statisticlike the date stamp on the back of a Kodak print.
5.7.2. Dragging to the Movie Track There's not much to using the Movie Track: Just drag a clip from the Clips pane directly onto it. For your visual pleasure , iMovie shows you a ghosted , translucent image of the clip's first frame as you drag. Here are a few tips for making the most of this Clips panetoMovie Track procedure: -
If you want a clip placed at the end of the clips in the Movie Track, drop it in the slice of gray, empty space at the right end. (This technique is much easier than in previous versions, because there's always extra gray space at the right end.) -
To put a clip between two clips on the Movie Track, drag your cursor between those clips, and watch as iMovie makes room by shoving existing clips to the right. -
You can also drag clips from the Movie Track back onto the Clips pane. You can take advantage of this feature whenever you decide that a sequence of clips isn't quite working, and you're going to postpone placing them into the movie. -
In the Movie Track, you can rearrange clips by dragging their icons horizontally. (Yes, this even works in the Timeline Viewer.) Once again, iMovie makes room between existing clips when your cursor passes between them. -
In the Timeline Viewer, when you drag a clip directly to the right, iMovie leaves an empty gap. This is your opportunity to create a pure black clip (or, in fact, a clip of any solid color ), as described in Section 5.8.1. -
You don't have to drag one clip at a time; it's often more efficient to drag several clips simultaneously . Section 5.1.1 describes the various ways you can select several clips (like drag-selecting them or -clicking to select nonadjacent ones). For example, you might arrange several clips on your Clips pane into a mini-sequence that you then drop into your Movie Track as a unit.
Tip: As you're building your film on the Movie Track, think in terms of sequences of shots. By -clicking, you can select, say, six or seven clips that constitute one finished sequence, and drag the selection (or cut and paste it) into a new location in the Movie Track to suit your artistic intentions.And what determines the order of the clips when they get dumped onto the Movie Track? The original positions of the clips on the Clips pane (top to bottom, left to right). (This is a change from the previous iMovie version.) If you take the trouble to drag them around first, you wind up with a great way to pluck the best clips out of your video toolbox and plunk them onto the Movie Track, already in the proper sequence.
5.7.3. Copying and Pasting Clips Dragging isn't the only way to move footage around in iMovie; the Copy, Cut, and Paste commands can be more convenient . For one thing, you don't need the mouse. For another, if you copy a clip from the Clips pane instead of dragging it, you leave a copy of the original behind. Later, if you've really made a mess of chopping up the clip in your Movie Track, you can return to the copyyour backupwithout sacrificing the other editing work you've done since you made the copy. (Of course, the Revert Clip to Original command can do the same thing, but maintaining a whole, untouched original on the Clips pane is visual and easier to understand.) For example, you can move a clip from the Clips pane to the Movie Track by clicking it, pressing -X, clicking in the Movie Track, and then pressing -V. (You can also copy the clip by beginning that sequence with -C instead.) You can move clips around within the Movie Track in the same way. In fact, you can cut or copy clips out of one iMovie project and then paste them into a different one. The pasting process may take some time, because iMovie must move huge multimegabyte video files around on your hard drive. But this feature can come in very, very handy.
Note: When you copy and paste clips within a single project, you're not duplicating any files on your hard drive, so copying and pasting clips doesn't eat away at your remaining free space. But when you paste into a different project, you may be using far more disk space than you think; see Section 5.3.1.
You may wonder how you're supposed to know where your cut or copied footage will appear when pasted. After all, there's no blinking insertion point to tell you. The scheme is fairly simple: -
If there's a highlighted clip in the Clips pane or the Movie Track, the pasted clips appear immediately to the right of it. iMovie shoves all other clips to the right to make room for the new arrival. In other words, it's always a good idea to click a clip before pasting to show iMovie where to paste. -
If no clip is highlighted, iMovie pastes the cut or copied clips at the Playhead position in the Movie Track, even if that means chopping an existing clip in half to make room. -
If your intention is to replace the existing video in the Movie Track (instead of just shoving it to the right), don't use the Paste command at all. Instead, use the Paste Over at Playhead command, which is described in Section A.8. |