Section 5.8. Tricks of the Timeline Viewer
5.8. Tricks of the Timeline ViewerEverything you've read in the preceding pages has to do with the Movie Track in general. Most of the features described so far are available in either of the Movie Track's incarnations, the Clip Viewer or the Timeline Viewer. But the Timeline Viewer is more than just another pretty interface. It's far more useful (and complex) than the Clip Viewer. Many of the Timeline's superpowers have to do with audio. Soundtracks, narration, music tracks, and sound effects all appear here as horizontal colored bars that play simultaneously with your video. You can read about these features in Chapter 8. Some of the Timeline's features, however, are useful for everyday video editingthat is, if you consider playing footage in slow or fast motion everyday effects. 5.8.1. ZoomingThe Timeline Viewer has a scroll bar, whose handle appears to be made of blue toothgel, that lets you bring different parts of your movie into view. But depending on the length and complexity of your movie, you may wish you could zoom in for a more detailed view, or zoom out for a bird's-eye view of the whole project. That's the purpose of the slider shown at lower left in Figure 5-9. It adjusts the relative sizes of the bars that represent your clips. If you drag the slider handle all the way to the left, iMovie shows the entire movie in a single screen, without your having to scroll. The clip bars may be almost microscopicyou may not even be able to see the thumbnail picture on short clipsbut at least you get a sense of the whole. As you drag the zoom slider handle to the right, your clip bars expand in real time, widening to show you more detail. Finally, if the handle is all the way at the right side of the slider, only a few frames of video fill the entire width of the Timeline Viewer. You've zoomed in over 50 times! There's no one best setting for the zoom level. You should adjust it constantly as you work, pulling back when you need to figure out why some sound effects are firing at the wrong moment, zooming in when you want to make fine adjustments to the sound volume in mid-clip (Chapter 8), and so on. 5.8.2. Sliding for BlacknessWhen you drag a clip to the right in the Timeline Viewer, you introduce a gap between the clip and the one to its left; iMovie automatically fills the gap with blackness and silence. Tip: For greater precision, hold down the Control key and tap the arrow keys to move a clip right or left, making a wider or narrower black clip one frame at a time. Add the Shift key to nudge the clip 10 frames at a time. You can turn this gap into a bona fide, clickable black clip in either of two ways:
Either way, you wind up with a new clip that's black and silent. What you do with this gap is your business. You can leave it black, creating an effective "bookend" between scenes. You can switch to the Clip Viewer and drag the black clip up onto your Clips pane for future reuse. Or you can change its color , as described next . Note: If there's a transition to the left of a clip (Chapter 6), dragging a clip to the right also drags everything attached to it, including the transition icon and the preceding clip, all in a merry little train. 5.8.3. Colorizing a Black ClipTurning a black clip into a colored clip is a handy way to create a colored background for some titles or credits, for example. See Figure 5-10 for the secret. Figure 5-10. When you double-click a black clip, this dialog box appears. (Other ways to get here: Control-click a clip and choose Show Info from the shortcut menu, or click a clip and choose File |
 Show Info.)
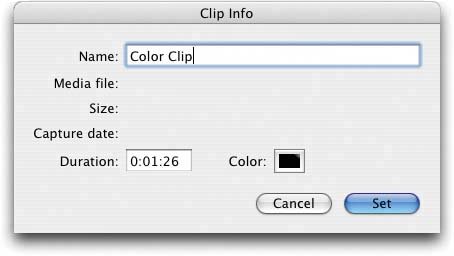
EAN: N/A
Pages: 203