Section 3.5. Sorting, Grouping, Stacking, and Filtering
3.5. Sorting, Grouping, Stacking, and FilteringUntil Vista came along, you could sort the files in a window into an alphabetical or chronological list. But that is so 2005. In Windows Vista, sorting is only one way to impose order on your teeming icons. Now there's grouping, stacking, and filtering new approaches to organizing the stuff in a window. All of this may get confusing, because every new feature means new controls and new window clutter. But in the end, mastering the stacking-and-grouping bit can pay off in time savings. As Figure 3-10 shows, the key to sorting, grouping, stacking, and filtering is the pop-up menus hiding within the column headings.
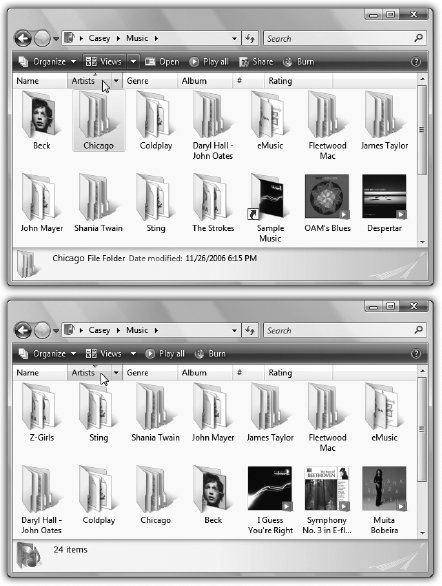
3.5.1. Sorting FilesSee the column headings at the top of every Explorer window (Name, Date modified, and so on)? In Details view, they make perfect sense; they're labels for the columns of information. But what the heck are they doing there in Icon view and List view? Your files and folders aren't even lined up beneath those headings! It turns out that these headings are far more important in Windows Vista than they were before. They're now your controls for sorting the iconseven in icon view. These headings aren't just signposts; they're also buttons . Click Name for alphabetical order, "Date modified" for chronological order, Size to view largest files at the top, and so on (Figure 3-11).
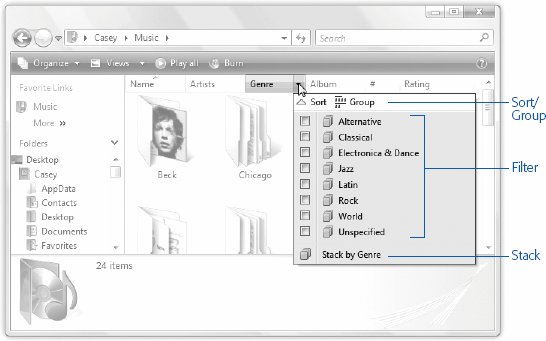
It's especially important to note the tiny, dark triangle in the heading you've most recently clicked. It shows you which way the list is being sorted. When the triangle points upward, oldest files, smallest files, or files whose names begin with numbers (or the letter A) appear at the top of the list, depending on which sorting criterion you have selected. Tip: It may help you to remember that when the smallest portion of the triangle is at the top, the smallest files are listed first when viewed in size order. To reverse the sorting order, just click the column heading a second time. Now newest files, largest files, or files whose names start with the letter Z appear at the top of the list. The tiny triangle turns upside-down. Note: Within each window, Windows groups folders separately from files . They get sorted, too, but within their own little folder ghetto. 3.5.2. GroupingWhen you group the icons in a window, they clump together by type, like kids in a high-school cafeteria. In this case, though, the clumping criteria is up to you. You can view your documents grouped by size, your photos grouped by the date they were taken, your music files grouped by band , and so on. As Figure 3-12 shows, Windows identifies each group with its own headline, making the window look like an index. It's an inspired tool that makes it easier to hunt down specific icons in crowded folders.
To group a window, start by opening the pop-up menu next to the column heading that represents the criterion you want: size, date, album, author, whatever (Figure 3-12). Note: Grouping isn't available in List viewonly Icon and Detail views. 3.5.3. StackingStacking's a lot like grouping. The big difference: in stacking, all the members of a particular group are represented by a single icon (Figure 3-13). It's designed to look like a crazy stack of icons, all piled on top of each other. Since a single stack icon now represents 10 or 100 or 1,000 icons, you save a lot of space in the window.
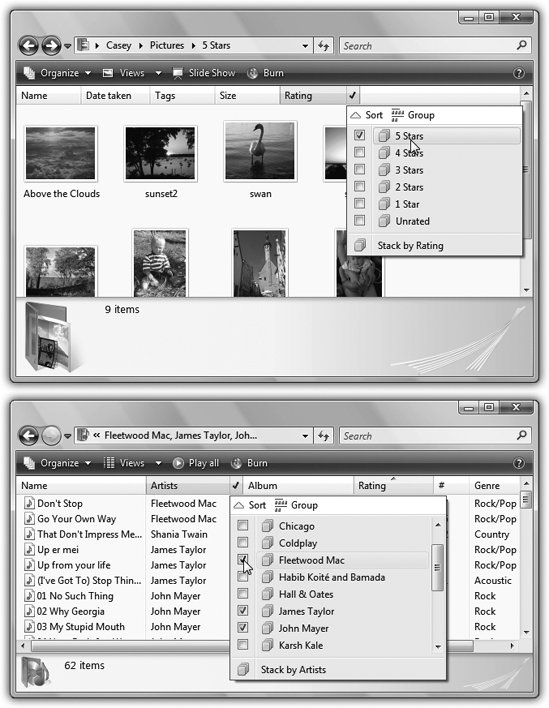
You create stacks using the "Stack by" command in each column heading's pop-up menu, as shown in Figure 3-13. When you double-click one of these stacks, a special Explorer window opens, showing the "exploded view" of the icons within. This isn't a real folder window, of course; it's a phantom folder, created just so that you can see the icons that were in its stack. Click the Back button to return to the stacked window. Tip: What's cool about stacks is that a certain icon may appear in more than one. If you've stacked by author, for example, a document written by collaborators Casey and Robin appears in both the Casey stack and the Robin stack. 3.5.4. FilteringFiltering means hiding . When you turn on filtering, a bunch of the icons in a window disappear , which can make filtering a little confusing. Tip: In case you one day think that you've lost a bunch of important files, look for the checkmark next to a column heading, as shown in Figure 3-14. That's your clue filtering is turned on, that Windows is deliberately hiding something from you.
On the positive side, filtering means screening out stuff you don't care about. When you're looking for a document you know you worked on last week, you can tell Windows to show you only the documents that were edited last week. Once again, you turn on filtering by opening the pop-up menu next to the column heading you want. For instance, if you want to see only your five-star photos in the Pictures folder, open the Rating pop-up menu (Figure 3-14, top). Sometimes, you'll see a whole long list of checkboxes in one of these pop-up menus (Figure 3-14, bottom). For example, if you want to see only the songs in your Music folder by the Beatles, turn on the Beatles checkmark. Tip: You can turn on more than one checkbox. To see music by the Beatles and U2, turn on both checkboxes. Filtering, by the way, can be turned on with sorting or grouping/stacking. To stop filtering, open the heading pop-up menu again and turn off the Filter checkbox. |
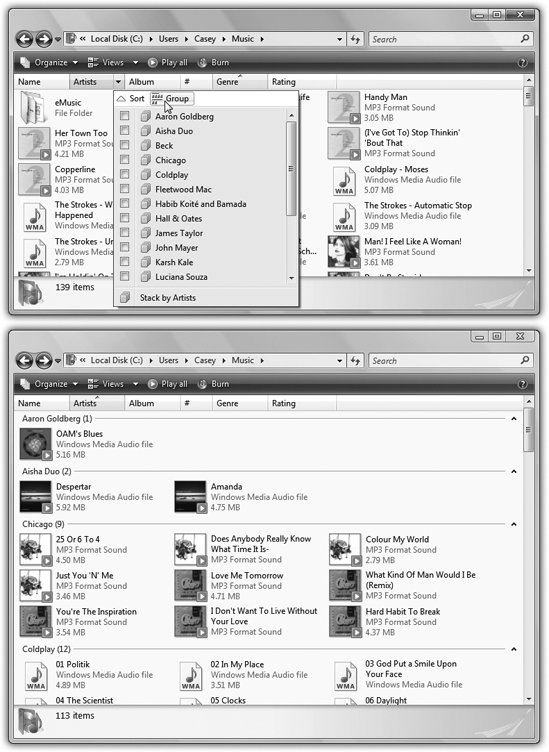
 next to the Artists column heading; in the pop-up menu, click Group.
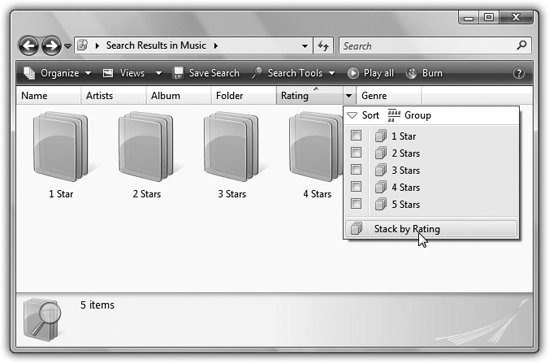
EAN: 2147483647
Pages: 175