Section 7.4. Saved Slideshows
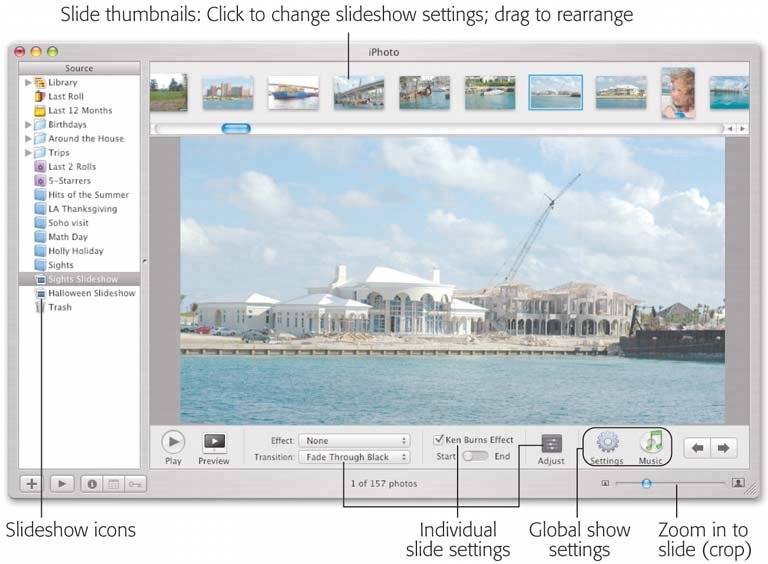
7.4. Saved SlideshowsiPhoto 6 also offers saved slideshows, each of which appears as an icon in your Source list. As noted earlier, the beauty of this system is that you can tweak a slideshow to deathyou can even set up different transition and speed settings for each individual slide and then save all your work as an independent clickable icon, ready for playback whenever you've got company. The key to all of this is the Slideshow icon at the bottom of the iPhoto window (Figure 7-4). It tosses you into the new Slideshow editing mode, which has some features of Edit mode and some features of regular old thumbnail-organizing mode. Here's how you create and fine-tune a saved slideshow:
When it's over, you can do all the usual things with the slideshow icon that now resides in your Source list:
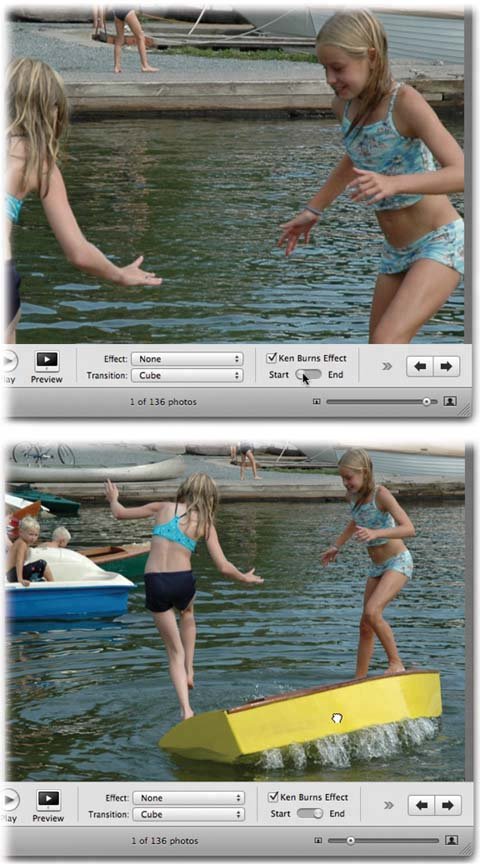
7.4.1. Global SettingsAs indicated by the preceding steps, you can make two kinds of changes to a saved slideshow: global ones (which affect all slides) and individual ones. Most of the global options are hiding behind the Settings and Music buttons, which summon the two dialog boxes shown in Figure 7-5. 7.4.1.1. The Music dialog boxThe Music dialog box should look familiar; it's identical to the dialog box shown in Figure 7-3. Here's where you choose the music that will accompany your slideshow, as described in Section 7.3.10. 7.4.1.2. The Settings dialog boxThe Settings button, however, brings up a dialog box that only seems familiar (Figure 7-5, top right). It contains many of the same options described on pages 182 through 188 (transition style, slide duration, Ken Burns effect, choice of music track or playlist, options to show your photos' titles and ratings, and so on). In this incarnation, though, you get a few new options. First, iPhoto wants to know how it should handle slideshows that aren't exactly the same length as the music you've selected for their soundtracks . Your options are "Repeat music during slideshow" ( loops the music as necessary to fit the slides) or "Fit slideshow to music" (plays the music only once, but squeezes or stretches the slides' time on the screen to fit the music). Figure 7-5. The Music dialog box (lower left) is identical to the one shown in Figure 7-3. The Settings dialog box (top right), though, offers a few new options. Everything in it, though, is wired for a single purpose: to establish the standard settings for every slide in the show. (You can override them later on a slide-by-slide basis, though.)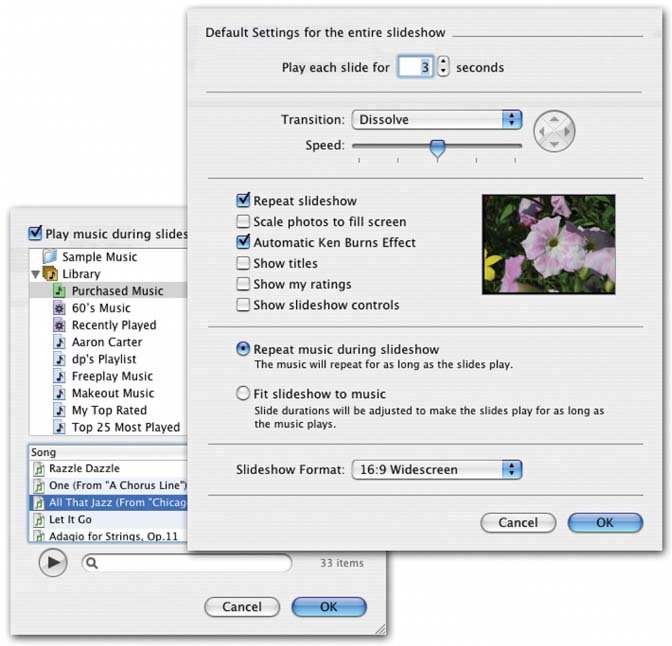 Second, you get a Slideshow Format pop-up menu. Here, you can tell iPhoto what shape the screen will be. Now, that may strike you at first as a singularly stupid statement; after all, doesn't the Mac know what shape its own screen is? But there's more to this story: Remember that you can build slideshows that aren't intended to be played on your screen. You might want to export a slideshow to play on other people's screens, or even on their TV sets, by burning the slideshow to a DVD. That's why this pop-up menu offers three choices: Current Display; 4:3 iDVD, TV (that is, a standard squarish TV set); and 16:9 Widescreen (for high-definition TV sets and other rectangular ones). In any case, the changes you make here affect all photos in the slideshow. Click OK when you're done, confident in the knowledge that you can always override these settings for individual slides. 7.4.1.3. The Effect pop-up menuThis pop-up menu lists three choices: None, Black and White, and Sepia (that is, brownish, old-fashioned monochrome). You could argue that Black and White makes a slideshow look artsier and more Ansel Adamsish, and that Sepia makes the pictures look more nostalgic and old-fashioned. You could also argue that both of these options are pretty gimmicky and should be used only as a last resort. 7.4.2. Individual-Slide OptionsThe Settings and Music dialog boxes offer plenty of control, but the changes you make there affect all slides in the show. For the first time, though, iPhoto 6 also offers control over individual slides. For example: 7.4.2.1. TransitionThe options in this pop-up menu are the different crossfade effects (Cube, Dissolve, and so on) that you can specify for the transition from one slide to another. (Whatever you choose here governs the transition out of the currently selected slide; every slideshow begins with a fade in from black.) 7.4.2.2. Transition speed and directionYou can also control the speed of the transitions on a slide-by-slide basis, and even which direction the transition effect proceeds across the screen (for transition styles that offer a choice). Because Apple figures this isn't the sort of control most people need every day, it hid these controls away. To see them, click the black Adjust button shown in Figure 7-6. Dragging the Speed slider left or right gets through the transition slower or faster. Tip: The idea behind the design of the strangely see-through Adjust panel is that you can leave it open . You can park it anywhere onscreen as you work through the slides in your show. Simply put, as you click a new slide, the Adjust panel changes to reflect whatever settings are in place for that photo. In other words, don't waste your time closing and reopening it. 7.4.2.3. Slide timingAs you know, the Settings dialog box (Figure 7-5) is where you specify how long you want each slide to remain onscreenin general. But if you want to override that setting for a few particularly noteworthy shots, the Adjust panel (Figure 7-6) is once again the solution. With the specially blessed photo on the screen before you, summon the Adjust panel (click the Adjust button, if the panel isn't already open). Use the "Play this slide for __ seconds" control to specify this slide's few seconds of fame. Tip: If you click the Reset to Defaults button in the Adjust panel, iPhoto wipes out any individual-slide customizations. It then reapplies your global transition and slide-timing settings to the selected photo. 7.4.2.4. Cropping and zoomingHere's a totally undocumented feature: You can choose to present only part of a photo in a slideshow, in effect cropping out portions of it, without actually touching the original. To enlarge the photo (thus cropping out its outer margins), just drag the Size slider at the lower-right corner of the iPhoto window. Whatever photo size you create here is how it will appear during the slideshow. What you may not realize, though, is that you can also drag inside the picture itself to shift the photo's position onscreen. Between these two techniquessizing and slidingyou can set up a very specific portion of the photo. (Heck, you could even present the photo twice in the same slideshow, revealing half of it the first time, half of it the next.) Figure 7-6. The Adjust panel offers some less frequently used individual-slide settings. For example, it lets you change the speed of a transition effect and the amount of time an individual slide remains onscreen. (The Transition pop-up menu here is identical to the one at the bottom of the iPhoto window.)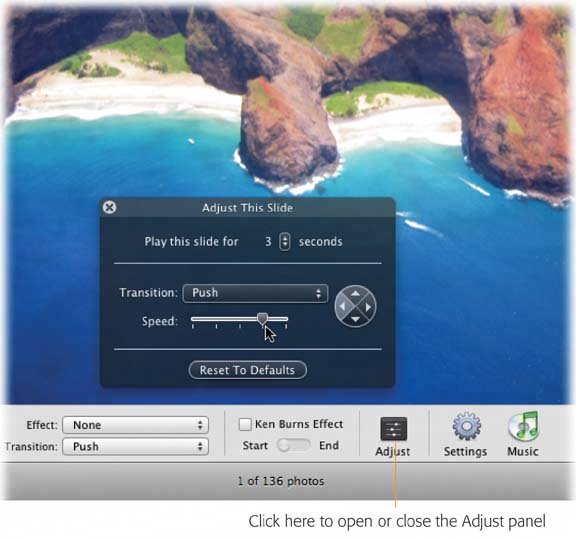 7.4.2.5. The Ken Burns Effect checkboxIf you flip back a few pages, you'll be reminded that the Ken Burns effect is a graceful , panning, zooming effect that brings animation to the photos of your slideshow, so that they float and move instead of just lying there. Figure 7-7. The idea behind the Ken Burns effect is that you set up the start and end points for the gradual zooming/panning effect. iPhoto, meanwhile, will automatically supply the in-between frames , producing a gradual shift from the first position to the second. In this case, the Ken Burns effect lets you save the "punch line" of this story-telling photo for the end of its time onscreen. |
EAN: 2147483647
Pages: 183