7.3. Instant Slideshows An instant slideshow, for the purposes of this book, is one that you begin by clicking the triangular Play button beneath the Source list without the Option key. It makes the Slideshow dialog box appear, so that you can make a few quick changes to the slideshow settings. (Slide selection and slide sequence, as described in the previous paragraphs, work the same way.) The Slideshow dialog box has two panelsSettings and Musicas shown in Figure 7-2. In iPhoto 6, you have more ways than ever to customize your slideshow: Figure 7-2. The Slideshow dialog box is where you set slideshow timing for each show. You can set it to go as fast as 1 second per slide, or bump the number up to 60 seconds each for a very leisurely presentation. (You can type a number larger than 60 in the "Play each slide for " field, but iPhoto will ignore you. It refuses to spend any more than one minute on each shot, no matter how good a photographer you are.)
Using the pop-up menu and Speed slider at the top of this dialog box, you can choose from 13 transition effects and decide how quickly you want them to go by. 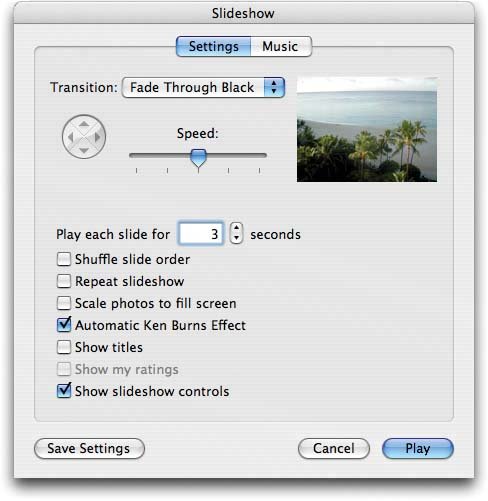
7.3.1. 7.3.1.1. Transitions You can choose from 13 different types of transition effects between slidesfor example, the crossfade or dissolve , in which one slide gradually fades away as the next "fades in" to take its place. Here's a summary: -
None . An abrupt switch, or simple cut, to the following image. -
Cube . Imagine that your photos are pasted to the sides of a box that rotates to reveal the next one. If you've ever used the Fast User Switching feature introduced in Mac OS 10.3, you've got the idea. -
Dissolve . This classic crossfade should be familiar to users of previous versions of iPhoto or the screen saver feature in Mac OS X. -
Droplet . This wild effect resembles animated, concentric ripples expanding from the center of a pondexcept that a new image forms as the ripples spread. -
Fade Through Black . After each slide has strutted and fretted its time upon the stage, the screen fades momentarily to black before the next one fades into view. The effect is simple and clean, like an old-fashioned living-room slideshow. Along with Dissolve, you should consider this effect one of the most natural and least distracting choices. -
Flip . The first photo seems to flip around, revealing the second photo pasted onto its back. -
Mosaic Flip Large, Mosaic Flip Small . The screen is divided into several squares, each of which rotates in turn to reveal part of the new image, like puzzle pieces turning over. (The two options refer to two sizes of the puzzle pieces.) -
Page Flip . Apple's just showing off here. The first photo's lower-right corner actually peels up like a sheet of paper, revealing the next photo "page" beneath it. -
Push, Reveal, Wipe . Three variations of "new image sweeping onto the screen." In Push, Photo A gets shoved off the other side of the screen as Photo B slides on. In Reveal, Photo A slides off, revealing a stationary Photo B. And in Wipe, Photo A gets covered up as Photo B slides on. -
Twirl . Photo A literally spins, furiously, shrinking to a tiny dot in the middle of the screenand then Photo B spins onscreen from that spot. The whole thing feels a little like the spinning-newspaper effect used to signify breaking news in old black-and-white movies. In most cases, choosing a transition effect makes two additional controls "light up" just below the pop-up menu: -
Direction . Determines the direction the new image enters from. Choose Right to Left, Top to Bottom, or vice versa in both cases. (Most people find left to right the most comfortable way to experience a transition, but a slow top-to-bottom wipe is pleasant, too.) -
Speed . Move the slider to the right for a speedy transition, or to the left for a leisurely one. Take into account your Timing setting, described below. The less time your photo is onscreen, the better off you are with a fast transition, so that your audience has time to see the picture before the next transition starts. However, moving the Speed slider all the way to the right produces a joltingly fast change. 7.3.2. Slide Timing If left to its own devices, iPhoto advances through your pictures at the rate of one photo every 3 seconds. If that seems too brisk or too slow, you can simply change the rate. In the Slideshow dialog box, use the "Play each slide for__seconds" controls to specify a different interval, as shown in Figure 7-2.
Tip: You can also adjust the speed during the slideshow, just by pressing the up or down arrow keys. Behind the scenes, iPhoto adjusts the number of seconds in the Slideshow dialog box accordingly .
7.3.3. Shuffle Slide Order An iPhoto slideshow normally displays your pictures in the order they appear in the photo-viewing area. But if you'd like to add a dash of surprise and spontaneity to the proceedings , turn on the "Shuffle slide order" checkbox. iPhoto will then shuffle the pictures into whatever order it pleases. 7.3.4. Repeat Slideshow When iPhoto is done running through all your photos in a slideshow, it ordinarily starts playing the whole sequence from the beginning again. If you want your photos to play just once through, turn off the "Repeat slideshow" checkbox. 7.3.5. Scale Photos to Fill Screen If any photos in your slideshow don't match your screen's proportions , you may want to turn on "Scale photos to fill screen." For example, if your slideshow contains photos in portrait orientationthat is, pictures taken with the camera rotatediPhoto fills up the unused screen space on each side with vertical black bars. Turning on "Scale photos" makes iPhoto enlarge the picture so much that it completely fills the screen. This solution, however, comes at a cost: Now the top and bottom of the picture are lost beyond the edges of the monitor. When the middle of the picture is the most important part, this option works fine. If the black bars bother you, the only other alternative is to crop the odd- sized pictures in the slideshow album so that they match your monitor's shape. (See "Cropping" in Section 6.5.1.)
Note: This option doesn't mean "Enlarge smaller photos to fill the screen"; iPhoto always does that. This option affects only photos whose proportions don't match the screen.
7.3.6. Automatic Ken Burns Effect Apple first introduced what it calls the "Ken Burns effect" in iMovie, not iPhoto. It's a special effect designed to address the core problem associated with using still photos in a movienamely, that they're still ! They just sit there without motion or sound, wasting much of the dynamic potential of video. For years , professional videographers have addressed the problem using special sliding camera rigs that produce gradual zooming, panning, or both, to bring photographs to life. Among the most famous practitioners of this art is Ken Burns, the creator of PBS documentaries like The Civil War and Baseball which is why Apple, with Burns' permission, named the feature after him. And now your own humble slideshows can have that graceful , animated, fluid Ken Burns touch. No photo ever just sits there motionless on the screen. Instead, each one flies gracefully inward or outward, sliding and zooming. It's a great effect, but it can occasionally backfire, too. Every now and then, for example, the actual subject of the photo won't be centered, or the photo won't make it completely onto the screen before the next one begins to zoom on. (One of the virtues of the saved slideshow, described below, is that you control where the Ken Burns panning and zooming begins and ends.) 7.3.7. Show Titles Show titles? Sure Fiddler on the Roof! West Side Story! Cats ! Just kidding. As noted in Section 5.10.1, every photo in your collection can have a namea title, in other words. If you turn on this option, iPhoto superimposes each photo's title during the slideshow in a small white-on-black box in the upper-left corner of the screen. Needless to say, the cryptic file names created by your digital camera ( IMG00034.jpg ) usually don't add much to your slideshow. But if you've taken the time to give your photos helpful, explanatory names ("My dog age 3 mos"), then by all means turn on the "Show titles" checkbox. 7.3.8. Show My Ratings As described in Section 5.15, you can differentiate your stunning award-winners from the photographic dogs by adding ratings to each, on a one-to-five-star scale. If you turn on this option, iPhoto superimposes a small ratings bar on the bottom of each slideshow picture. (Unfortunately, you can't change the rating using this mini-bar, since it's for display purposes only. Of course, a quick mouse wiggle summons the fullblown control bar, complete with its own star-rating panel that you can change.)
Note: The control bar and the star-rating panel occupy the same space near the bottom of the slideshow "canvas," so they can't both be onscreen at the same time. That's why the "Show my ratings" checkbox is grayed out whenever "Show slideshow controls" is turned on.
7.3.9. Show Slideshow Controls You can always summon iPhoto's new onscreen control bar by twitching the mouse during a slideshow; then, if a few seconds go by without any mouse activity, the bar politely fades away again. If you turn on "Show slideshow controls," however, then the control bar appears automatically every time this slideshow beginsno mouse wiggling requiredand remains onscreen all the time. 7.3.10. Music: Soundtrack Central Perhaps more than any other single element, music transforms a slideshow, turning your ordinary photos into a cinematic event. When you pair the right music with the right pictures, you do more than just show off your photos; you create a mood that can stir the emotions of your entire audience. So if you really want your friends and family to be transfixed by your photos, add a soundtrack. That's especially easy if, like many Mac OS X fans, you've assembled a collection of your favorite music in iTunes, the free MP3-playing software that comes with every Mac. (It's also included with the $80 iLife package, or you can download it from www.apple.com.) For the background music of an iPhoto slideshow, you have the choice of an individual song from your iTunes Library or an entire playlist . Gone are the days of listening to the same tune repeating over and over again during a lengthy slideshowa sure way to go quietly insane (unless, of course, you really like that song). The possibilities of this new feature are endless, especially combined with iPhoto's smart albums feature. You can create a smart album that contains, say, only photos of your kids taken in December, and give it a soundtrack composed of holiday tunes, created effortlessly using a smart playlist in iTunes. Instant holiday slideshow! Your first iPhoto slideshow is born with a ready-to-use soundtrackJ. S. Bach's Minuet in G . In fact, Apple sends iPhoto to you equipped with two Bach classicsthe Minuet in G and Jesu, Joy of Man's Desiring . They're listed in the Sample Music category. Not to knock Bach, but it's fortunate that you're not limited to two of his greatest hits. To switch to a soundtrack of your own choosing, click the Music button at the top of the Slideshow dialog box (Figure 7-2). If you use iTunes, every track in your iTunes Library automatically appears here. You can search and sort through your songs and playlists, just as though you were in iTunes itself. To get started, click the Music button near the top of the Slideshow dialog box. As shown in Figure 7-3, a folder called Sample Music appears at the top, containing the two Bach pieces mentioned above. A second category, called GarageBand, appears if you've used GarageBand to create musical masterpieces of your own. Finally, if you have songs of your own in iTunes, click the iTunes flippy triangle (and then click Library) to access them. Your iTunes playlists appear at this point, too. (For iTunes songs, a playlist represents what an album is in iPhoto: a hand-picked subset of the larger collection.) In other words, you can use this list either to select an entire playlist to use as your soundtrack, or to call up a playlist for the purpose of listing the individual songs in it, thereby narrowing your search for the one song you seek. -
To listen to a song before committing to it as a soundtrack, click its name in the list and then click the triangular Play button (  ). (Click the same button, darkened during playback, when you've heard enough.) ). (Click the same button, darkened during playback, when you've heard enough.) Figure 7-3. The Music tab of the Slideshow dialog box lets you choose a playlist (or your entire iTunes Library). By clicking the column headings, you can sort the list by Song, Artist, or Time. You can also use the Search box, as shown here, to pinpoint an individual song.
If you have a long slideshow, use the list to choose an iTunes playlist rather than an individual song. iTunes will repeat the song (or playlist) for as long as your slideshow lasts. 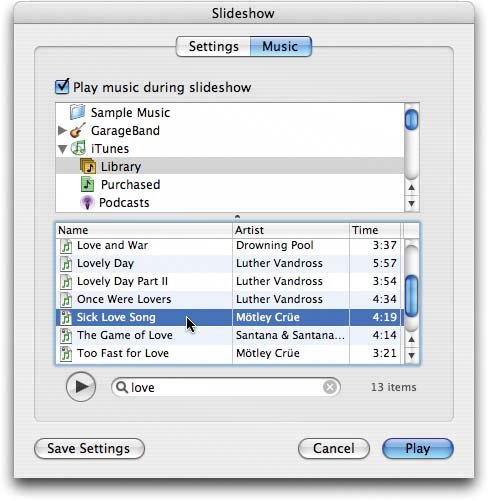 -
To use an entire playlist as a soundtrack for your slideshow, select it from the list. At slideshow time, iPhoto will begin the slideshow with the first tune in the playlist and continue through all the songs in the list before starting over. -
To use an individual song as a soundtrack, click its name in the list. That song will now loop continuously for the duration of the slideshow. -
Rather than scroll through a huge list, you can locate the tracks you want by using the capsule -shaped Search field below the song list. Click in the Search field, and then type a word (or part of a word) to filter your list. iPhoto searches the Artist, Song, and Album fields of the iTunes Library and displays only the matching entries. To clear the search and view your whole list again, click the X in the search field. -
Click one of the three headersArtist, Song, or Timeto sort the iTunes music list alphabetically by that header. -
You can also change the arrangement of the three columns by grabbing the headers and dragging them into a different order. Once you've settled on (and clicked) an appropriate musical soundtrack for the currently selected album, click Save Settings (to memorize that choice without starting the slideshow) or Play (to begin the slideshow right now). From now on, that song or playlist will play whenever you run a slideshow from that album. (It also becomes the proposed soundtrack for any new slideshows you create.) Alternatively, if you decide you don't want any music to play, turn off the "Play music during slideshow" checkbox above the list.
Note: You can't select multiple songs from the song list in the Slideshow dialog box. If you have in mind a group of several songs that would make a perfect backdrop for your slideshow, the solution is to create a new playlist in iTunes, taking care to drag into it the desired songs from your Music Library, in the order that you want them to play. Switch back to iPhoto, and choose that playlist from the pop-up menu in the Slideshow dialog box (see Figure 7-3).
7.3.11. Different Shows, Different Albums You can save different slideshow settings for each icon in your Source list. To save settings for a specific photo album, for example, first choose the album from the Source list, then click the Slideshow icon in the lower pane of the iPhoto window to open the Slideshow dialog box. Pick the speed, order, repeat, and music settings you want, then click Save Settings. The settings you saved will automatically kick in each time you launch a slideshow from that album.
Tip: Thereafter, you can Option-click the Play button to start the show without interruption by the dialog box; iPhoto recreates the show just the way you had it last.
 |