B.1. iPhoto Menu This first menu, Mac OS X's Application menu, takes on the name of whatever program happens to be running in the foreground. In iPhoto's case, that would be iPhoto. B.1.1. About iPhoto This command opens the "About" box containing the requisite Apple legalese. There's really only one good reason to open the About iPhoto window: It's the easiest way to find out exactly which version of iPhoto you have. B.1.2. iPhoto Hot Tips Opens a page on Apple's Web site that lists a brief overview of iPhoto 6's newest features, and tricks like keyboard shortcuts. B.1.3. Preferences Opens the Preferences window (Figure B-1), which has six panels to choose from: B.1.3.1. General -
Tell iPhoto how many months to show in the Last ___ Months album and how many rolls to show in the Last ___ Rolls album, as discussed in Chapter 5. -
Have iPhoto display the total photo count, in parentheses, next to each album in the Source list. -
Choose how you want iPhoto to open photos when you double-click them. You have four choices: Open the photo for editing in the main iPhoto window, in a separate window, in the new full-screen mode, or in another program (which you choose by clicking the Set button). Details appear in Chapter 5. -
Change the setting of iPhoto's Rotate button so that it spins selected photos counterclockwise instead of clockwise. -
Choose the email program that you want iPhoto to use when emailing pictures as attachments using the Mail Photo feature. -
Specify whether or not iPhoto is allowed to check for ".01" upgrades that Apple releases via the Internet. If yes, then you'll see, from time to time, dialog boxes that invite you to download and install these updates (which usually fix bugs ). Figure B-1. You'll probably be visiting iPhoto's Preferences window fairly regularly, so remember the keyboard shortcut that takes you here:  -comma. You need to open Preferences every time you want to turn Photo Sharing on or off, for example. -comma. You need to open Preferences every time you want to turn Photo Sharing on or off, for example. 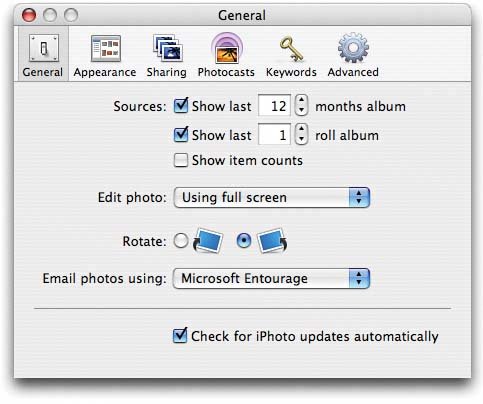
B.1.3.2. Appearance -
Add a drop shadow or thin black outline frame to your thumbnails in the photoviewing area. -
Change the background of the photo-viewing area from white to blackor any shade of gray. -
Align thumbnails to a grid in the iPhoto window. -
Superimpose a floating, dark gray label on the screen while you're scrolling, to help you figure out where you are in your vast library. (It shows the date, or rating, or name of the photos whizzing by, according to your sort criterion.) -
Choose a size (small or large) for the album titles in the Source list. -
Use animated scrolling refers to what happens when you press the Page Up or Page Down keys on your keyboard. When this option is on, the thumbnails slide up or down on the screen. When it's off (or when you're going too fast for iPhoto to process the animation), the window just jumps suddenly to the next screenful. B.1.3.3. Sharing Set up iPhoto for sharing your iPhoto Library over a home or small-office network, as described in Section 9.5. B.1.3.4. Photocasts This simple panel pertains to photocasting (Section 9.4.1). At the top, you choose how often you want your copy of iPhoto to check for updated versions of other people's photocasts. The rest of this pane simply lists the albums that you've broadcast; you can use the Stop Publishing to terminate the public's access to your masterpieces. B.1.3.5. Keywords Here's where you add or delete keywords, which you can use to tag your photos for quick retrieval later. (Section 5.12 has the details.) New in iPhoto 6: a pop-up menu that lets you specify what happens when you turn on more than one keyword button. iPhoto can either round up only the photos with all of those keywords, or the ones that match any of the keywords. B.1.3.6. Advanced A better name might be "Miscellaneous." Here we go: -
Copy files to iPhoto Library folder when adding to library . As noted in Section 4.2.4, iPhoto 6 is willing to track your photos no matter where they are on your hard drivein their current folder homeswithout duplicating them in its own library. Here's the on-off switch. -
Add ColorSync profile . As you may have discovered through painful experience, computers aren't great with color. Each device you use to create and print digital images "sees" color a little bit differently, which explains why the deep amber captured by your scanner may be rendered as chalky brown on your monitor, yet come out as a fiery orange on your Epson inkjet printer. Since every gadget defines and renders color in its own way, colors are often inconsistent as a print job moves from design to proof to press. ColorSync attempts to sort out this mess, serving as a translator between all the different pieces of hardware in your workflow. For this to work, each device (scanner, monitor, printer, digital camera, copier , proofer, and so on) has to be calibrated with a unique ColorSync profile a file that tells your Mac exactly how it defines colors. Armed with the knowledge contained in the profiles, the ColorSync software can compensate for the various quirks of the different devices, and even the different kinds of paper they print on. Using the ColorSync Utility program (in Applications  Utilities), you can specify which ColorSync profile each of your gadgets should use. The next step, though, is to embed a profile right into each photo , making all of the ColorSync tracking automatic. This feature, once relegated to the professional world, is now available right in iPhoto, thanks to this checkbox. Utilities), you can specify which ColorSync profile each of your gadgets should use. The next step, though, is to embed a profile right into each photo , making all of the ColorSync tracking automatic. This feature, once relegated to the professional world, is now available right in iPhoto, thanks to this checkbox. -
Save edited RAW file as 16-bit TIFFs . Here's another high-end feature. As you know from Section 6.20, iPhoto ordinarily saves RAW files as JPEG graphics once you've edited them. But many photographers object that JPEG is a compressed format that, in theory, can degrade the quality of the original photo. This option tells iPhoto to save such pictures in the TIFF format instead, which consumes far more disk space but doesn't compress the photos. -
Use RAW files with external editor . This means, "Open RAW photos with Adobe's RAW-file editor, as described in Section 6.20 of this book." B.1.4. Empty Trash Purges the contents of the iPhoto Trash, permanently deleting any photos, books, slideshows, and albums in it. There's no turning back once you choose Empty Trash: Your photos are gone, and there's no Undo command. Think before you empty. B.1.5. Shop for iPhoto Products This isn't so much a command as it is a marketing ploy. It opens your Web browser and opens a page on Apple's Web site that offers to sell you digital cameras , tripods, printers, and other accessories. B.1.6. Provide iPhoto Feedback This command takes you to a Web form on Apple's site where you can register complaints, make suggestions, or gush enthusiastically about iPhoto. B.1.7. Register iPhoto This is a link to yet another Apple Web page. Registering iPhoto simply means giving Apple your contact information. There's no penalty for not registering, by the way. Apple just wants to know more about who you are, so that it can offer you exciting new waves of junk mail. B.1.8. Check for Updates As noted on the previous page, Apple occasionally patches iPhoto to make it faster or better. If you've turned off automatic checking, you can instruct the program manually to check in with the mother ship via the Internet. B.1.9. Hide iPhoto, Hide Others, Show All These aren't iPhoto's commandsthey're Mac OS X's. In any case, they determine which of the various programs running on your Mac are visible onscreen at any given moment. The Hide Others command is probably the most popular of these three. It zaps away the windows of all other programs including the Finderso that the iPhoto window is the only one you see.
Tip: If you know this golden Mac OS X trick, you may never need to use the Hide Others command: To switch into iPhoto from another program, hold down the Option and keys when clicking the iPhoto icon in the Dock. Doing so simultaneously brings iPhoto to the front and hides all other programs you have running, producing a distraction-free view of iPhoto.
B.1.10. Quit iPhoto This command closes iPhoto, no questions asked. You're not even asked to save changes, because as you've probably noticed, iPhoto doesn't even have a Save command. Like Filemaker Pro, 4D, and other database programs, iPhotoitself a glorified databasecontinually saves changes as you add, delete, or edit photos.  |