9.2. Printing Fortunately, the setup described so far in this chapter is a one-time-only task. Once it's over, printing is little more than a one-click operation. 9.2.1. Printing from Applications After you've created a document you want to see on paper, choose File  Print (or press Ctrl+P). The Print dialog box appears, as shown in Figure 9-5. Print (or press Ctrl+P). The Print dialog box appears, as shown in Figure 9-5. This box, too, changes depending on the program you're usingthe Print dialog box in Microsoft Word looks a lot more intimidating than the WordPad versionbut here are the basics: Figure 9-5. The options in the Print dialog box are different on each printer model and each application, so your Print dialog box may look slightly different. For example, here are the Print dialog boxes from Microsoft Word (left) and WordPad (right). Just click OK or Print (or press Enter) to send the document to the printer. 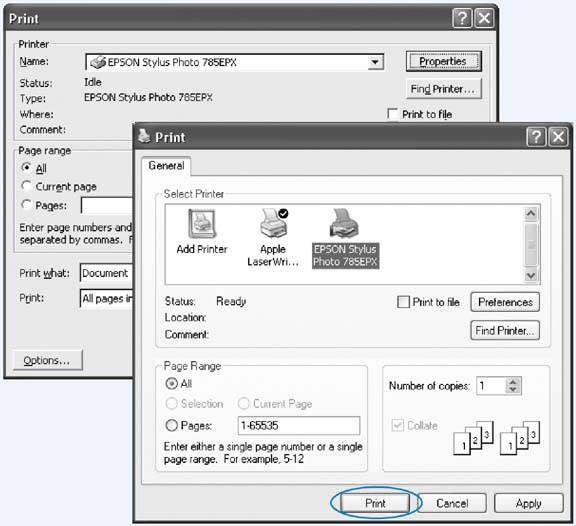
-
Select Printer . If your PC is connected to several printers, or if you've created several differently configured icons for the same printer, choose the one you want from this drop-down list or scrolling panel of printer icons. -
Preferences/Properties . Clicking this button opens a version of the printer's Properties dialog box, as shown in Figure 9-6. Figure 9-6. When you choose Properties from the Print dialog box, you can specify the paper size you're using, whether you want to print sideways on the page (Landscape), what kind of photo paper you're using, and so on. Here, you're making changes only for a particular printout; you're not changing any settings for the printer itself. (The specific features of this dialog box depend on the program you're using.) 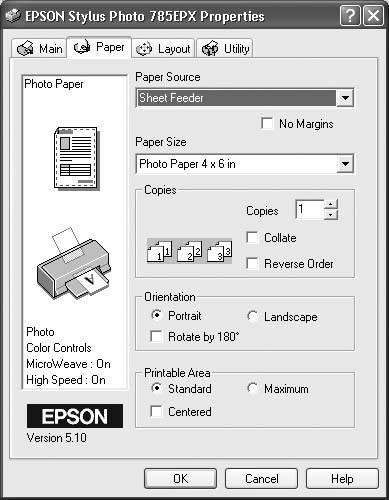
-
Page range . These controls specify which pages of the document you want to print. If you want to print only some of the pages, click the Pages option and type in the page numbers you want (with a hyphen, like 3-6 to print pages 3 through 6).
Tip: You can also type in individual page numbers with commaslike 2, 4, 9 to print only those three pagesor even add hyphens to the mix, like this: 1-3, 5-6, 13-18.
Click Current Page to print only the page that contains the blinking insertion point. Click Selection to print only the text you selected (highlighted) before opening the Print dialog box. (If this option button is dimmed, it's because you didn't highlight any textor because you're using a program that doesn't offer this feature.) -
Number of copies . To print out several copies of the same thing, use this box to specify the exact amount. You'll get several copies of page 1, then several copies of page 2, and so onunless you also turn on the Collate checkbox, which produces complete sets of pages, in order. -
Print . The Print drop-down list in the lower-left section of the dialog box offers three options: "All pages in range," "Odd pages," and "Even pages." Use the Odd and Even pages options when you have to print on both sides of the paper, but your printer has no special feature for this purpose. You'll have to print all the odd pages, turn the stack of printouts over, and run the pages through the printer again to print even page sides. -
Application-specific options . The particular program you're using may add a few extra options of its own to this dialog box. Figure 9-7 shows a few examples from Internet Explorer's Print dialog box. When you've finished making changes to the print job, click OK or Print, or press Enter. Thanks to the miracle of background printing, you don't have to wait for the document to emerge from the printer before returning to work on your PC. In fact, you can even exit the application while the printout is still under way, generally speaking. Figure 9-7. The Web page about to be printed uses frames (individual, independent, rectangular sections). The Print dialog box in Internet Explorer recognizes frames, and lets you specify exactly which frame or frames you want to print. If the page contains links to other Web pages (and these days, what Web page doesn't?), you can print those Web pages, too, or just print a table of the links (a list of the URL addresses). 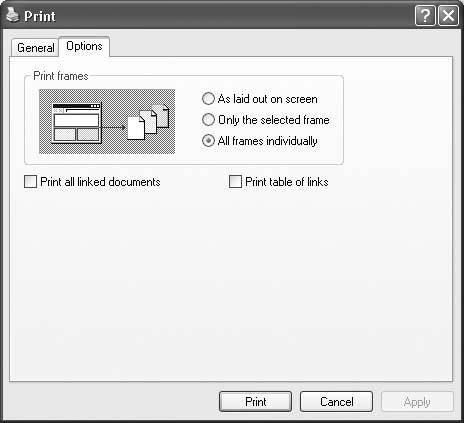
9.2.2. Printing from the Desktop You don't necessarily have to print a document while it's open in front of you. You can, if you wish, print it directly from the desktopvia an open disk or folder window, or Windows Explorer, for examplein any of three ways: -
Right-click the document icon, and then choose Print from the shortcut menu. Windows launches the program that created itWord or Excel, for example. The Print dialog box appears, so that you can specify how many copies you want and which pages you want printed. When you click Print, your printer springs into action, and then the program quits automatically (if it wasn't already open). -
If you've opened the Printers and Faxes window, you can drag a document's icon directly onto a printer icon. -
If you've opened the printer's own print queue window (Figure 9-8) by double-clicking the Printers icon in your Printers and Faxes window, you can drag any document icon directly into the list of waiting printouts. Its name joins the others on the list. These last two methods bypass the Print dialog box, and therefore give you no way to specify which pages you want to print, nor how many copies. You just get one copy of the entire document. 9.2.3. Printing from the Internet If you use Internet Explorer to browse the Web (see Chapter 7), the Print dialog box offers a tab called Options, which contains a few special features for printing Web pages. Figure 9-7 illustrates a few of them.  |