2.3. Optional Window Panes: All Versions Most Explorer windows have some basic informational stuff across the top: the Address bar and the task toolbar, at the very least. But that's just the beginning. As shown in Figure 2-4, the Organize menu on the task toolbar lets you hide or show as many as four other strips of information. Turning them all on at once may make your windows feel a bit claustrophobic, but at least you'll know absolutely everything there is to know about your files and folders. 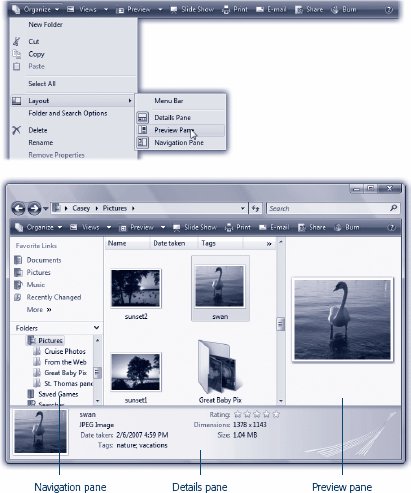 | Figure 2-4. Windows Vista has you surroundedor at least your Explorer windows .
Use the Organize menu to summon or dismiss each of the optional panes that can line a window. A subtle outline appears around the icon for each pane you've summoned. Choose the name of a pane once to make it appear, and a second time to hide it . | |
The trick is to choose a pane name from the Organize  Layout command, as shown in Figure 2-4. Here are the options youll find there. Layout command, as shown in Figure 2-4. Here are the options youll find there.
Tip: You can adjust the size of any pane by dragging the dividing line that separates it from the main window. (You'll know when you've got the right spot when your cursor turns into a double-headed arrow.)
2.3.1. Search Pane As shown in Figure 2-1, the Search pane appears across the top of the window, just below the Address bar. Of course, the Search box already appears in every Explorer window, next to the Address barso why do you need a Search pane as well? Because the pane gives you a lot more control. It lets you specify more elaborate search criteria, including where you want Windows to look. Details are on page 120. 2.3.2. Details Pane This strip appears at the bottom of the window, and it can be extremely useful. It reveals all kinds of information about whatever icon you've clicked in the main part of the window: its size, date, type, and so on. It's the sort of information that, in previous versions of Windows, you wouldn't be able to see without right-clicking and opening the Properties window. Some examples: -
For a music file, the Details pane reveals the song's duration, band and album names , genre , the star rating you've provided, and so on. -
For a disk icon, you get statistics about its formatting scheme, capacity, and how much of it is full. -
For a Microsoft Office document, you see when it was created and modified, how many pages it has, who wrote it, and so on. -
If nothing is selected, you get information about the open window itself: namely, how many items are in it. -
If you select several icons at once, this pane shows you the sum of their file sizesa great feature when you're burning a CD, for example, and don't want to exceed the 650 MB limit. You also see the range of dates when they were created and modified. What's especially intriguing is that you can edit many of these details, as described on page 70.
Tip: To hide the Details pane, you could return to the Organize Layout command and choose the panes name a second time. But it's faster to just right-click a blank spot in the pane (usually the lower-right corner works well) and, from the shortcut menu, choose Hide Details Pane.
2.3.3. Preview Pane The Preview pane appears at the right side of the window. That's right: Microsoft has now invented information strips that wrap all four sides of a window. NOSTALGIA CORNER
Would You Like to See the Menu Bar? | | You may have noticed already that in Vista, there's something dramatically different about the menu bar (File, Edit, View and so on): it's gone. Microsoft decided that you'd rather have a little extra space to see your icons. Fortunately, you can bring it back, in three ways. Temporarily . Press the Alt key or the F10 key. Presto! The traditional menu bar reappears. You even get to see the classic one-letter underlines that tell you what letter keys you can type to operate the menus without the mouse. Permanently, all windows . On the Task toolbar, choose Organize Layout Menu Bar. The traditional menu bar appears, right above the task toolbar. There it will stay forever, in all Explorer windows, or at least until you turn it off using the same command. Permanently, all windows (alternate method) . Here's another trick that achieves the same thing. Choose Start Control Panel. Click Classic View, then Folder Options, then the View tab. Turn on "Always show menus," and then click OK. |
Anyway, the Preview pane can be handy when you're examining pictures, text files, Office documents, PDF files, sounds, and movies. As you click each icon, you see a magnified thumbnail version of what's actually in that document. As Figure 2-5 demonstrates , a controller lets you play sounds and movies right there in the Explorer window, without having to fire up Windows Media Player. (Cool.) 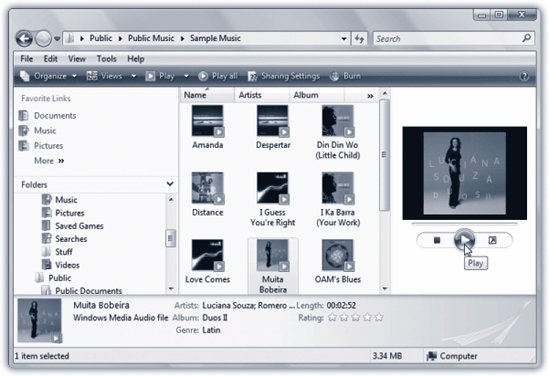 | Figure 2-5. In many windows, the Preview pane can get in the way, because it shrinks the useful window space without giving you much useful information. But when you're browsing movies or sound files, it's awesome ; it lets you play the music or the movie right in place, right in the window, without having to open up a playback program . | |
2.3.4. Navigation Pane The Navigation pane has two halves : Favorite Links (the top part) and Folders (the bottom part). 2.3.4.1. Favorite Links list The primary purpose of this area is to list places to which you want quick access. Since this pane will be waiting in every Explorer window you open, listing your favorite folders here can save you a lot of repetitive folder-burrowing. One click on a folder name opens the corresponding window. For example, click the Pictures icon to view the contents of your Pictures folder in the main part of the window (Figure 2-6).  | Figure 2-6. The Navigation pane makes navigation very quick, because you can jump back and forth between distant corners of your PC with a single click .
Folder and disk icons here work just like normal ones. You can drag a document onto a folder icon to file it there, for example . | |
This list also offers icons for Recently Changed and Searches. These links refer to saved searches . You can read more about what they are and how they were created on page 123. For now, it's enough to know that Recently Changed summons a quick list of everything on your hard drive that you've modified in the last 30 days, and Searches brings up a window filled with similar canned searches: Recent Documents, Recent E-mail, Shared By Me, and so on. The beauty of this parking lot for containers is that it's so easy to set up with your favorite places. For example: -
Remove an icon by dragging it out of the window entirely and onto the Recycle Bin icon; it vanishes from the list. (Of course, you haven't actually removed anything from your PC; you've just unhitched its alias from the Navigation pane.) -
Rearrange the icons by dragging them up or down in the list. Release the mouse when the thick black horizontal line lies in the desired new location.
Tip: You can also sort this list alphabetically . Right-click anywhere in the list; from the shortcut menu, choose Sort by Name.
-
Install a new disk or folder icon by dragging it off of your desktop (or out of a window) into any spot in the list. -
Adjust the width of the pane by dragging the vertical divider bar right or left.
Tip: If you drag carefully , you can position the divider bar just to the right of the disk and folder icons, thereby hiding their names. Some people find it a tidier look; you can always identify the folder names by pointing to them without clicking.
2.3.4.2. Folders list The bottom of the Navigation pane, if you've chosen to view it (Figure 2-7), is a hierarchical folder "tree" that shows the hierarchy of your entire computer. In essence, this view shows every folder on the machine at once. It lets you burrow very deeply into your hard drive's nest of folders without ever losing your bearings. 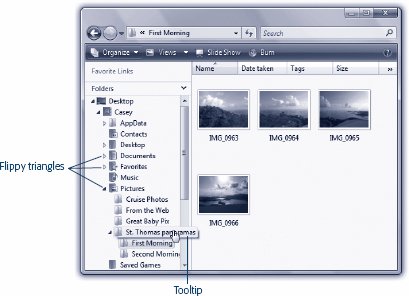 | Figure 2-7. When you click a disk or folder in the Folders hierarchy, the main window displays its contents, including files and folders. Double-click to expand a disk or folder, opening a new, indented list of what's inside it; double-click again to collapse the folder list again .
At deeper levels of indentation, you may not be able to read an icon's full name. Point to it without clicking to see an identifying tooltip . | |
Note: In previous editions of Windows, summoning this panel was a special trick used by power users. There were all kinds of shortcuts you could use to open it, like Shift-double-clicking a disk or folder icon, or pressing  +E. All those tricks do in Vista is open up the Navigation pane if you've closed it. Microsoft intends for folder-tree mode to be the standard Windows look. +E. All those tricks do in Vista is open up the Navigation pane if you've closed it. Microsoft intends for folder-tree mode to be the standard Windows look.
As you can see, this hierarchical list displays only disks and folders; the main window displays the contents (folders and files) of whatever disk or folder you click. POWER USERS' CLINIC
Folder-List Keyboard Shortcuts | | If you arrive home one day to discover that your mouse has been stolen, or if you simply like using the keyboard, you'll enjoy the shortcuts that work in the Explorer window: F6 or Tab cycles the "focus" (highlighting) among the different parts of the window: Favorite Links, Folders, main window. Backspace highlights the "parent" disk or folder of whatever is highlighted. Alt-double-clicking an icon opens the Properties window for that icon. (It shows the same sort of information you'd find in the Details pane.) Alt+left arrow key opens the previously viewed window, as though you've clicked the Back button in a browser. (Once you've used Alt+left arrow, you can press Alt+right arrow key to move forward through your recent open windows.) You can also press the letter keys to highlight a folder or file that begins with that letter, or the up and down arrow keys to "walk" up and down the list. |
When you double-click a folder or disk name (or single-click the flippy triangle next to it), you turn the list view into an outline; the contents of the folder appear in an indented list, as shown in Figure 2-7. Double-click again, or click the flippy triangle again, to collapse the folder listing. By selectively expanding folders like this, you can, in effect, peer inside two or more folders simultaneously , all within the single Folders list. You can move files around by dragging them onto the tiny folder icons, too. If you expand folders within folders to a sufficient level, the indentation may push the folder names so far to the right that you can't read them. You can remedy this problem either by making the pane wider (Figure 2-8), or by pointing to a folder whose name is being chopped off. Vista temporarily displays its entire name.  | Figure 2-8. If you don't already see the Folders tree, open it by clicking the ^ button at the bottom of the Navigation pane. You can then adjust its height or width by dragging the top or right edges, as shown here . | |
 |