Section 23.5. Local Users and Groups: All Versions
23.5. Local Users and Groups: All VersionsThe control panels you've read about so far in this chapter are designed for simplicity and convenience, but not for power. Windows offers a second way to create, edit, and delete accounts: an alternative window that, depending on your taste for technical sophistication, is either intimidating and technicalor liberating and flexible. It's called the Local Users and Groups console. 23.5.1. Opening the ConsoleYou can open up the Local Users and Groups window in any of several ways:
In any case, the Local Users and Groups console appears, as shown in Figure 23-8.
In this console, you have complete control over the local accounts (and groups, as described in a moment) on your computer. This is the real, raw, unshielded command center, intended for power users who aren't easily frightened. The truth is, you probably won't use these controls much on a domain computer. After all, most people's accounts live on the domain computer, not the local machine. You might occasionally have to log in using the local Administrator account to perform system maintenance and upgrade tasks , but you'll rarely have to create new accounts. Workgroup computers (on a small network) are another story. Remember that you'll have to create a new account for each person who might want to use this computeror even to access its files from across the network. If you use the Local Users and Groups console to create and edit these accounts, you have much more control over the new account holder's freedom than you do with the User Accounts control panel. 23.5.2. Creating a New AccountTo create a new account in the Local Users and Groups console, start by double-clicking the Users folder in the middle of the window. It opens to show you a list of the accounts already on the machine. It includes not only the accounts you created during the Vista installation (and thereafter), but also the Guest and secret Administrator accounts described earlier in this chapter. To create a new account, choose Action
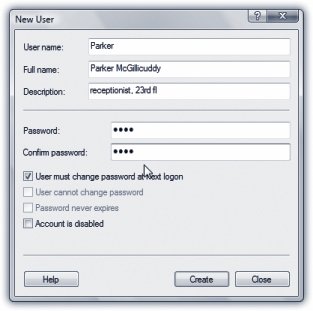
In the Password and Confirm Password text boxes, specify the password that your new colleague will need to access the account. Its complexity and length are up to your innate sense of paranoia . Tip: If you can't create a new account, it's probably because you don't have the proper privileges yourself. You must have an Administrator account (page 669) or belong to the Administrators group (page 685). If you turn off the "User must change password at next logon" checkbox, you can turn on options like these:
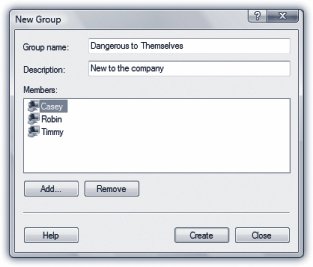
Note: When an account is disabled, a circled down-arrow badge appears on its icon in the Local Users and Groups console. (You may have noticed that the Guest account appears this way when you first install Windows Vista.) When you click the Create button, you add the new account to the console, and you make the dialog box blank again, ready for you to create another new account, if necessary. When you're finished creating accounts, click Close to return to the main console window. 23.5.3. GroupsAs you may have guessed from its name, you can also use the Local Users and Groups window to create groups named collections of account holders. Suppose you work for a small company that uses a workgroup network. You want to be able to share various files on your computer with certain other people on the network. You'd like to be able to permit them to access some folders, but not others. Smooth network operator that you are, you solve this problem by assigning permissions to the appropriate files and folders (page 692). In fact, you can specify different access permissions to each file for each person . But if you had to set up these access privileges manually for every file on your hard drive, for every account holder on the network, you'd go out of your mindand never get any real work done. That's where groups come in. You can create one groupcalled Trusted Comrades, for exampleand fill it with the names of every account holder who should be allowed to access your files. Thereafter, it's a piece of cake to give everybody in that group access to a certain folder, in one swift step. You end up having to create only one permission assignment for each file, instead of one for each person for each file. Furthermore, if a new employee joins the company, you can simply add her to the group. Instantly, she has exactly the right access to the right files and folders, without your having to do any additional work. 23.5.3.1. Creating a group To create a new group, click the Groups folder in the left side of the Local Users and Groups console (page 681). Choose Action
A Select Users dialog box appears. Here, you can specify who should be members of your new group. Type each account-holder's name into the text box, separated by semicolons, and then click Check Names to make sure you spelled them right. (You can always add more members to the group, or remove them later.) Finally, click OK to close the dialog box, and then click Create to add the group to the list in the console. The box appears empty again, ready for you to create another group. 23.5.3.2. Built-in groupsYou may have noticed that even the first time you opened the Users and Groups window, a few group names appeared there already. That's because Windows comes with a canned list of ready-made groups that Microsoft hopes will save you some time. For example, when you use the User Accounts control panel program to set up a new account, Windows automatically places that person into the Standard or Administrators group, depending on whether or not you made him an administrator (page 669). In fact, that's how Windows knows what powers and freedom this person is supposed to have. Here are some of the built-in groups on a Vista computer:
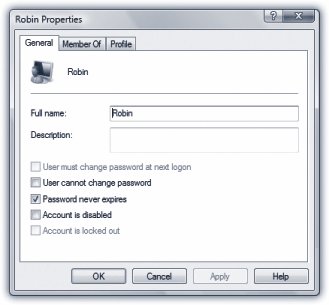
In addition to these basic groups, there are some special-purpose groups like Backup Operators, Replicator, Cryptographic Operators, Event Log Readers, and so on. These are all groups with specialized privileges, designed for high-end network administration. You can double-click one (or widen its Description column) to read all about it. Note: You can add an individual account to as many groups as you like. That person will have the accumulated rights and privileges of all of those groups. 23.5.4. Modifying Users and GroupsTo edit an account or group, just double-click its name in the Local Users and Groups window. A Properties dialog box appears, as shown in Figure 23-11.
You can also change an account password by right-clicking the name and choosing Set Password from the shortcut menu. (But see page 676 earlier in this chapter for some cautions about this process.) |
 Control Panel
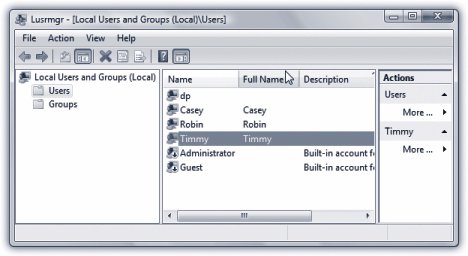

EAN: 2147483647
Pages: 284