Chapter 9: Rational Robot and GenWin
|
| < Day Day Up > |
|
This chapter demonstrates how to use the Rational Robot to record e-business transactions, how to instrument those transactions in order to generate relevant e-business transaction performance data, and how to use TMTP's GenWin facility to manage playback of your transactions.
9.1 Introducing Rational Robot
Rational Robot is a collection of applications that can be used to perform a set of operations on a graphical interface or to operate directly at the network protocol layer using an intuitive and easy to use interface.
Rational Robot has been around a while and is reliable and complete in the features it offers, the range of supported application types is considerable, and the behavior between application types is almost identical.
It provides a robust programming interface that allows you to add strict controls to the program flow and includes technologies that allows the simulation to complete, even if portions of the graphical interface of the application under stress changes during development.
Each record step is shown graphically with a specific iconography.
Rational Robot can be used to simulate transactions on applications running in generic Windows environment, Visual Basic applications, Oracle Forms, Powerbuilder applications, Java applications, Java applets, or Web sites. Some of these applications are supported out of the box, others require the installation of specific Application Enablers provided with Rational Robot, and still others require the user to load a specific Application Extension.
It allows for quick visual recording of the application under test and playback in a debugging environment to ensure that the simulation flows correctly.
Scripts can be played back on a variety of Windows platforms, including Windows NT® 4.0, Windows XP, Windows 2000, Windows 98, and Windows Me.
9.1.1 Installing and configuring the Rational Robot
Rational Robot is provided by TMTP Version 5.2 as a zip file that containing the Rational Robot CD iso image so that you can burn your own Rational Robot CD using your favorite software. The setup procedure does not differ if the image is used from the CD or downloaded from TMTP.
Rational Robot is installed following the generic setup steps you need to follow on most Windows applications. After the installation there are specific steps you must follow to enable and load all the components needed to record and playback a simulation on the application you will use (Java, HTML, and so on).
Installing
Put the Rational Robot CD-ROM in the CD-ROM tray of the machine where simulations will be recorded or played back; setup is identical in both cases.
Double click on the C517JNA.exe application, which you can find in the robot2003GA folder in the Rational Robot CD. The setup procedure will start. You should get the window shown in Figure 9-1.

Figure 9-1: Rational Robot Install Directory
Change the install directory if you are not satisfied with the default setting and select OK. The install directory will be displayed at a later stage, but no changes will be possible. After you click Next, the install continues for a while (see Figure 9-2 on page 328).
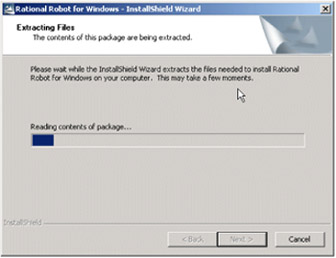
Figure 9-2: Rational Robot installation progress
The setup wizard will be loaded and displayed (see Figure 9-3).

Figure 9-3: Rational Robot Setup wizard
Click on Next, and the Product Selection panel is displayed. In this panel, you have the choice of selecting the Rational License Manager that you need to use Robot and Rational Robot itself. Select Rational Robot in the left pane (see Figure 9-4 on page 329).

Figure 9-4: Select Rational Robot component
Click Next to continue the setup; the Deployment Method panel is displayed (see Figure 9-5).

Figure 9-5: Rational Robot deployment method
Select Desktop installation from CD image and click on Next; the installation will check various items and then display the Rational Robot Setup Wizard (see Figure 9-6 on page 330).
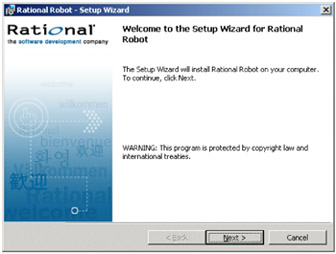
Figure 9-6: Rational Robot Setup Wizard
Click on Next; the Product Warnings will be displayed (see Figure 9-7).
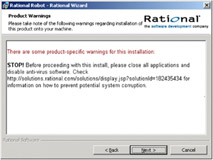
Figure 9-7: Rational Robot product warnings
Check if any message is relevant to you. If you already have Rational products installed, you could be required to upgrade those products to the latest version.
Click on Next; the License Agreement panel will be displayed (see Figure 9-8 on page 331).

Figure 9-8: Rational Robot License Agreement
Select I accept the terms in the license agreement radio button, and then click on Next; the Destination Folder panel is displayed (see Figure 9-9).

Figure 9-9: Destination folder for Rational Robot
Click on Next; the install folder cannot be changed at this stage. The Custom Setup panel is displayed. Leave the defaults and click on Next; the Ready to Install panel is displayed (see Figure 9-10 on page 332).

Figure 9-10: Ready to install Rational Robot
You can now click on Next to complete the setup. After a while, the Setup Complete dialog is displayed (see Figure 9-11).

Figure 9-11: Rational Robot setup complete
Deselect the check boxes if you want and click on Finish.
Installing the Rational Robot hotfix
There is a hotfix provided in the Rational Robot CD under the folder robot2003Hotfix. You can install it by doing the following:
-
Close Rational Robot if you are already running it.
-
Search the folder where Rational Robot has been installed for the file rtrobo.exe. Copy the rtrobo.exe file and the CLI.bat files provided in the robot2003Hotfix folder into the folder where you found rtrobo.exe.
-
Open a command prompt in the Rational Robot install folder and run CLI.bat. This is just a test script; if you do not get any errors, the fix is working OK and you can close the command prompt.
Installing the Rational License Server
Repeat all the steps in the above section, but select the Rational License Server in the Product Selection panel. Complete the installation as you did with Rational Robot.
After setting up the Rational License Server, you can install the named-user license provided in the Rational Robot CD.
Installing the Rational Robot License
-
To install the named-user license you have to start the Rational License Key Administrator by selecting Start → Programs → Rational Software and clicking on the License Key Administrator icon.
The License Key Administrator starts and displays a wizard (see Figure 9-12).
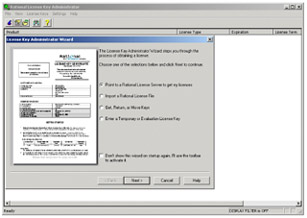
Figure 9-12: Rational Robot license key administrator wizard
In the License Key Administrator Wizard, select Import a Rational License File and click on Next. The Import License File panel is displayed; click the Browse button and select the ibm_robot.upd provided in the root folder of the Rational Robot CD (see Figure 9-13 on page 334).
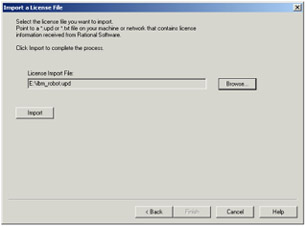
Figure 9-13: Import Rational Robot license
Click on the Import button to import the license. The Confirm Import panel is displayed (see Figure 9-14).
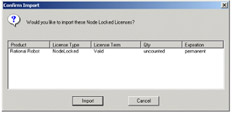
Figure 9-14: Import Rational Robot license (cont...)
Click on the Import button on the Confirm Import panel to import the IBM license in the License Key Manager; if the import process is successful, you will se a confirmation message box (see Figure 9-15).
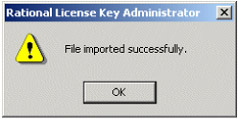
Figure 9-15: Rational Robot license imported successfully
Click on OK to return to the License Key Manager.
The License Key Manager will now display the new license as being available (see Figure 9-16).
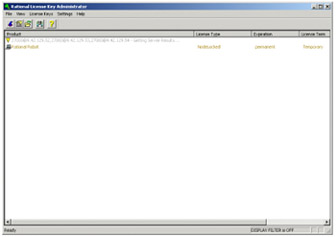
Figure 9-16: Rational Robot license key now usable
You can now close the License Key Administrator. Rational Robot is now ready for use.
Configuring Rational Robot Java Enabler and Extensions
For Rational Robot to correctly simulate operations being performed on Java applications, the Java Extension must be loaded and a specific component called Robot Java Enabler must be installed and configured.
Configuring the Java Enabler
The Java Enabler setup program is installed during the Rational Robot installation, but has to be selected and customized for use before you can record a simulation successfully. It is important that you ensure that Rational Robot is not running when you set up the Java Enabler; you will need to enable any JVM you add to the system and need to use.
You can set up the Java Enabler by selecting the Java Enabler setup icon, which you can find by selecting Start → Rational Software → Rational Test program group.
After selecting the Java Enabler icon, the setup starts and a dialog with a selection of Java Enabler Types is displayed (see Figure 9-17 on page 336).
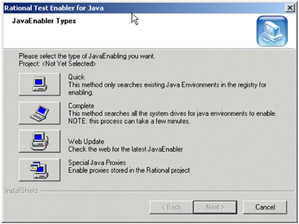
Figure 9-17: Configuring the Rational Robot Java Enabler
Select the Quick setup method to enable Rational Robot for the JVM in use. If you have multiple JVMs and want to be sure that you enable all of them for Rational Robot, you can instead select Complete, and this will perform a full scan of your hard drive for all installed JVMs.
After selecting Quick, a dialog will be displayed with the JVMs found on the system (see Figure 9-18 on page 337). From this list, you should select the JVM you will use with the simulations and select Next.

Figure 9-18: Select appropriate JVM
The setup completes and you are given an option to verify the setup log. The log will show what files have been changed/copied during the setup process.
Rational Robot is now ready to record and playback simulations on Java applications running in the JVM that you enabled.
If you add a new JVM or change the JVM you initially enabled, you will have to re-run the Rational Test Enabler on the new JVM.
Loading the Java Extension
The Java enabler, although important, is not the only component needed to record simulations on Java applications: a specific enabler has to be loaded when Rational Robot starts.
The Java Enabler is loaded by default after Rational Robot is installed; to ensure that it is being loaded, select Tools → Extension Manager in the Rational Robot menu. The Extension Manager dialog is displayed (see Figure 9-19 on page 338).
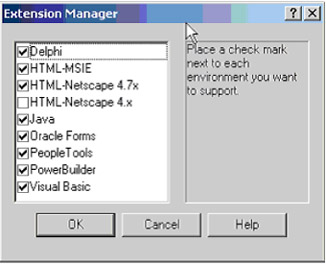
Figure 9-19: Select extensions
Ensure that the Java check box is selected; if it was not, you would also need to restart Rational Robot to load the Java Extension.
Loaded Application Extensions loaded have a performance downgrade drawback: if you are not writing simulations on the other application types in the list, deselect them.
Setting up the HTML extensions
Rational Robot supports simulations that run in a Web browser, thanks to browser specific extensions that must be loaded by Rational Robot.
The browsers supported for testing are all versions of Microsoft Internet Explorer, Netscape 4.x and Netscape 4.7x.
By default, Rational Robot supports MSIE and Netscape 4.7x. You can check the loaded extensions by selecting Tools → Extension Manager; this will display the Extension Manager dialog shown in Figure 9-19.
Any changes in the Extension Manager list will require Rational Robot to restart in order to load the selected extensions.
If you plan to test only a specific set of the application types listed in the Extension Manager, deselect those you do not plan to use to increase Rational Robots performance.
One important point to consider when planning a simulation in a browser is that the machine that will run the simulation's browser must be of the same kind and use the same settings as the one where the simulation is recorded: A typical error is to have different settings for the cookies so that one browser accepts them while the other displays a dialog to the user, thus breaking the simulation flow.
Differences for Netscape users
We recommend using Netscape 4.x only if it is specifically needed, since it requires local browser caching to be enabled and would not simulate applications using HTTPS. Also, Netscape 4.7x and Netscape 4.x are mutually exclusive; if you want to use one, you should not select the other.
9.1.2 Configuring a Rational Project
Before you can record a Rational Script, you must have a valid Rational Project to use. During Rational Robot installation, you will be taken through the following procedure. However, you will also have to use this procedure to create a Rational Robot project for use by the Generic Windows Management Agent.
First, you need to decide on the location of your project . All Rational Projects are stored in specific directory structures, and the top-level directory for each project has to be created manually before defining the project to Rational. When using Rational with the TMTP Generic WIndows Management Agent, the project directory has to be available to the Generic Windows Management Agent. The base location for all projects are dictated by the Generic Windows Management Agent to be the $MA\apps\genwin\ directory (where $MA denotes the installation directory of the Management Agent). Since this directory structure is created as part of the Generic Windows Management Agent installation procedure, we advise you to install this component prior to defining and recording projects.
Before proceeding, either install the Generic Windows Management Agent, or open Windows Explorer and create the directory structure for the project. Make sure the project directory itself is empty.
To create a Rational Project, perform the following steps:
-
Start the Rational Administrator by selecting Start → Programs → Rational Robot → Rational Administrator.
-
Start the New Project Wizard by clicking File → New Project on the Administrator menu.
-
On the wizard's first page (Figure 9-20 on page 340):
-
Supply a name for your project, for example, testscripts. The dialog box prevents you from typing illegal characters.
-
In the Project Location field, specify a UNC path to the root of the project, referring to the directory name you created in above. It does not really have to be a shared network directory with a UNC path.
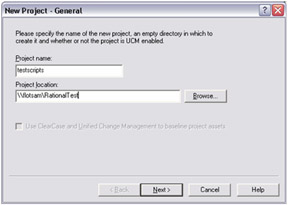
Figure 9-20: Rational Robot Project -
-
Click Next. If you do create a password for the Rational project, supply the password on the Security page (see Figure 9-21 on page 341). If you do not create a password, then leave the fields blank on this page.
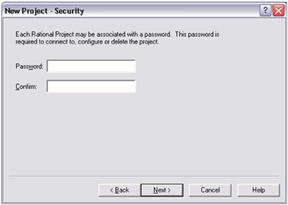
Figure 9-21: Configuring project password -
Click Next on the Summary page and select Configure Project Now (see Figure 9-22 on page 342). The Configure Project dialog box appears (see Figure 9-23 on page 343).
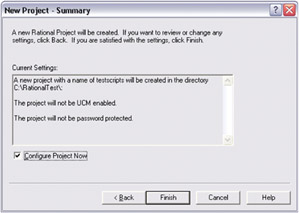
Figure 9-22: Finalize project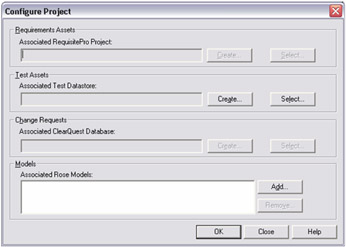
Figure 9-23: Configuring Rational Project
A Rational Test datastore is a collection of related test assets, including test scripts, suites, datapools, logs, reports, test plans, and build information.
You can create a new Test datastore or associate an existing Test datastore.
For testing Rational Robot, the user must set up the Test datastore.
To create a new Test datastore:
-
In the Configure Project dialog box, click Create in the Test Assets area. The Create Test Datastore tool appears (see Figure 9-24 on page 344).
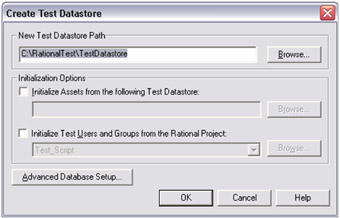
Figure 9-24: Specifying project datastore -
In the Create Test Datastore dialog box:
-
In the New Test Datastore Path field, use a UNC path name to specify the area where you would like the tests to reside.
-
Select initialization options as appropriate.
-
Click Advanced Database Setup and select the type of database engine for the Test datastore.
-
Click OK.
-
9.1.3 Recording types: GUI and VU scripts
The kind of recordings that can be performed with Rational Robot can be divided in two different types:
-
GUI scripts
-
VU scripts
GUI scripts are used to record simulations interacting with a graphical application. These scripts are easy to use, but have the drawback of not allowing more than one script to execute at a time, and a requirement to have direct access to the computer desktop screen. On the other hand, they allow for recording very detailed graphical interaction (mouse movements, keystrokes, and so on) and allow the use of Verification Points to ensure that operations outcomes are those expected. The language used to generate the script is SQABasic, and GUI scripts can be played back with Rational Robot or as part of Rational Test manager.
GUI scripts can be used in a set of complex transactions (repeated continuously) to measure a performance baseline that can be compared when the server configuration changes or to ensure that the end user experience is satisfactory from the end-user point of view (to satisfy an SLA).
VU scripts record the client server requests at the network layer only for specific supported application types and can be used to record outgoing calls performed by the client (network recording) or incoming calls on the server (proxy recording). VU scripts do not support Verification Points and cannot be used to simulate activity on a Generic Windows applications. VU only supports specialized network protocols, not generic API access on the network layer, and VU scripts can only be played back using Rational Test Manager. The playback of VU scripts is not supported by TMTP Version 5.2, so VU will be ignored in this book.
9.1.4 Steps to record a GUI simulation with Rational Robot
There are differences in how a simulation recording is set up and prepared on different applications. For example, to record an HTTP simulation in a browser, you need to load the Extension for the browser you will be using, while with Java, you need to load the Extension and configure the Java Enabler on the JVM you will be using. But whatever application you are using, there are common points that will be followed.
-
Record the script on the GUI.
-
Add features to the script during recording (ARM API calls for TMTP, Verification Points, Timers, comments, and so on).
-
Compile the script.
-
Play the script back for debugging.
-
Save and package the script for TMTP Version 5.2.
Record the script on the GUI
To record a GUI script, click the Record GUI script on the toolbar:

Type an application name in the Record GUI Dialog (Figure 9-25).
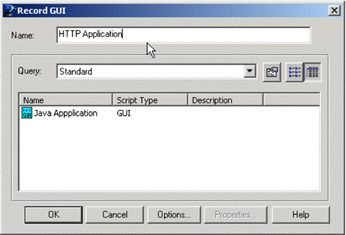
Figure 9-25: Record GUI Dialog Box
Click on OK, and Rational Robot will minimize while the Recording toolbar is displayed:

The Recording toolbar contains the following buttons: Pause the recording, Stop the recording, Open the Rational Robot main window, and Display the GUI Insert toolbar. The first three are self-explanatory; the last is needed to easily add features to the script being recorded using the GUI Insert toolbar (Figure 9-26).
![]()
Figure 9-26: GUI Insert
From this toolbar you can add Verification Points, start the browser on a Web page for recording, and so on.
Add Verification Points to the script
During the GUI simulation flow, it is a good idea to insert Verification Points, which are points in the program flow that save information on GUI objects for comparing with the expected state. When you create a Verification Point, you select a Verification Method (case sensitivity, sub string, numeric equivalence, numeric range, or blank field) and an Identification Method (by content, location, title, and so on); with Verification Points, you can also insert timers and timeouts in the program flow. Verification is especially needed to ensure that if the application has delays in the execution, Rational Robot will wait for the Verification Point to pass before continuing the execution.
Verification Points can be created on Window Regions and Window Images using OCR, but in the case of e-business applications, Object Properties Verification Points are easier to use, reliable, and less subject to suffer changes in the application interface or data displayed.
The state of an application working in a client server environment during the playback of a simulation often changes if the data retrieved from the server is different from the one retrieved during the recording, so to avoid errors during the playback, it is a good idea to use Verification Points. Using Verification Points, you can verify that an object's properties are those expected.
Verification Points can be added in a script:
-
During the recording
-
While editing the script after the recording
In both cases, you need to press the Display GUI insert Toolbar in the Rational Robot floating toolbar during the recording or on the Standard Toolbar while editing, but you must be sure that the cursor is at the point where you want to add the Verification Point if you have already recorded the script. After you press the Display GUI Insert Toolbar button, you will see the GUI Insert toolbar floating (Figure 9-26 on page 346).
Select the type of Verification Point needed, for example, Object Properties, and type a name for the Verification Point in the Verification Point Name dialog (Figure 9-27 on page 348).
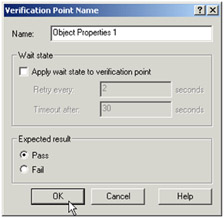
Figure 9-27: Verification Point Name Dialog
In case the object you will use as a Verification Point takes some time to be displayed or to get to the desired state, check the Apply wait state to Verification Point check box and select the retry and time-out time in seconds. Also, select the desired state; in simulations, you generally always expect the result to be of Pass type. Click on OK when you complete all the settings, and the Object Finder dialog is displayed, as in Figure 9-28 on page 349.
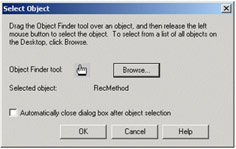
Figure 9-28: Object Finder Dialog
Select the icon of the Object Finder tool and drag it on the object whose properties you want to investigate. A flyover appearing on each object will tell you how it is identified, for example, a Java label will show a tool tip showing a Java label when the Object Finder tool is on it. When the mouse is released, the properties for the object you selected are displayed in the Object Properties Verification Point panel (Figure 9-29 on page 350).

Figure 9-29: Object Properties Verification Point panel
Select the property/value pair that you want to check in the Verification Point and click on OK.
If you were recording the simulation, the Verification Point will be included in the correct point of the script. If you where adding the Verification Point after the script recording, the Verification Point will be included where the cursor was in the script.
Here is how a Verification Point on a Java Label would look like in the script (Example 9-1).
Example 9-1: Java Label Verification Point
Result = LabelVP (CompareProperties, "Type=Label;Name=TryIt Logo", "VP=Object Properties;Wait=2,30")
Add timers to the script
Rational Robot supports the use of timers in scripts to measure performance, but these timers do not support the ARM API standard and cannot be used to measure transaction performance with TMTP. Timers are inserted using the Start Timer button in the GUI Insert Toolbar, but you will also need to add ARM API calls to the script to capture transaction performance.
Timers can still be valuable to use if you want to have an idea of how long a transaction takes on the fly; in this case, you can insert timers together with ARM API calls.
Use comments in the script for maintenance
It is a good idea to record comments in the script during execution, in particular where you pressed particular code sequences or typed down information that was relevant only in that particular step. For example, suppose you are testing a Web-based interface that pulls information from a database. Since the information retrieved can change over time while the interface of the application does not, when you add a Verification Point on a graph that is dynamically generated, add a comment to remind you that the portion of script may need further coding.
9.1.5 Add ARM API calls for TMTP in the script
ARM API calls need to be included in the script by manually editing the code; the instructions you add will load the ARM function library, define ARM return codes for use in the script, will initialize the simulation so that ARM will consider the API calls coming from it, and define the start and stop points for each transaction.
You can create any number of transactions inside the script sequentially, including one in another or overlapping.
To load the ARM API, you can add code similar to Example 9-2 in the script header, or cut the sample below and paste it into your script directly. This may help avoid typing errors.
Example 9-2: Script ARM API declaration
Declare Function arm_init Lib "libarm32"(ByVal appl_name As String,ByVal appl_userid As String,ByVal flags As Long,ByVal data As String,ByVal data_size As Long)As Long Declare Function arm_getid Lib "libarm32"(ByVal appl_id As Long,ByVal tran_name As String,ByVal tran_detail As String,ByVal flags As Long,ByVal data As String,ByVal data_size As Long)As Long Declare Function arm_start Lib "libarm32"(ByVal tran_id As Long,ByVal flags As Long,ByVal data As String,ByVal data_size As Long)As Long Declare Function arm_stop Lib "libarm32"(ByVal start_handle As Long,ByVal tran_status As Long,ByVal flags As Long,ByVal data As String,ByVal data_size As Long)As Long Declare Function arm_end Lib "libarm32"(ByVal appl_id As Long,ByVal flags As Long,ByVal data As String,ByVal data_size As Long)As Long
To declare variables to hold returns from ARM API calls, add the script in Example 9-3.
Example 9-3: ARM API Variables
Dim appl_handle As Long Dim getid_handle As Long Dim start_handle As Long Dim stop_rc As Long Dim end_rc As Long
All the code above can be put at the top of the script. Next, you must initialize the simulation as an ARM'ed application, and to do this, you perform the operations shown in Example 9-4 in the script.
Example 9-4: Initializing the ARM application handle
appl_handle = arm_init("GenWin","*",0,"0",0) The code in Example 9-4 retrieves an application handle using the ARM API so that the application is universally defined; this is needed because with applications that have been ARM instrumented in the source code, you might have multiple instances of the same application running at a time.
| Important: | In order for the TMTP Version 5.2 GenWin component to be able to retrieve the ARM data generated with this Rational Robot script, the Application handle needs to use the value "GenWin", as shown in Example 9-4. |
Next, you need a transaction identifier, and you will need one for each transaction your script will simulate.
| Important: | The second parameter should match the pattern "ScriptName.*", where the .* indicates any characters, and ScriptName is the name of the Rational Robot Script. Using our example above, valid transaction IDs could be "MyTransaction" and "MyTransactionSubtransaction1". The third parameter is the description, which will be displayed in the TMTP Topology view, so it should be a value that will provide useful information when viewing the Topology. |
As you can see, the application handle is sent to the ARM API and a transaction handle is retrieved (Example 9-5).
Example 9-5: Retrieving the transaction handle
getid_handle =a rm_getid(appl_handle,"MyTransaction","LegacySystemTx",0,"0",0)
Now you can start the transaction. The line below (Example 9-6) needs to precede the script steps where the transaction you want to measure takes place.
Example 9-6: Specifying the transaction start
start_handle =arm_start(getid_handle,0,"0",0)
Again, ARM gets a handle ad returns another; in this case, it gets the transaction handle you got and returns a start handle. The handle is needed to end the right transaction.
After the transaction completes with a successful Verification Point, you need to end the transaction using the call in Example 9-7.
Example 9-7: Specifying the transaction stop
stop_rc = arm_stop(start_handle,0,0,"0",0)
This will close the transaction. As you can see, we ensure that we are closing the transaction by starting the stop call, which includes the transaction start handle.
The last call (Example 9-8) you need is for cleanup purposes and can be included at the end of the script. The end call sends the application handle you received with the initialization.
Example 9-8: ARM cleanup
end_rc = arm_end(appl_handle,0,"0",0)
This will complete the set of API calls for the transaction you are simulating.
Compile the script
Rational Robot scripts are compiled before playback begins. The compilation can be started by the user by clicking on the Compile button to ensure that the script is formally correct, or the compile stage can be left to Rational Robot that takes care of it whenever a change is done to the source.
Scripts are recorded with the rec extension; their compiled form is sbx. Include files have the sbh extension and are automatically compiled by Rational Robot, so the user does not have to worry about them in any case.
Debugging scripts
Rational Robot includes a fully functional debugging environment you can use to ensure that your script flow is correct and that all edge cases are covered during the execution.
Starting the debugging process also compiles the script in case it has just been recorded or if the source has been changed.
To start debugging, open an existing script or record a new script and click on the Debug menu. The menu is displayed, as shown in Figure 9-30.
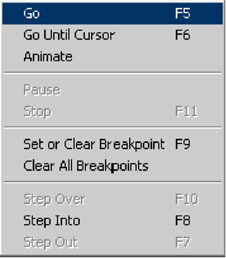
Figure 9-30: Debug menu
Before starting to debug, you will probably need to set breakpoints in the script to run a portion of script that is already working. To use breakpoints, move the cursor in the script up to where the breakpoint to be set and select Set or Clear Breakpoint to set or clear a breakpoint at that point in the script. You can also simply press F9 to set or clear breakpoints on the current line.
To run the script up to the selected line, you have to select Go Until Cursor in the Debug menu or press F6; this will start playback of the script and stop before executing the line that is currently selected. At any time, you can choose the Step Over, Step Into, and Step Out buttons, which work as in any other debugging environment.
One interesting option you have in the Debug menu is the Animate option; this will play back the script in Animation Mode. Animation Mode plays the script by highlighting, in yellow, each line that is executed. Keep in mind that the script will still playback at considerable speed, not giving you time to evaluate what is occurring; it is a good idea to increase the delay between key strokes to ensure that you can analyze the execution flow. To do this, you can change the delay between commands and keystrokes by selecting Tools → GUI Playback Options. This will display the GUI Playback Options dialog (Figure 9-31).

Figure 9-31: GUI Playback Options
Select the Playback tab and increase the Delay between commands to 2000; this will leave a two second delay between commands during the playback. You can also increase the Delay between keystrokes to 100 if you want better visual control on the keys being pressed. Click on OK when you are done and get back to the script. The next time you select Animate in the Debug menu, you will have more time to understand what the script is doing.
If the machine used to record and debug the simulation is the same that will execute, ensure that you set Delay between commands back to 100 and Delay between keystrokes back to 0 before playing back the script with TMTP.
Other than executing scripts to a specific line and running in Animation Mode, you can also investigate variable values in the Variable window. This window is not enabled by default; to ensure that you see it, you must select Variables in the View menu. The Variable window will be displayed in the right-lower corner of the Rational Robot window, but can be moved around the main window and docked where you prefer.
The values you see in this window are updated at each step of script playback.
Other interesting items
Other than those mentioned above, Rational Robot includes a set of extra features that you might be interested in. For example, you can use datapools to feed data in the simulation that will change data entered in specific fields, or use an Authentication Datapool if you want to store passwords and login IDs separately from the script (although we recommend encrypting passwords locally using VB code; the following section , "Obfuscating embedded passwords in Rational Scripts" on page 356 describes how to do this). You may also be interested in tips regarding screen locking discused in , "Rational Robot screen locking solution" on page 360.
Obfuscating embedded passwords in Rational Scripts
Often, when recording Rational Scripts, it is necessary to record user IDs and passwords. This has the obvious security exposure that if your script is viewed, the password will be viewable in clear text. This section describes a mechanism for obfuscating the password in the script.
This mechanism relies on the use of an encryption library. The encryption library that we used is available on the redbook Web site. The exact link can be found in Appendix C, "Additional material" on page 473.
First, the encryption library must be registered with the operating system. For our encryption library, this was achieved by running the command:
regsvr32.exe EncryptionAlgorithms.dll
Once you have run this command, you must encrypt your password to a file for later use in your Rational Robot scripts. This can be achieved by creating a Rational Robot Script from the text in Example 9-9 on page 357 and then running the resulting script.
Example 9-9: Stashing obfuscated password to file
Sub Main Dim Result As Integer Dim bf As Object Dim answer As Integer ' Create the Encryption Engine and store a key Set bf = CreateObject("EncryptionAlgorithms.BlowFish") bf.key = "ibm" Begin Dialog UserDialog 180, 90, "Password Encryption" Text 10, 10, 100, 13, "Password: ", .lblPwd Text 10, 50, 100, 13, "Filename: ", .lblFile TextBox 10, 20, 100, 13, .txtPwd TextBox 10, 60, 100, 13, .txtFile OKButton 131, 8, 42, 13 CancelButton 131, 27, 42, 13 End Dialog Dim myDialog As UserDialog DialogErr: answer = Dialog(myDialog) If answer <> -1 Then Exit Sub End If If Len(myDialog.txtPwd) < 3 then MsgBox "Password must have more than 3 characters!", 64, "Password Encryption" GoTo DialogErr End If ' Encrypt strEncrypt = bf.EncryptString(myDialog.txtPwd, "rational") ' Save to file 'Open "C:\secure.txt" For Output Access Write As #1 'Write #1, strEncrypt Open myDialog.txtFile For Output As #1 If Err <> 0 Then MsgBox "Cannot create file", 64, "Password Encryption" GoTo DialogErr End If Print #1, strEncrypt Close #1 If Err <> 0 Then MsgBox "An Error occurred while storing the encrypted password", 64, "Password Encryption" GoTo DialogErr End If MsgBox "Password successfully stored!", 64, "Password Encryption" End Sub Running this script will generate the pop-up window shown in Figure 9-32, which asks for the password and name of a file to store the encrypted version of that password within.

Figure 9-32: Entering the password for use in Rational Scripts
Once this script has run, the file you specified above will contain an encrypted version of your password. The password may be retrieved within your Rational Script, as shown in Example 9-10.
Example 9-10: Retrieving the password
Sub Main Dim Result As Integer Dim bf As Object Dim strPasswd As String Dim fchar() Dim x As Integer ' Create the Encryption Engine and store a key Set bf = CreateObject("EncryptionAlgorithms.BlowFish") bf.key = "ibm" ' Open file and read encrypted password Open "C:\encryptedpassword.txt" For Input Access Read As #1 Redim fchar(Lof(1)) For x = 1 to Lof(1)-2 fchar(x) = Input (1, #1) strPasswd = strPasswd & fchar(x) Next x ' Decrypt strPasswd = bf.DecryptString(strPasswd, "rational") SQAConsoleWrite "Decrypt: " & strPasswd End Sub The resulting unencrypted password has been retrieved from the encrypted file (in our case, we used the encryptedpassword.txt file) and placed into the variable strPasswd, and the variable may be used in place of the password where required. A complete example of how this may be used in a Rational Script is shown in Example 9-11.
Example 9-11: Using the retrieved password
Sub Main 'Initially Recorded: 10/1/2003 11:18:08 AM 'Script Name: TestEncryptedPassword Dim Result As Integer Dim bf As Object Dim strPasswd As String Dim fchar() Dim x As Integer ' Create the Encryption Engine and store a key Set bf = CreateObject("EncryptionAlgorithms.BlowFish") bf.key = "ibm" ' Open file and read encrypted password Open "C:\encryptedpassword.txt" For Input Access Read As #1 Redim fchar(Lof(1)) For x = 1 to Lof(1)-2 fchar(x) = Input (1, #1) strPasswd = strPasswd & fchar(x) Next x ' Decrypt the password into variable strPasswd = bf.DecryptString(strPasswd, "rational") Window SetContext, "Caption=Program Manager", "" ListView DblClick, "ObjectIndex=1;\;ItemText=Internet Explorer", "Coords=20,30" Window SetContext, "Caption=IBM Intranet - Microsoft Internet Explorer", "" ComboEditBox Click, "ObjectIndex=2", "Coords=61,5" InputKeys "http://9.3.4.230:9082/tmtpUI{ENTER}" InputKeys "root{TAB}^+{LEFT}" ' use the un-encrypted password retrieved from the encrypted file. InputKeys strPasswd PushButton Click, "HTMLText=Log On" Toolbar Click, "ObjectIndex=4;\;ItemID=32768", "Coords=20,5" PopupMenuSelect "Close" End Sub
Rational Robot screen locking solution
Some users of TMTP have expressed a desire to be able to lock the screen while the Rational Robot is playing. The best and most secure solution to this problem is to lock the endpoint running simulations in a secure cabinet. There is no easy alternative solution, as the Rational Robot requires access to the screen context while it is playing back. During the writing of this redbook, we attempted a number of mechanisms to achieve this result, including use of Windows XP Switch User functionality, without success. The following Terminal Server solution implemented at one IBM customer site was suggested to us. We were unable to verify it ourselves, but we considered it useful information to provide as a potential solution to this problem.
This solution relies on the use of Windows Terminal Server, which is shipped with the Windows 2000 Server. When a user runs an application on Terminal Server, the application execution takes place on the server, and only the keyboard, mouse, and display information is transmitted over the network. This solution relies on running a Terminal Server Session back to the same machine and running the Rational Robot within the Terminal Server session. This allows the screen to be locked and the simulation to continue running.
-
Ensure that the Windows Terminal Server component is installed. If it is not, it can be obtained from the Windows 2000 Server installation CD from the Add On components dialog box (see Figure 9-33 on page 361).
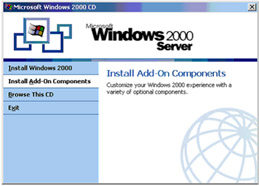
Figure 9-33: Terminal Server Add-On ComponentAs the Terminal Server session will be back on the local machine, there is no reason to install the Terminal Server Licensing feature. Due to this fact, you should also select the Remote Administration mode option during Terminal Server install.
After the Terminal Server component is installed, you will need to reboot your machine.
-
Install the Terminal Server client on the local machine. The Terminal Server install provides a facility to create client installation diskettes. This same source can be used to install the Terminal Server client locally (Figure 9-34 on page 362) by running the setup.exe (the path to this setup.exe is, by default, c:\winnt\system32\clients\tsclient\win32\disks\disk1).
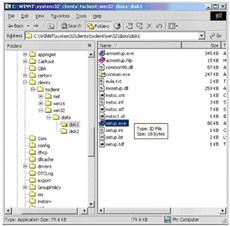
Figure 9-34: Setup for Terminal Server client -
Once you have installed the client, you may start a client session from the appropriate menu option. You will be presented with the dialog shown in Figure 9-35 on page 363. From this dialog, you should select the local machine as the server you wish to connect to.

Figure 9-35: Terminal Client connection dialogNote It is useful to set the resolution to one lower than that used by the workstation you are connecting from. This allows the full Terminal Client session to be seen from the workstation screen.
-
Once you have connected, you will be presented with a standard Windows 2000 logon screen for the local machine within your client session. Log on as normal.
-
Now you can run your Rational Robot scripts using whichever method you would normally do this, with the exception of via GenWin. You may now lock the host screen and the Rational Robot will continue to run in the client session.
Recording a GUI simulation on an HTTP application
There is an important difference you must consider when you start to record a simulation on a browser-based application: the browser window must be started by Rational Robot. You should not click on the Record GUI script and then start the browser by clicking on a Desktop link.
To record the GUI simulation, do the following steps:
-
Click on the Display GUI Insert toolbar button located in the GUI Record toolbar:

This displays the GUI Insert toolbar:

-
Click on the Start browser button:

This will display the Start browser dialog (Figure 9-36), where you must type down the initial address the browser has to start with and a Tag that will be used by Rational Robot to identify the correct browser window if there are multiple windows running.
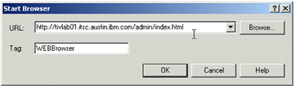
Figure 9-36: Start Browser Dialog
When you click on OK, the browser opens on the address specified and all actions performed in the browser are recorded in the script. Apart from the differences to start the application/browser, there are not any major differences compared to the procedure you usually follow for recording any other application simulation.
Recording a GUI simulation on a Java application
Before recording a simulation running on Java, ensure that you installed and configured the Rational Java Enabler on the JVM you will be using and load the Java Extension.
To record a GUI simulation on a Java application, select the Record GUI Script button on the toolbar in the main Rational Robot window and start the application in the usual way.
Simulate and perform all the actions that you need; Rational Robot will record the simulation while you execute, as on any other kind of application.
There are not any differences between Java simulations and generic Windows applications; only the object properties slightly change.
|
| < Day Day Up > |
|
EAN: 2147483647
Pages: 105