14.2. Making the Printout The experience of printing depends on the printer you're using ”laser printer, inkjet, or whatever. In every case, however, all the printing options hide behind two commands: File Page Setup, which you need to adjust only occasionally, and File Print, which you generally use every time you print. You'll find these two commands in almost every Macintosh program. 14.2.1. Page Setup The Page Setup dialog box lets you specify some key characteristics about the document you're going to print: orientation, paper dimensions, and so on (see Figure 14-2). 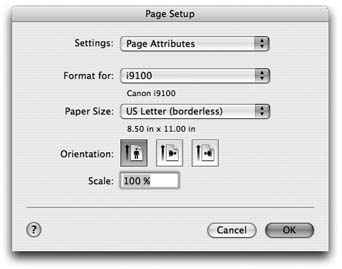 | Figure 14-2. Here in Page Setup are the controls you need to print a document rotated sideways on the page, so that it prints "the long way." The Scale control, which lets you reduce or enlarge your document, can be handy if the program you're using doesn't offer such a control. And the Paper Size pop-up menu, of course, specifies the size of the paper you're printing on ”US Letter, US Legal, envelopes, or one of the standard European or Japanese paper sizes (A4 and B5). | |
The options here vary by program and printer. The Page Setup options for an Epson inkjet, for example, differ dramatically from those for a laser printer. Only your printer's user manual can tell you exactly what these choices do.
Tip: You must configure the Page Setup settings independently in each program you use. And by the way, to change the default paper size for all new documents, choose Save As Default from the Settings pop-up menu. (Mac fans in the UK: You're welcome.)
14.2.2. The Print Command Although you can grow to a ripe old age without ever seeing the Page Setup dialog box, you can't miss the Print dialog box. It appears, like it or not, whenever you choose File Print in one of your programs. Once again, the options you encounter depend on the printer you're using. But here's what you may find on the box's main screen (the screen you see when the pop-up menu reads Copies & Pages): -
Printer . If you have more than one printer connected to your Mac, you can indicate which you want to use for a particular printout by choosing its name from this pop-up menu. -
Presets . Here's a way to preserve your favorite print settings. Once you've proceeded through this dialog box, specifying the number of copies, which printer trays you want the paper taken from, and so on, you can choose Save As from the pop-up menu shown in Figure 14-3, and then assign your settings set a name (like "Borderless, 2 copies"). Thereafter, you'll be able to recreate that elaborate suite of settings just by choosing its name from this pop-up menu.
Note: Quite a few of the printer drivers in Tiger have changed. For example, Tiger relies on the GIMP printer drives described earlier to replace the Epson drivers for several popular printers. Settings in the new drivers may be slightly different from the original ones.This is a long-winded way of saying: "If you've upgraded to Tiger from Mac OS X 10.3, some of your old, upgraded presets may need redefining."
-
Copies . Type the number of copies you want printed. The Collated checkbox controls the printing order for the various pages. For example, if you print two copies of a three-page document, the Mac will generally print the pages in this order: 1, 2, 3, 1, 2, 3. If you turn off Collated, on the other hand, it'll print in this order: 1, 1, 2, 2, 3, 3. -
Pages . You don't have to print an entire document ”you can print, say, only pages 2 through 15.
Tip: You don't have to type numbers into both the From and To boxes. If you leave the first box blank, the Mac assumes that you mean "from page 1." If you leave the second box blank, the Mac understands you mean "to the end." To print only the first three pages, in other words, leave the first box blank, and type 3 into the second box. (These page numbers refer to the physical pages you're printing, not to any fancy numbering you've set up in your word processor. As far as the Print dialog box is concerned , the first printed page is page 1, even if you've told your word processor to label it Section 12.9.)
-
PDF . A PDF file, of course, is an Adobe Acrobat document ”a file that any Mac, Windows, Linux, or Unix user can view, read, and print using either Preview or the free Acrobat Reader (included with every PC and earlier Mac operating system). Much more on PDF files on Section 14.5.2.2. In previous Mac OS X versions, you could easily save any document as a PDF file instead of printing it ”a truly beautiful feature that saves paper, ink, and time. The document remains on your hard drive, and the text inside is even searchable using Spotlight. But in designing Tiger, Apple added a long list of additional PDF options (like password-protected ones, emailed ones, and so on). It faced a design quandary : How could it offer a new list of PDF- related options without junking up the Print dialog box? Its solution was a strange little item called a pop-up button , shown in Figure 14-3. Use it like a pop-up menu. The command you'll use most often is probably Save as PDF, which turns the printout into a PDF file instead of sending it to the printer. For details on the other PDF-related options here, see Section 14.5.2.2. -
Preview . This button provides a print-preview function to almost every Mac OS X program on earth, which, in the course of your life, could save huge swaths of the Brazilian rain forest and a swimming pool's worth of ink in wasted printouts. Technically, the Preview button sends your printout to Preview. As described on Section 10.19.1.2, Preview lets you zoom in or zoom out, rotate, or otherwise process your preview. When you're satisfied with how it looks, you can print it (File Print), cancel it (File Close), or turn it into a PDF file (File Save as PDF). -
Supplies . This new Tiger feature will strike you either as blissfully convenient or disgustingly mercenary: a button that takes you directly to a Web page where you can buy new cartridges for your specific printer model. If you examine the unnamed pop-up menu just below the Presets pop-up menu, you find dozens of additional options. They depend on your printer model and the program you're using at the moment, but here are some typical choices: -
Layout . As described in Figure 14-3, you can save paper and ink or toner cartridges by printing several miniature "pages" on a single sheet of paper. -
Scheduler . This option lets you specify when you want your document to print. If you're a freelancer, sitting at home with an inkjet on your desk, you might not immediately grasp why anyone wouldn't want the printouts right now . But try to print a 400-page catalog in a big office where other people on the network might conceivably resent you for tying up the laser printer all afternoon, and you'll get the idea. -
Paper Handling . You can opt to print out your pages in reverse order so that they stack correctly, or you can print just odd or even pages so that you can run them through again for double-sided printing. 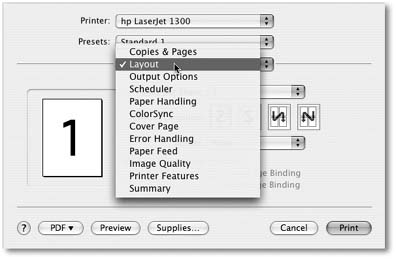 | Figure 14-3. The options included in this dialog box depend on the printer model you're using.
On the Layout pane, you can choose from the Pages per Sheet pop-up menu to indicate how many miniature virtual pages you want printed on each sheet, to save paper and ink. | |
-
ColorSync . Most color printers offer this panel, where you can adjust the color settings ”a little more red, perhaps. This is also where you indicate whose color-matching system you want to use: Apple's ColorSync, your printer manufacturer's, or none at all. -
Quality & Media (inkjet printers only). Here's where you specify the print quality you want, the kind of paper you're printing on, and so on. (The name of this panel varies by manufacturer.) -
Error Handling . Using these controls, you can specify that you want a technical message to print out when the laser printer reports a PostScript error (when your document is too complex for the printer's memory, for example). Depending on your printer, you may also be able to specify what kind of notification you want to receive if your specified paper tray runs out of paper. -
Paper Feed . If you chose the correct printer model when setting up your printer, then this screen " knows about" your printer's various paper trays. Here's where you specify which pages you want to come from which paper tray. (By far the most popular use for this feature is printing the first page of a letter on company letterhead, and the following pages on blank paper from a second tray.) -
[Program Name] . Whichever program you're using ”Mail, Word, AppleWorks, or anything else ”may offer its own special printing options on this screen. Some HP printers, for example, offer Cover Page, Finishing, and other choices. -
Summary . This command summons a text summary of all your settings so far.
Tip: Here's one for the technically inclined. Open your Web browser and enter this address: http://127.0.0.1:631 . You find yourself at a secret "front end" for CUPS (Common Unix Printing System), the underlying printing technology for Mac OS X 10.4 ”and one that lets your Mac communicate with a huge array of older printers that don't yet have Mac OS X drivers. Using this administration screen, you can print a test page, stop your printer in its tracks, manage your networked printers and print jobs, and more ”a very slick trick.
14.2.3. Printing When all of your settings look good, click Print (or press Enter) to send your printout to the printer.
Tip: Background printing is turned on all the time in Mac OS X ”you can't turn it off. That is, you can go right on doing other work while the printing proceeds.As you may have realized by now, Mac OS X is the king of multitasking. It spends about as much of its attention thinking about printing as you do thinking about what you'll have for breakfast next Wednesday.
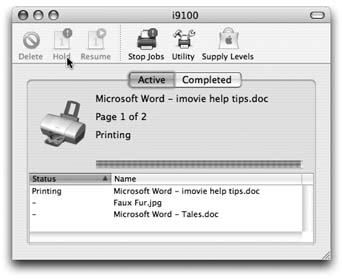 | Figure 14-4. Waiting printouts appear in this Print Center window. You can sort the list by clicking the column headings Name or Status; make the columns wider or narrower by dragging the column-heading dividers horizontally; or reverse the sorting order by clicking the column name a second time. The new Supply Level button shows you how much ink each cartridge has remaining (certain printer models only). | |
|