14.1. Mac Meets Printer One of the biggest complaints about the original Mac OS X was that at the outset, not many printer companies had rewritten their printer drivers ”the software that controls various printer models ”for Mac OS X. Fortunately, the situation has improved: Today's Mac OS X comes with hundreds of printer drivers from Epson, HP, Lexmark, Canon, and others.
Tip: The Tiger installer described in Appendix A even offers to give you the strangely named but wonderful GIMP-Print, a package of high quality printer drivers for Mac OS X. These drivers give new life to hundreds of current and older Epson, Canon, HP, and Lexmark printers.
14.1.1. Setting Up a Printer The beauty of Mac OS X is that setting up a printer for the first time is incredibly easy. The first time you want to print something, follow this guide: -
Connect the printer to the Mac, and then turn the printer on . Inkjet printers usually connect to your USB jack. Laser printers generally hook up to your Ethernet connector. (If you're on an office network, the laser printer may already be connected somewhere else on the network, saving you this step. If you're hooking the printer straight into your Mac's Ethernet jack, you may need an Ethernet crossover cable to connect it, rather than a standard Ethernet cable.)
Note: Most Ethernet-or network-connected laser printers communicate with your Mac using a language called AppleTalk. If you have such a printer, here is step 1.5: Open the Network pane of System Preferences and double-click your network connection (like Ethernet or AirPort). Click the AppleTalk tab; turn on Make AppleTalk Active, and then click Apply Now. (If you omit this step, the Printer Setup Utility nags you about it in step 5.)
-
Open the document you want to print. Choose File Print. In the Print dialog box, choose your printer's name from the Printer pop-up menu (or one of its submenus, if any) . Cool! Wasn't that easy? Very nice how the Mac auto-discovers, auto-configures, and auto-lists almost any USB, FireWire, Bluetooth, or Bonjour (Rendezvous) printer. Have a nice afternoon. The End. Oh ”unless your printer isn't listed in the Printer pop-up menu. (It can happen.) In that case, read on. -
From the Printer pop-up menu, choose Add Printer (Figure 14-1, top) . A program called Printer Setup Utility opens automatically. You could also have opened it manually from your Applications Utilities folder, or by opening the Print & Fax panel of System Preferences and clicking Printer Setup. It's even better at auto-detecting printers available to your Mac. If you see the printer's name now, in the Printer Browser window, click it and then click Add (Figure 14-1, middle). You've just designated that printer as the default printer, the one that you'll print on most of the time. You're all set. Have a good time. Unless, of course, your printer still isn't showing up. Proceed to step 4. -
Click More Printers. In the next dialog box, use the pop-up menu to specify how the printer is connected to your Mac . For example, choose USB if you've connected an inkjet printer to your USB port. (You may see a brand-named version here, like Epson USB or Canon USB; choose that, if it matches your printer brand.) Choose AppleTalk if you're connected to a laser printer via an Ethernet network cable or AirPort wireless network.
Tip: Windows Printing means, "Hey, your Mac can send printouts to a Windows-only printer out there on your office network!" Just choose this option, click the name of the network group you're in, and then type an account name and password, if necessary.
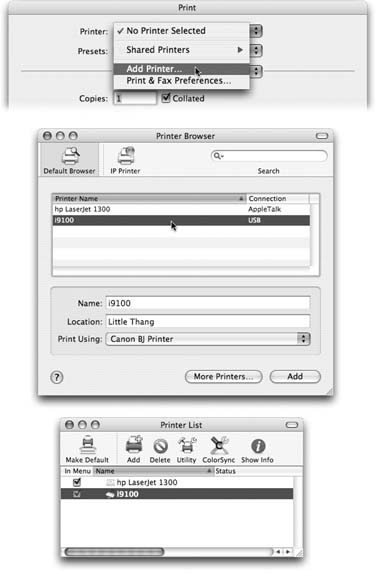 | Figure 14-1. Top: To introduce your Mac to a new printer, try to print something ”and then choose Add Printer from this pop-up menu.
Middle: Your Mac should automatically "see" any printers that are hooked up and turned on. Click the one you want, and then click Add. (If you have some oddball printer whose driver doesn't come built into Mac OS X, a "Driver not installed" message appears. Find the driver, if it exists, on the printer's Web site.)
Bottom: If you've set up more than one printer in this way, you'll see all of them listed in the Printer List. (To get there from the Printer Browser shown above, choose View Printer List.) The one whose name appears in bold is the default printer, the one destined to produce your next printout unless you choose a different one from the Print pop-up menu. | | After a moment, the names of any printers that are turned on and connected appear in the printer list. For most people, that means only one printer ”but one's enough. -
Click the name of the printer you want to use . As an optional step, you can open the Printer Model pop-up menu at the bottom of the dialog box. Choose your printer's manufacturer (like HP or Canon), and then, in the list that appears, choose your particular printer's model name, if you can find it. That's how your Mac knows what printing features to offer you when the time comes: double-sided, legal size , second paper tray, and so on. -
Click Add . After a moment, you return to the main Printer Browser window, where your printer now appears (Figure 14-1, top). You're ready to print.
Note: If you still don't see your printer's name show up, ask yourself: Is my Mac on a corporate network? Does the network have an LPR (Line Printer) printer? If you and your company's network nerd determine that the printer you want to use is, in fact, an LPR printer, click IP Printing at the top of the Printer Browser dialog box (Figure 14-1, middle). Fill in the appropriate IP address and other settings, as directed by your cheerful network administrator.
14.1.2. Multiple Printers If you're lucky enough to own several printers, repeat the steps above for each one. Eventually, you'll have introduced the Mac to all the printers available to it, and all of their names show up in the printer list. To see the printer list so far, open Printer Setup Utility(by opening your Applications- Utilities folder, for example.) Make sure you're looking at the Printer List shown at bottom in Figure 14-1. If you don't see it, choose View Show Printer List. The printer listed in bold is the default printer ”the one that the Mac uses unless you explicitly choose a different one for a particular printout. To specify a different default printer, click its name in the printer list and then click the Make Default button on the toolbar (or press c-D).
Tip: Don't miss the Show Info button in the toolbar of the printer list (Figure 14-1, bottom). Among other things, it lets you rename a printer. In a building where all the printers show up with such helpful names as 172.168.3.4 and 172.168.9.23, this feature can be extremely helpful.
Whenever you want to switch from one printer to the other, you can use the Printer pop-up menu that appears in the Print dialog box (Figure 14-3). But you may also want to create 7 printer icons , a handy, little-known Mac OS X feature that gives you drag-and-drop access to your printers. Click a printer's name in the printer list and then choose Printers Create Desktop Printer; Mac OS X creates an icon for that printer on your desktop (or wherever you like). Repeat for your other printers. From now on, you can print a document on a certain printer just by dragging the document's icon onto the appropriate printer desktop icon.
Tip: You know how Mac OS X comes with the necessary software for hundreds upon hundreds of printers? Unless you're in Oprah's tax bracket , you probably don't own that many printers ”but their drivers are taking up nearly a gigabyte of hard drive space!To clean out the ones you don't need, open your hard drive Library Printers folder. Throw away the folders for printer companies that didn't make your printer. (Administrator account required.)
|