10.25. TextEdit TextEdit: It's not just for Read Me files anymore. As always, TextEdit (Figure 10-34) is a basic word processorbut it's not nearly as basic as it used to be. You can create real documents with real formatting, using style sheets, colors, automatic numbering and bullets, tables, and customized line spacing, andget thiseven save the result as a Microsoft Word document. There's even a multiple-level Undo command. If you had to, you could write a novel in TextEdit and it would look pretty decent. 10.25.1. TextEdit's Two Personalities The one confusing aspect of TextEdit is that it's both a plain text editor (no formatting; globally compatible) and a true word processor (fonts, sizes, styles; compatible with other word processors). You need to keep your wits about you as you edit, because the minute you add formatting to your document, TextEdit no longer lets you save it as a plain text file.  | Figure 10-34. The text ruler gives you control over tab stops, line spacing, paragraph justification, and so on. Pressing  -R makes it appear and disappear. The Style pop-up menu lists canned sets of character and paragraph formatting, so you can apply them consistently throughout a document. -R makes it appear and disappear. The Style pop-up menu lists canned sets of character and paragraph formatting, so you can apply them consistently throughout a document. | |
Here's the scheme: -
You can change a plain text document to a formatted one by choosing Format  Make Rich Text. The ruler appears automatically to remind you that a new world of formatting has just become available. Make Rich Text. The ruler appears automatically to remind you that a new world of formatting has just become available. -
Conversely, you can change a formatted document (a Word file you've opened, for example) to a plain text document by choosing Format Make Plain Text. An alert message appears to point out that youre about to lose all formatting. -
If you know what kind of document you always want to open , go to the TextEdit Preferences dialog box; on the New Document pane, select Rich Text or Plain Text. Thats the kind of document you get each time you choose File New. 10.25.2. Working in TextEdit As you begin typing, all the usual word processing rules apply, with a few twists : -
Choose Bold, Italic, and font sizes using the Format Font submenu, or choose Format Font Show Fonts (-T) to open up the standard Mac OS X Font panel (Section 14.7.2.5). You can even create subscript or superscript, change the color of the text (Format Font Show Colors), and so on. -
Common paragraph-alignment optionsAlign Left, Align Right, Center, Justifyare all available as ruler buttons and also reside in the Format Text submenu. Adjust the line spacing (single, double, or any fraction or multiple) using the Spacing pop-up menu in the ruler. -
New in Tiger: The ruler also offers automatic bulleting and numbering of highlighted (or about-to-be-typed) paragraphs. Just choose the numbering style you prefer from the Lists pop-up menu. -
Also new in Tiger: You can select several bits of text simultaneously . To pull this off, highlight your first piece of text by dragging, and then press as you use the mouse to select more text. Bingo: You've highlighted two separate chunks of text. When you're done selecting bits of text here and there, you can operate on them en masse. For example, you can make them all bold or italic with one fell swoop. You can even use the Cut, Copy, and Paste commands, as described in the next section. When you cut or copy, the command acts upon all your selections at once. UP TO SPEED
The Deal with Microsoft Word | | Yes, you read that correctly: Humble TextEdit can now open and create Microsoft Word documents! Your savings: the $400 price of Microsoft Office! Well, sort of. When you open a Microsoft Word document, most of the formatting comes through alive : bold, italic, font choices, colors, line spacing, alignment, and so on. Even very basic tables make it into TextEdit, although with different column widths. A lot of Word-specific formatting does not survive crossing the chasm , however: borders, style sheets, footnotes, and the like. Bullets and numbered lists don't make it, either, even though TextEdit can create its own versions of these. And TextEdit doesn't recognize the comments and change tracking that your collaborators might use to mark up your manuscript. Saving a TextEdit document as a Word document (File Save As) is a better bet, because Word understands the many kinds of formatting that TextEdit can produceincluding bullets, numbering, and tables. The one disappointment is that Word doesnt recognize any style sheets you've set up in TextEdit. The formatting applied by those style names survivesjust not the style names themselves . Even so, a built-in Word-document editor is a huge, huge step for the Mac OS. It means that in many cases, you can be a first-class citizen on the playing field of American business. Nobody ever needs to know that you're (a) using a Mac, and (b) not using the real Microsoft Word. |
You also drag any one of the highlighted portions to a new area, confident that the other chunks will come along for the ride. All of the selected areas wind up consolidated in their new location.
Tip: If you Option -drag one of the highlighted bits, you copy it, leaving the original in place.
-
Similarly, you can use the Find command to highlight a certain term everywhere it appears in a document. To do that, choose Edit Find Find (or just press -F). Fill in the "Find" and "Replace with" boxesand then press the Control key. The Replace All button changes to say Select All. POWER USERS' CLINIC
Advanced Typography in TextEdit | | If you just sprayed your coffee upon reading the heading of this sidebar, you're forgiven. Advanced typography in TextEdit? Isn't that a little bit like saying, "page layout in Note Pad"? Not at all. TextEdit is a gleaming showcase for Mac OS X's typographical smarts. Most of the commands in the Format Font submenu should be familiar to you: Bold, Italic, Underline, and so on. But a few were once found only in expensive page-layout programs like PageMaker and QuarkXPress. For example: Kern . Use these commands, such as Tighten and Loosen, to nudge the letters of the selected text closer together or farther apartan especially useful feature when you're fiddling with headlines and headings. There are no controls to set how much you want to kern the text, but you can apply these commands repeatedly to the same text selection to intensify them. If you want your text to be very tight, for example, just keep choosing the Tighten command. The characters creep closer and closer together until they crash into each other. Ligature . Ligatures are letter pairs, such as fl and ff, that, in fancy typesetting, are often conjoined into special combination characters, as shown here. If you choose Format Font Ligature Use Default (or Use All), TextEdit displays these letter pairs with the appropriate ligatures. (This works only if the font youre using has those ligatures built into it. New York, Charcoal, Apple Chancery, and all Adobe Expert fonts do, for example, but many other fonts don't.) Baseline . The baseline is the imaginary "floor" for text characters in a line of type. You can push text above this line or sink it below the baseline using the Raise and Lower commands in the Baseline submenu. The Superscript and Subscript commands, meanwhile, shift characters far above or below the baseline, so you can write stuff like H 2 0. Character Shape . In a few fonts, such as Adobe Expert fonts, this submenu offers a choice between Traditional Form and specialized type treatments like Small Caps. Copy Style/Paste Style . If mastering the new Styles pop-up menu (described on the facing page) is too much effort, these commands offer another way to copy and paste just the font formatting to other text in your documentthe font, color, style, and size , but none of the actual text or paragraph attributes, such as alignment.  |
Tip: Oh, don't get TextEdit started on secret keystrokes in the Find box. If you press Option, for example, the Replace All button changes to say In Selection (meaning that you'll search-and-replace only the highlighted blob of text).You can combine the two previous tricks, too. If you press Control and Option, the Replace All button changes to say In Selectionbut now you're selecting , not replacing, all occurrences of the search text just within the highlighted block.
-
If you Option-drag vertically, you can freely select an arbitrary column of text (not necessarily the entire page width). This technique is very useful when you want to select only one column in a multicolumn layout, or when you want to select the numbers in a list ("1.," "2.," and so on) and format them all at once. (As noted earlier, this trick also works in Preview PDF documents.) 10.25.3. Style Sheets A style is a prepackaged collection of formatting attributes that you can apply and reapply with a click of the mouse (bold, 24-point Optima, double- spaced , centered, for instance). You can create as many styles as you need: chapter headings, sidebar styles, and so on. You end up with a collection of custom-tailored styles for each of the repeating elements of your document. Once you've created your styles, you can apply them as you need them, safe in the knowledge that they'll be consistent throughout the document. During the editing process, if you notice you accidentally styled a headline using the Subhead style, you can fix the problem by simply reapplying the correct style.
Note: Unlike a real word processor, TextEdit doesn't let you change a style's formatting and thereby update every occurrence of it. You can't search and replace by style, either.
-
Creating a named style . To create a style, start by formatting some text so that it looks the way you like it, complete with font, color, line spacing, tab settings, and so on. Then, from the Styles pop-up menu in the ruler, choose Other (Figure 10-35, top). Click Add to Favorites, type a name for the style, turn on both checkboxes (Figure 10-35, bottom), and click Add. -
Applying a style . Later, when you want to reuse the formatting you set up, highlight some text and then choose the appropriate name from the Styles pop-up menu. TextEdit applies the formatting immediately.
Tip: If you simply click inside a paragraph, applying a style affects only paragraph attributes like line spacing, tab stops, and alignment. If you highlight text instead, applying a style affects only character attributes like the font and type size.If you highlight an entire paragraph, however, both text and paragraph formatting appears.
-
Deleting a style . To delete a superfluous style, choose Other from the Styles pop-up menu on the ruler. Click the Favorite Styles button, choose the unwanted style's name from the pop-up menu, and click Remove From Favorites. (Deleting a style doesn't affect any formatting that's already in your document; it just removes the name from the Styles menu.) 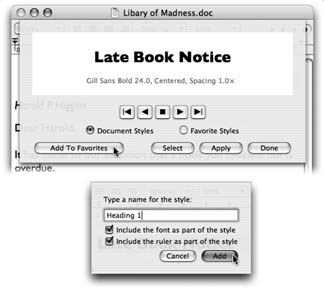 | Figure 10-35. Highlight the text you want to format. Then, from the Styles pop-up menu in the ruler, choose Other. With each click of a triangle button, you summon a snippet of the next chunk of formatting. When you find one you like, you can either click Apply (to zap the highlighted text into submission) or Add To Favorites (to reuse this canned style later). In the latter case, you can give the new style a name (bottom). | |
-
Copying by example . In Word and most other "serious" word processors, the routines above correctly describe how you use styles. In TextEdit, however, you can use Option- -C and Option- -V (Format Copy Style and Format Paste Style) to grab formatting from one place in your document and reuse it elsewhere. (Of course, you cant apply styles in text-only documents.) 10.25.4. Tables Tables can make life a heck of a lot easier when you want to create a rsum, agenda, program booklet, list, multiple-choice test, Web page, or another document where numbers, words, and phrases must be aligned across the page. In the bad old days, people did it by pressing the Tab key to line up columns a technique that turned into a nightmare as soon as you tried to add or delete text. But using a word processor's table feature is light- years easier and more flexible, because each row of a table expands infinitely to contain whatever you put into it. Everything else on its row remains aligned.
Tip: Tables are also critical for designing Web pages, as any Web designer can tell you. Even though you can't see the table outlines, many a Web page is filled with columns of text that are aligned invisibly by tables. And now that TextEdit can save your work as an HTML document, it's suddenly a viable candidate for designing basic Web pages.
-
Create a table by choosing Format Text Table. The floating Table palette appears (Figure 10-36). Use it to specify how many rows and columns you want. The placeholder table in your document adjusts itself in real time.  | Figure 10-36. Note to Web designers: TextEdit may not be Dreamweaver, but it's great for spinning out quick Web pages, thanks to the table features. Here, you can see that a big table forms the underlying structure for this Web page, along with a couple of nested ones and color selections. | |
-
Format the table using the other controls in the Table palette. The Alignment controls let you specify how the text in one of the table cells hugs its border. Cell Border controls the thickness of the line around the selected cells ' borders (or, if you enter 0, makes the table walls invisible). The color swatch next to Cell Border specifies the color of the solid lines. The Cell Background controls let you color in the table cells with colors of your choice. (Choose Color Fill from the pop-up menu, and then click the color swatch.) This is an especially valuable option for Web designers. -
Adjust the rows and columns by dragging the cell borders. -
Merge two selected cells by clicking Merge Cells in the Table palette. Once you've done that, you can use the Split Cell button to split them apart again. (Split Cell doesn't work except in cells you've previously merged.) -
Nest one table inside a cell of another by clicking in the cell and then clicking Nest Table. Change the numbers in the Rows and Columns boxes to set up its dimensions (Figure 10-36). 10.25.5. TextEdit as Web Designer The new Table palette isn't the only clue that Apple intends TextEdit to be a quick-and-dirty Web page design program. Consider these other tools: -
You can easily add graphics to the page by dragging or pasting them into a document. The program understands TIFF, PICT, JPG, and GIF formats. -
You can add Web-style hyperlinks by highlighting "Click here" (or whatever the link says), choosing Format Text Link, and entering the Web address in the resulting dialog box. Or just drag a link in from Safari, Mail, or another program. (To edit the link later, Control-click it and choose Edit Link.) -
To save a document as an HTML (Web page) file, choose File Save As; from the File Format pop-up menu, choose Web Archive. GEM IN THE ROUGH
Files Within Files Within Files | | It's no surprise that you can include formatted text and pictures in a TextEdit document, but here's a shocker. You can also embed an entire program or document within a TextEdit file. Try this experiment: Create a new TextEdit document in Rich Text mode. Drag a couple of program icons into the TextEdit document. Do the same with some documents that were created using native Mac OS X programs (another TextEdit document, for example). When you save the file, Mac OS X saves embedded copies of the applications and documents you dragged into the TextEdit document itself. (The TextEdit file is saved in a format called RTFD, which is a Rich Text Format document with attachments.) Once you've saved the file, you can double-click any of the icons in the file to launch the embedded items. In the TextEdit document shown here, you could launch the Chess, DVD Player, and Mail programsall right from within the file. To make things even wilder, it's possible to drag a TextEdit file containing embedded items into another TextEdit file, saving a file within a file within a file. One important point: The double-clickable icons you create in TextEdit using this method are not aliases or links to your original documents and programs. They're actual, full copies. If you embed a 10 MB program into a TextEdit document, you'll end up with a 10 MB TextEdit file! 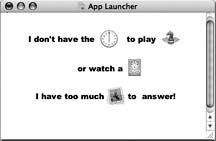 |
Don't miss the HTML options in TextEdit Preferences. On the "Open and Save tab, you can specify what kind of HTML document you want to produce, what cascading style sheets (CSS) setting you want, and whether or not you want TextEdit to include code to preserve blank areas (white space) in your layout.
Tip: When you open a Web page documentthat is, an HTML documentTextEdit is faced with a quandary . Should it open up the page as though it's a Web page, interpreting the HTML code as though it's a browser? Or should it reveal the underlying HTML code itself?Actually, that's up to you. When you choose File Open, turn on "Ignore rich text commands to make the document open up as HTML code. (To make this change permanent, check out the same checkbox on the "Open and Save" pane of the TextEdit Preferences dialog box.)
New Document pane have no effect on documents that are already openonly on documents you open or create from now on. Most of the settings are self-explanatory; nonetheless, handy explanatory balloons appear if you point to an option without clicking. Here are a few settings that may not be immediately clear: -
Font . If Helvetica 12 doesn't especially float your boat, you can change TextEdit's starting font. Note that you can set two default fontsone for Rich Text documents and another one for Plain Text files.
Note: By definition, plain text files don't have any formatting. So whatever font you choose here for Plain Text files is for your editing pleasure only. If you plan to send the file to anyone else, remember that the font choice won't be saved with the document.
-
Window Size . These settings have no effect unless you're in Wrap to Window mode (in which the text rewraps to fit the window width), as opposed to Wrap to Page mode. If you are in Wrap to Window mode, then these dimensions determine the size of the window that appears each time you create a new TextEdit document. -
Properties . These boxesAuthor, Company, and Copyrightare some of the tags that Spotlight inspects when it searches your Mac. If you'd like to be able to round up your documents by these characteristics, fill them in here to specify the information you want to use for most documents. (To fill them in differently for individual documents, choose File Show Properties instead.) 10.25.7. TextEdit's Other Writing Tools TextEdit includes a few other very useful document-editing tools: -
Allow Hyphenation . When you select this command from the Format menu, TextEdit breaks up words by syllable and inserts hyphens when necessary in order to create more visually pleasing line breaks.
Tip: It's especially important to turn this feature on if your paragraph alignment is set to Justify, or if you create narrow columns of text. If hyphenation is turned off, TextEdit won't break up whole words at the end of a lineeven if it leaves big, ugly white gaps between words.
-
Prevent Editing . When you turn this option on (again, in the Format menu), you're locked out. You can select and copy text to your heart's content, but you can't change anything. Prevent Editing mode can be useful if you want to prevent yourself from making accidental changes to a file, but it's not much of a security feature. (All anyone has to do is choose Format Allow Editing to regain full editing privileges.) -
Spell Checking . If the Edit Spelling Check Spelling As You Type command is turned on, you get interactive spell checking, just as in Microsoft Word and other word processors. That is, misspelled words get flagged with a dashed red line the moment you type them. To open the full Spelling panel at any time, choose Edit Spelling Spelling (or press Shift- -:). Using the panel, you can correct errors (choosing from the suggestions generated by Apple's built-in spelling dictionary) or tell TextEdit to learn or ignore other suspected misspellings. The quickest way to handle spelling corrections is shown in Figure 10-37.
Tip: This feature isn't really a TextEdit functionit's a system-wide spell checker that you'll also find in Stickies, Mail, iCal, iPhoto, and other programs. You learn it once, you've learned it forever.
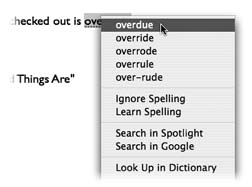 | Figure 10-37. You're never more than a Control-click away from more accurate spelling in TextEdit. Once you Control-click a questionable word, the suggestions of Apple's built-in dictionary appear right in the shortcut pop-up menu, along with the Learn and Ignore commands. | |
-
AutoComplete . This feature is ideal for anyone who's in a hurry, who's unsure of a spelling, or who's trying to solve a crossword puzzle. See Figure 10-38 for details, and note that AutoComplete is actually available in almost every Cocoa program. |