| When you work in GarageBand, the timeline is your primary canvas. It's something like the timeline view in iMovie: a scrolling map of the overall project, marked at the top by a beat ruler that helps you figure out where you are in the song. Tracks are the horizontal, parallel stripes that represent instruments playing simultaneously . Which is lucky, because if this software could play only one instrument at a time, it would have to be renamed GarageSolo. You'll learn how to fill these gray stripes in the following chapters. For the moment, though, it's useful to learn your way around the tracks themselves . After all, like the musicians in a real garage band , they're paid very little, but respond well if you treat them with a little respect. As you read the following instructions, you might want to follow along by working with the Garage Door song you opened in the previous section (Section 1.3). 1.8.1. Creating a Track You can add a track in any of three ways. -
Click the + button below the track names . You can see this button in Figure 1-1. -
Choose Track  New Track . Or press Option- -N. New Track . Or press Option- -N. Both of these methods open the New Track dialog box shown in Figure 1-6. Click the appropriate tabReal Instrument or Software Instrumentand then, on the right side of the dialog box, click the name of the kind of instrument you plan to add. (If you intend to record soundthat is, if what you need is a Real Instrument trackyou can bypass the dialog box by simply choosing Track New Basic Track. Details in Chapter 6.) You can read more about this process in the tutorial at the end of Chapter 2.
Tip: A track's header is the dark area at the left edge of the track, where you see its name and icon. To find out which kind of track you're dealing withReal Instrument or Software Instrumentclick the track header. If it turns greenish, you're dealing with a Software Instrument (MIDI) track. If it's purplish, you've clicked a Real Instrument (live recording) track.You can select one track after another, "walking" through the list of them, by pressing the up or down arrow keys on your keyboard.
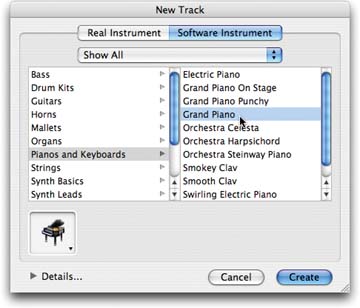 | Figure 1-6. A certain track can handle either a Real Instrument (sound file) or a Software Instrument (MIDI notes), so you have to tell GarageBand which sort of instrument you intend to add. If you're going to record a Real Instrument, also specify which effects you want GarageBand to add to the track, like reverb or EQ (equalization). Details in Chapter 7.
If you've installed additional instrumentssome of Apple's Jam Packs, for exampleyou can isolate them by choosing them from the pop-up menu that now says Show All. | |
-
Drag a loop into an empty gray spot in the timeline (the track display area) Chapter 2 covers this method in delicious detail. In any case, a new track appears below all the existing tracks.
Tip: If you have a standard, preferred "combo"drums at the bottom, bass line above that, then piano, then guitar, and so onyou can save a lot of time by building an empty GarageBand template with this track structure. Save this empty file to your desktop. Each time you want to work from this template, open itand then before filling it with music, choose File Save As and name the song youre about to create.
The number of simultaneous tracks that GarageBand can play depends on the horsepower of your Mac and which kind of tracks they are; Software Instruments make the Mac work a lot harder than Real Instrument recordings. On slower Macs, four or five tracks is about the limit; 10 or 12 tracks is typical on a Power Mac G4. If you have a fully tricked-out, top-of-the-line Power Mac G5 loaded with RAM, then you can build tracks into the dozens. Fortunately, there's a whole chapter's worth of tips and tricks for helping GarageBand overcome the strain of track- intensive compositions waiting in Chapter 10.
Tip: As you add and work with tracks, keep your eye on the Playhead handle. As described in Figure 1-7, it's an early-warning system that lets you know when you're overwhelming your Mac.
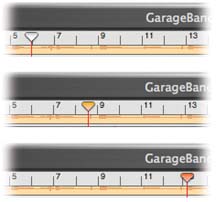 | Figure 1-7. As you play and record music, the Playhead triangle darkens from white, through ever darker shades of orange and redto indicate how much trouble your Mac is having. If it spends a lot of time in the red, you're approaching your maximum track limit. | |
1.8.2. Rearranging Tracks You can rearrange your tracks' top-to-bottom order just by dragging them vertically. You might, for example, like to keep the track you're working on up at the top where it's easy to find. Or maybe you like to keep your tracks in traditional "score order" (that is, as the instruments would appear in standard full-orchestra sheet music). 1.8.3. Deleting a Track Before you nuke one of your tracks, scroll through the whole thing to make sure you're not about to vaporize some important musical material. (Consider zooming outtap Control-left arrow repeatedlyuntil the entire track fits on your screen.) Then click the track header to select it. Choose Track Delete Track, or press -Delete, to send the track into the great sheet music stack in the sky. (Of course, GarageBand's amazing Undo command can resurrect it if necessary; see the box on Section 1.8.5.) 1.8.4. Renaming a Track Click a track's header to select it, and then click carefully , once, on its name. It's now a simple matter to edit the track's name, as shown in Figure 1-8. 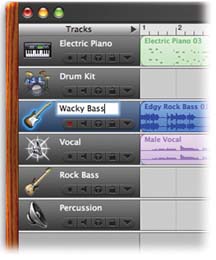 | Figure 1-8. If a track header is already selected, click once on the track's name to open its "renaming rectangle." If not, click inside the track header's colored area first, then click the track name. (Just don't double-click the track name; you'll open up a dialog box by accident .) Hold your breath and remain very still. At last, the name-editing box appears.
Edit the name by typing. Then press Return or Enter, or click somewhere else in GarageBand, to make the new name "stick." | |
1.8.5. Track Characteristics The importance of the New Track dialog box shown in Figure 1-6 depends on what kind of musical material you intend to record (that is, which of the two tabs you click): -
Real Instrument . This tab lists instruments, all right, but they actually refer to effects presets that contain canned settings for reverb, echo, and other processing effects that have been optimized for each instrument type. The actual instrument sound is determined by your microphone or whatever electronic instrument you hook up to your Mac. Chapter 6 has details. GEM IN THE ROUGH
There's Undo, and Then There's Undo | | GarageBand offers a multiple-level Undo command. That is, you can take back more than one editing step, backing up in time. GarageBand, in fact, can take back the last 30 steps. If you choose the Edit Undo command (or press -Z), you can rewind your file closer and closer to its condition when you last saved it. (Or if you haven't saved the file, Undo takes you closer and closer to the moment when you opened it.) That fine print may startle people who are used to, say, Microsoft Word, which lets you keep undoing even past the point of saving a document. It's a good argument for saving a GarageBand file less frequentlybecause once you save the document, you lose the ability to undo changes up to that point. Of course, if you really do want to rewind your work all the way back to the instant when you last saved the piece, you can bypass all of those Edit Undos and instead choose File Revert to Saved. GarageBand tosses out all the work youve done since the last save. And one last thing: If you rewind too far, and you Undo your way past a good edit you made, you also have a multiple Edit Redo command at your disposal. In effect, it undoes the Undos. |
-
Software Instrument . This tab also lists instruments, but here, you're choosing an instrument sound that will play when you press the keys of your MIDI keyboard. Details in Chapter 4.
Tip: Either way you can also choose an icon for the track, using the pop-up menu at the lower-left corner. Apple gives you 68 little graphics to choose fromevery instrument in GarageBand, plus silhouettes of singers. (These are purely graphic ornaments; they don't affect the sound in any way.)To open this palette of icons, by the way, you don't have to click the tiny, down-pointing triangle, as you might expect. Instead, click squarely on the icon itself. The broader target means quicker access.
The appearance of the New Track dialog box is not, fortunately, the only chance you get to adjust these parameters. You can summon the same box at any time, even after recording into the track, by double-clicking the track header, or, if a track is already selected, by choosing Track Track Info ( -I). The resulting dialog box is now called Track Info, but it looks overwhelmingly familiar.
Note: In fact, when you open the Track Info dialog box, you get a Details button at the bottom that you don't get in its New Track dialog box. Details on effects in Chapter 6.You also get a Master Track tab at the top of the dialog box; it's described in Chapter 7.
|