Flylib.com

Books Software


Step 2.2: Run Eclipse


Step 2.2: Run Eclipse

click to expand

q 2.2(a) Locate the IDE.

Unlike many Windows programs, Eclipse does not automatically add an option to the Start button. Instead, to start the IDE, you first need to navigate to the correct folder using Windows Explorer, as shown in Figure 2.12.

click to expand
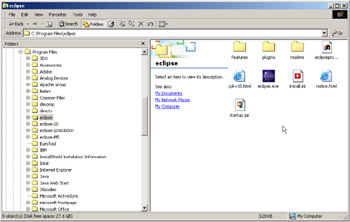
Figure 2.12: The Eclipse folder, indicating the launch icon for the IDE.

At this point, you may want to make a shortcut icon that you can place either on your desktop or in your start menu. Personally, I use the Microsoft Office quick launcher. I just drop the icon on the bar and it's there for me whenever I need it.

q 2.2(b) Right-click the IDE icon and select Create Shortcut.

click to expand
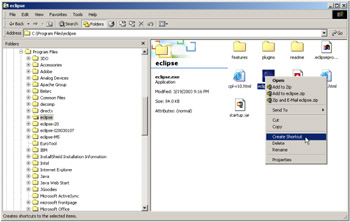
Figure 2.13: Use the pop-up menu to create a shortcut for the IDE icon.

A new icon will appear, which will look exactly like the IDE icon, but with an arrow on the bottom left indicating that this is a shortcut. You can now move this shortcut icon wherever you want to allow easy access to the program.

click to expand
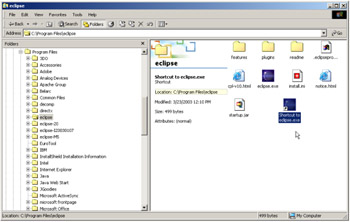
Figure 2.14: The Eclipse folder, indicating the launch icon for the IDE.

q 2.2(c) Start the IDE.

Note  

Once you have located the Eclipse folder, double click on the IDE icon, shown on the left. You can also use the shortcut icon you created in Step 2.2(d). You will see the small window shown in Figure 2.15, followed by the splash screen in Figure 2.16. The first window only appears the first time you start Eclipse after the install, but the splash screen appears every time.

click to expand
Figure 2.15: This window is shown only the first time you launch Eclipse.

click to expand
Figure 2.16: The startup screen for the Eclipse IDE.

q 2.2(d) Wait for the IDE workbench to appear.

On the machine used for this book, a 1.6GHz Pentium 4, the splash screen stayed up for about 12 seconds. Then the screen shown in Figure 2.17 appeared.

click to expand
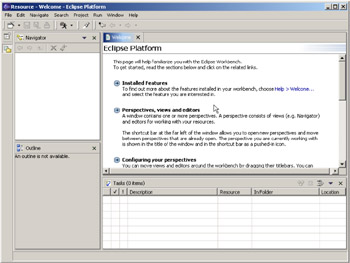
Figure 2.17: Success! The Eclipse IDE in its default configuration!


Step 3: Introducing the Workbench

Overview

Everything in Eclipse is done through the workbench. The workbench is sort of your view on the world. In this step, I'm going to introduce you to it.

First, I'll point out the different parts of the workbench. Then I'll show you the Eclipse Workbench User Guide, an in-depth guide to the features of the workbench. This is an excellent reference document.

In the next step, we will learn more about the components and how to use them.


Introduction

First, I'll review the basic components of the Eclipse IDE workbench. Figure 3.1 shows the workbench with the various pieces broken apart. If your screen doesn't resemble the one shown (not exploded, of course), then please execute the actions in Step 3.1 to get to the initial welcome display.

click to expand
Figure 3.1: The Eclipse IDE Workbench, with its individual components broken out.

The basic workbench, no matter what perspective you use, consists of a group of panels (or panes) surrounded by a group of bars. A specific collection of panels is known as a perspective. In this particular perspective, you'll notice a Navigator view in the upper left panel. Typically, this sort of panel is used to group all the components of your project. The components are referred to as resources .

The default perspective is the Resource perspective, which basically treats all resources as text files.

The bars

The bars tend to stay the same from one perspective to the next . While you can customize the appearance and content of the bars, the bars themselves tend to always be available and in the same locations.

  1. Title Bar: This is the standard Windows title bar (or whatever operating system you happen to be running Eclipse under). The title bar always displays the name of the current perspective.

  2. Menu Bar: This is the overall Eclipse menu bar, which allows you to do all manner of general tasks . The available options in this menu will also change based on the resource currently selected.

  3. Tool Bar: This is the overall Eclipse tool bar, which also allows you to perform both general tasks and specific tasks for selected items.

  4. Perspective Bar: The perspective bar allows you to switch quickly between open perspectives or to open new perspectives.

  5. Status Bar: This line typically displays information about the selected item, although it can contain additional information depending on the task you're currently performing. For example, when you're in a text editor, the status bar might show the current position within the document.

The panels

There are two types of panels: views and editors.

  1. Views: Views show groups of related objects. In a typical display (although this is by no means required), the upper left hand panel will show a Navigator view.

  2. Editors: Editors are just what the name implies: tools to edit documents. These documents can be program source or runtime configurations ” basically, anything that can be edited.

Views are lists of items. They can be the resources in a project; in which case the view is generally called a Navigator view. Another view type is the task list, which contains to-do items, such as current syntax errors. A third view type is the attribute view, which might show either the properties or the outline of a selected item in the navigator view. The number of views continues to grow as third-party developers create more and more plug-ins. However, in this book you'll only need to learn the basic views shipped with the Eclipse product itself.

Note that some views come with their own toolbars. These toolbars are in addition to the main Eclipse tool bar and provide additional, view-specific functions.

As opposed to views, which can be rather free-form, editors are quite focused. They generally provide context-sensitive, syntax-aware editing for the selected resource. While the open-source Eclipse project really only has a single editor (the Java editor), IBM has written many more editors, and many of these are available in the WebSphere Development Studio client. They include editors for everything from RPG to COBOL, from JavaServer Pages to Cascaded Style Sheets.

There are also a number of third-party editors, ranging from C and C++ to COBOL. Editors for languages you might not normally hear about, such as Eiffel and AspectJ, are being developed, as well as more popular names such as Pascal and Python.