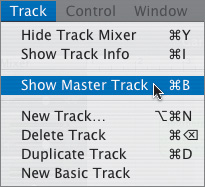
| Throughout this lesson, you have been mixing the song by adjusting the individual tracks. The song has come a long way since the arrangement you started with, and the mix is almost finished. There's one thing left to work with, and that is the Master track. Unlike individual tracks, the Master track controls the entire song. In the next series of exercises, you'll work with the Master track to change the volume and effects for the overall song. There are two ways to show the Master track: Let's try it now. 1. | Choose Track > Show Master Track.
 The Master track appears at the bottom of the Timeline. The Master Volume curve shows the Master track by default.
| 2. | Click the Master Track header to select it.
The Master Track header changes from grey to purple.
 The Master Track Curve pop-up lets you show either the Master Volume curve or the Master Pitch curve.
| 3. | On the purple Master Track header, click the Master Track Curve pop-up and select the Master Pitch curve.
 You can set control points on the Master Pitch curve to change the pitch of (transpose) the overall song.
| 4. | In the Master Track Curve pop-up, change back to the Master Volume curve.
|
Understanding the Different Volume Controls There are four different volume controls to consider as you finish your song. Each volume control adjusts a particular level. Track Volume Track volume is the volume level of an individual track. You adjust it using either the track's Volume slider or the track's Volume curve. The purpose of adjusting the track volume is to balance the levels of the different tracks in order to make them higher or lower in the overall mix. Master Track Volume To dynamically adjust the volume levels of the overall song, you adjust the volume of the Master track, which is a combination of all the mixed individual tracks. To change Master track volume, you adjust the control points in the Master track's Volume curve. The time to adjust Master track volume is after you have balanced the levels of all the individual tracks. Master Output Volume It is important to understand the difference between the overall song volume, which you control through the Master track, and the master output volume. The master output volume is the volume level that goes out of GarageBand to the computer. This output level determines the level your song will have when it is exportedfor example, when it is output from GarageBand to iTunes. You can control the master output volume of the song by using the Master Output Volume slider, located in the lower-right corner of the window. 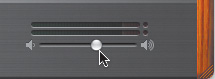 This slider should only be adjusted after you have mixed the levels of the individual tracks and then adjusted the Master track volume. Once the overall song is mixed, you use the Master Output Volume slider to raise or lower the output level. This step ensures that you avoid clipping and that the export volume of the finished song is not too low. Computer Output Volume The computer output volume is how loud you hear your GarageBand project through your headphones or computer speakers. You should always use volume controls for your computer to adjust the loudness in your headphones and speakers. You should not use the Master Output Volume slider in GarageBand for this purpose. Adjusting your computer's output volume level lets you listen to your GarageBand music as loudly or quietly as you like without changing the output level of the actual project so that it exports too loudly or too quietly. Note The volume controls for your computer can be accessed through the speaker icon in the menu at the top of the screen or in the Sound pane of your System Preferences window.
Now that you understand the difference between the different volume controls, let's focus on the Master track volume and the master output volume. Adding Control Points to the Master Track One of the most important features of the Master track is that it can be used to dynamically change the Volume curve of the overall song. Let's add control points to the Master track Volume curve to fade out the end of the song. 1. | Move the playhead to the beginning of the 29th measure.
| 2. | Play the end of the song and listen to the way it sounds.
Did you notice that the strings keep going long after the last bass note? Let's fade out the Master track after the last note in the Electric Bass track.
| 3. | Move the playhead to the beginning of the 31st measure.
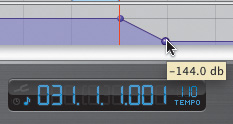
| 4. | Click the Master track Volume curve at the beginning of the 31st measure to add a control point.
Note When you use the playhead as a guide for placing control points, you may have trouble clicking exactly on the Volume curve at the playhead position. If necessary, move the playhead out of the way so you can set your control point exactly where you want to. | 5. | Click the Master track Volume curve at the beginning of the 32nd measure to add a control point.
| 6. | Click-drag the control point at the beginning of the 32nd measure down to the lowest volume level.
 | 7. | Press the left arrow five times to move the playhead back five measures.
| 8. | Play the end of the song and listen to the Master track volume fade out at the end.
Now the song has a nice clean fade after the last note.
|
Adding Effects to the Overall Song To add an effect to an individual track, you used the Track Info window for the track. The Master track also has a Track Info window that allows you to make changes to the overall song. There are three ways to open the Master Track Info window: Select the Master track and press Cmd-I. Choose Track > Show Track Info. Click the Track Info button. The button is located between the Add Track (+) and Loop Browser buttons. The Track Info button will open the Track Info window for any selected track, including the Master track.
Let's open the Master Track Info window and add an effect to the entire song. 1. | Press Cmd-I or click the Track Info button to open the Master Track Info window.
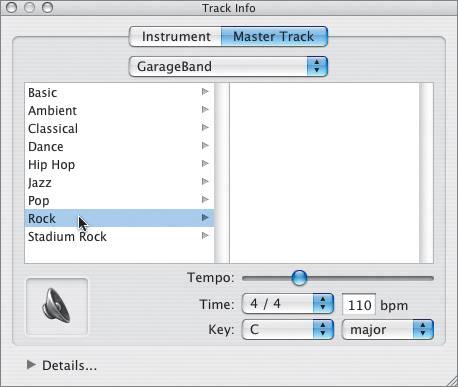 The Master Track Info window opens.
| 2. | Select Rock from the effects presets list.
| 3. | Select Rock Basic from the list of specific presets on the right.
You may see a dialog box that asks if you want to save the file before opening a new one. Click Discard.
You just added a Rock Basic preset to the overall song. Let's listen to the song to hear how it sounds.
| 4. | Press the Home key and then the spacebar to play the song from the beginning.
| 5. | While the song is playing, press the down arrow to hear the other Rock preset effects applied to the song. Stop playback when you have selected an effect.
Did you find a favorite preset? I like the way the LA Rock preset sounds. You can select whichever you like best.
| 6. | Click the Details triangle to view the other effects options for the Master track.
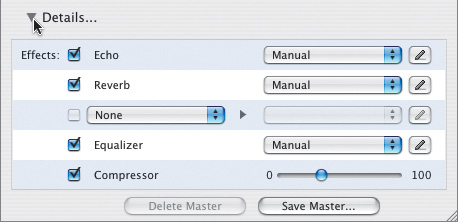 At the bottom right of the Track Info window for the Master track are the Tempo, Time signature, and Key controls for the entire song. The other controls work the same way they do for the individual track effects. You can even save master effects settings to create your own presets.
| 7. | Click the Details triangle again to close the details portion of the window, and then close the Master Track Info window.
| 8. | Press Cmd-B to hide the Master track.
|
Now that you've added control points and effects to the Master track, it's time to check the output level for clipping. This is the last thing you do to your final mix to prepare the song for export. Checking for Clipping You've finished your final mix, adjusted all of the track levels individually, and made adjustments to the overall song. The last thing you need to do is play the song from the beginning and watch the Master Output Volume meters to make sure the song output levels are good, and not clipping. 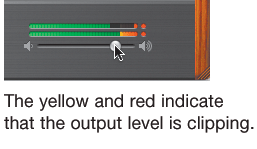 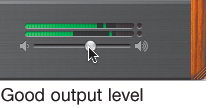 When the output level is good, the average volume levels (solid green bars) move as high as the middle or upper third of the meters, and the peaks (green lines) never turn yellow or red. To change the output volume for the song, you click-drag the Master Output Volume slider. Let's raise the master output volume to illustrate clipping. 1. | Click-drag the Master Output Volume slider to the right so that it is near the highest level.
It doesn't need to be at the highest level to cause clipping.
Note You may wish to take a moment to lower the volume of your computer because the playback will now be louder than normal. | 2. | Press the Home key and then the spacebar to play the song from the beginning.
As the song plays, watch the Master Output Volume meters for any signs of clipping. If the clipping indicators turn red, press the spacebar to stop playback.
 | 3. | Click the red clipping indicators to reset them.
| 4. | Click-drag the Master Output Volume slider to the left to lower the output volume of the song.
| 5. | Repeat steps 2 through 4 until you find a good level for the Master track volume.
Make sure your output level isn't too low. Try to set the output level as loud as you can safely, without the meters reaching the yellow or the red clipping range.
| 6. | Press Cmd-S to save the finished mix.
|
Working with Vocal Effect Presets Technically, the song is complete. However, I added two instrument tracks and one vocal track at the end. The instrument tracks are empty so that you can record your own part to go along with the song. For the vocal track, I added a spoken introduction to the song. Sorry, I'm not a vocalist, and there isn't a filter that can make my singing voice sound good enough for this song. You can still test the vocal effects on my spoken words, and if you really want to add some singing, go for itafter the lesson. 1. | Select the Female Basic track (the lowest track) in the Timeline.
| 2. | Press M to unmute the track.
| 3. | Press the Home key to move the playhead to the beginning of the song, then play the first few measures to hear the vocal part.
| 3. | Press S to solo the track, then press C to turn on the cycle region.
| 4. | Create a cycle region over the first 2 measures of the song.
| 5. | Press Cmd-I to open the Track Info window for the selected track.
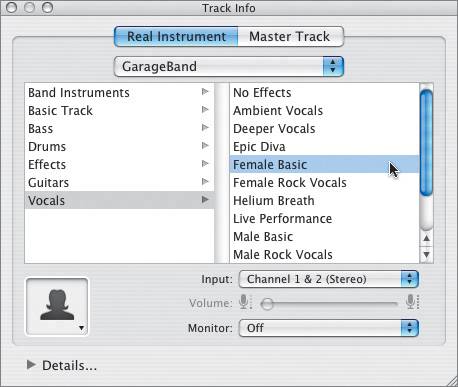 | 6. | Select the Helium Breath vocal preset to hear what I sound like after inhaling a dose of helium.
When you stop laughing, use the up and down arrow keys to try different vocal effects. The Male and Female presets are designed to accentuate those respective voices, but they will not make a female vocalist sound like a male or vice versa.
| 7. | Select Female Basic as the preset vocal effect.
|
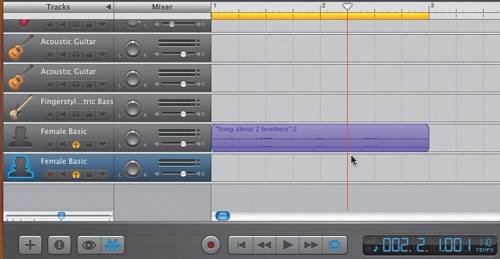
Project Tasks What if you like more than one preset? Suppose you want the first part of the vocal to use the Female Basic effect and you want the words highway bound to use the Ambient Vocals preset. So, based on everything you've learned so far, how would you do this? Easy enough. Simply duplicate the track, split the region, and place the parts on two separate tracks with different effects presets. 1. | Select the Female Basic track, if it is not already selected.
| 2. | Choose Track > Duplicate Track, or press Cmd-D to duplicate the track.
| 3. | Solo the new, duplicate track.
Now both vocal tracks should be soloed.
| 4. | Select the "Song about 2 brothers" region in the Timeline.
| 5. | Press Ctrlright arrow to zoom in to the track.
| 6. | Move the playhead to the 2nd beat of the 2nd measure.
 | 7. | Press Cmd-T to split the selected region at the playhead position.
| 8. | Click anywhere in the empty track space to deselect the regions.
| 9. | Drag the second vocal region downward to the second Female Basic track.
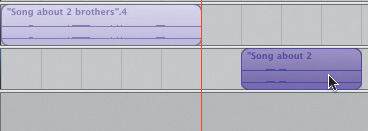 | 10. | Move the vocal region in the lowest track 1 beat to the right so that it starts halfway between the 2nd and 3rd measures.
This adds a pause between the first part of the sentence and the end.
| 11. | Open the Track Info window for the lowest vocal track and change the effect preset to Ambient Vocal; then close the Track Info window.
| 12. | Unsolo the two vocal tracks and press C to close the cycle region.
| 13. | Press Cmd-S to save your work, then listen to the finished song.
|
Testing Your Trained Ear Now that you understand how to mix a song in GarageBand, let's put your ear to the test. In this exercise, you'll listen to the original, unmixed song, then the mixed song. See if you hear the difference in the two versions. 1. | Choose File > Open Recent > 7-1 Highway Bound unmxd to open the original unmixed version.
| 2. | Play the first half of the song.
| 3. | Choose File > Open Recent > Highway Bound to open your finished mix.
| 4. | Play the finished mix.
As the song plays, ask yourself the following questions:
Does the mixed version of the song sound better than the unmixed version? Do you notice the left-to-right placement of the different tracks in the stereo field? Do you notice the overall balance of the volume between the tracks? Can you hear that the lead instruments (guitars) are louder in the mix than the supporting instruments?
If you heard any or all of these things, you've trained your ear to hear beyond the basic song.
|
Congratulations! Now you know how to mix your songs to make them sound professional. |