| So far, you have adjusted the different track volume and pan levels for each individual track using the controls in the Track Mixer. This method is great for setting one volume or pan level for an entire track. But what if you need the level to change during the song? This next series of exercises will show you how to change the volume and panning within a track by setting control points along the Volume or Pan curve. To make changes to a track's Volume or Pan curve, you first need to show the curve in the Timeline. Showing Volume Curves There are two ways to show the Volume curve for a track: Press A (for Audio) to show the Volume curve for the selected track. In the track header, click the triangle to the right of the Lock button.
Our goal in the next two exercises is to show the Volume curve and then set control points on the Volume curve to fade the volume of the Hollywood Strings track up and down during the song. First, you need to show the Volume curve. 1. | Select the Hollywood Strings track.
| 2. | Click the triangle next to the Lock button to show the track's Volume curve.
 The Volume curve appears below the Hollywood Strings track.
In this case, the Volume curve isn't actually a curve. It's a straight line that represents the steady volume of the track.
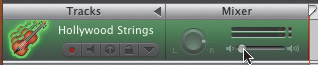
| 3. | Click-drag the Hollywood Strings track Volume slider all the way to the left and watch the movement of the Volume curve.
As you can see, the Volume slider moves the Volume curve.
| 4. | Option-click the Hollywood Strings track Volume slider to move the slider back to the default position.
If the Volume curve does not move to the default position, click the Hollywood Strings track Volume slider once to apply the new position to the Volume curve.
|
Adding and Adjusting Control Points Now that you can see the Volume curve, you can make adjustments to it using control points. Control points set a fixed volume level on the Volume curve at a specific point along the Timeline. Changing the position of a control point allows you to bend the Volume curve, which raises or lowers the volume between the control points.  You need two control points to change the volume dynamically. The first control point is for the starting volume level. The second control point is for the new volume level. You can move a control point by click-dragging the point. You can add a new control point by clicking the Volume curve. Control points are often used to fade music in or fade music out. In a movie theater, the lights slowly fade down before the movie starts, then fade back up after the movie. With music, when you slowly fade the volume of a song up from silence or slowly fade the music down to silence, this is fading in or fading out the music. Let's add some control points to fade in the Hollywood Strings track. 1. | Locate the large green point on the far left of the Volume curve.
 This control point sets the volume for the overall track.
| 2. | Click-drag the control point at the beginning of the Volume curve and drag it down to the bottom of the track to lower the volume of the track to the lowest possible volume (silence).
Notice the gray horizontal line above the current Volume curve position. This line indicates the default volume level.
 | 3. | Move the playhead to the beginning of the 5th measure.
Note You may wish to zoom in to the track one or two levels (Ctrlright arrow) to see the numbered measures you are looking for in the Beat Ruler. | 4. | Click the Volume curve at the playhead position to set a control point where the first note is played in the Hollywood Strings region.
 A new control point appears in the Volume curve at the playhead position. This control point has a value that is the same as the lowest volume level. A new control point appears in the Volume curve at the playhead position. This control point has a value that is the same as the lowest volume level.
Notice that the Track Curve pop-up is set to Track Volume and that the Volume curve is on (blue). You can turn the Track curve on or off by clicking the Track Curve On/Off button located to the left of the pop-up. The Track curve turns on (blue) automatically whenever you create a control point in the Volume curve.
| 5. | Click the Volume curve at the beginning of the 6th measure to set a new point at that position.
Let's change the value of the new control point so that it is the same as the default volume level for the track.
| 6. | Click-drag the new control point (at the 6th measure) up to the horizontal gray default volume line. The default volume level is 0.4 dB.
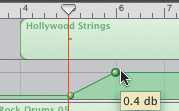 The volume of the track gradually changes between the 5th and 7th measures to fade the volume of the track up from silence.
| 7. | Press the left arrow key to move the playhead to the beginning of the Hollywood Strings region.
| 8. | Press S to solo the track, then play the first part of the song and listen to the Hollywood Strings track fade in.
| 9. | Press S to unsolo the track and play the beginning of the song again to hear the fade-in mixed with the rest of the tracks.
Now that you've added control points to the Volume curve for the Hollywood Strings track, let's hide the Volume curve.
| 10. | Press A to hide the Volume curve on the Hollywood Strings track.
| 11. | Press the Home key to move the playhead back to the beginning of the Timeline.
Notice that the Volume slider for the Hollywood Strings track is at the lowest volume position. That's because the Volume curve is now at its lowest position, which is at the beginning of the Timeline.
 | 12. | Try to click-drag the Volume slider on the Hollywood Strings track.
The Volume slider is disabled because the Volume curve has been changed. Once you add the first control point, the Volume slider becomes disabled.
| 13. | Press the spacebar to play the beginning of the song. Watch the Volume slider in the Hollywood Strings track as the song plays.
The Volume slider moves to reflect the value of the Volume curve. By setting the control points, you have automated the Volume slider.
| 14. | Press Cmd-S to save your work.
|
Now that you know how to add control points to dynamically change the volume of an individual track, let's try setting control points on the Pan curve. Dynamically Panning a Track Another new feature in GarageBand 2 is the ability to add control points to the Pan curve so that the sound moves from one speaker to the other. In the song you are mixing, there are two guitars, so the musicians could be separated onstage to create a panoramic stereo field. Then let's say that the backup vocalist holding the shaker is pacing back and forthmaybe she had a little too much coffee, or maybe she's just trying to liven things up. Whatever the reason, panning a sound from one speaker to the other is an advanced mixing technique that can add a little excitement to an instrumental part. Let's add some control points to Pan curve on the Shaker track to give it some movement within the stereo field. 1. | Click the disclosure triangle on the Shaker track to reveal the Volume curve.
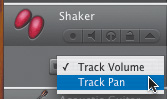
| 2. | Click the Track Curve pop-up and select the Pan curve.
 | 3. | Click-drag the control point at the beginning of the Pan curve and drag it up to the highest position (64), which is panned all the way to the left.
| 4. | Click-drag the control point to the lowest position (+63), which is panned all the way to the right.
Zero (0) is the center panning position.
| 5. | Click the Pan curve to add a control point at the beginning of the first region in the Shaker track.
| 6. | Set the control point to +47, which favors the right speaker but is not panned all the way.
 | 7. | Add another control point at about halfway through the first shaker region (the beginning of the 11th measure).
| 8. | Set the control point value to 48.
 This position in the stereo field is opposite that of the first control point and will favor the left speaker.
| 9. | Set one more control point at the end of the first shaker region. Make the value of the control point the same as that of the first point (+47).
 | 10. | Solo the Shaker track and listen to the panned region.
You have just successfully created a dynamic panning effect.
|
Project Task Now we'll dynamically pan the second region in the Shaker track. 1. | Add three control points (beginning, middle, and end) to the Shaker track's Pan curve.
| 2. | Set the three control points so that the sound will pan from one speaker to the other and then back.
Tip You only need to move the middle control point, since the other two are already in position. | 3. | Click the disclosure triangle on the Shaker track to hide the Track curves.
| 4. | Unsolo the Shaker track.
| 5. | Save your changes, and then listen to the song with the dynamically panned Shaker track.
|
Excellent. Now it's time to move on to the Master track. |