| In the next series of exercises, you'll crop and position a video clip directly in the Canvas. Your goal in the first part of the exercises is to move the surfing man to the left half of the frame. The video file you'll be working with is called surf_1_SD_jpg.mov and is located in the Lesson_04 folder. 1. | Press the spacebar to begin playback in the Canvas.
| 2. | Select surf_1_SD_jpg.mov in the File Browser; then click the Import button to import the movie into the project.
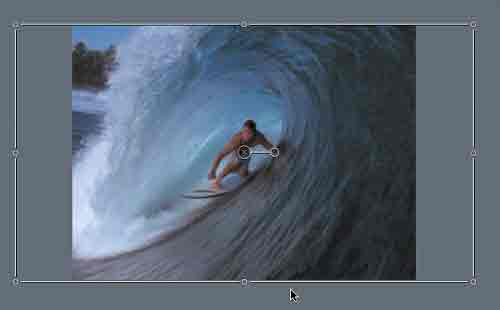
A video clip of a surfing man fills the Canvas screen.
| 3. | Press Cmd-(minus) to zoom out of the Canvas one level for a better view of the bounding box around the surf_1_SD object in the Canvas.
|
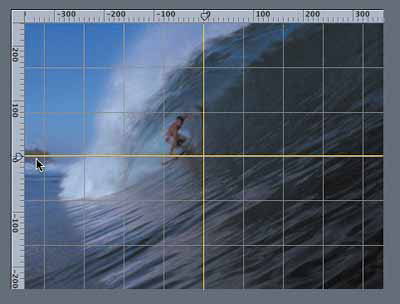
You could now try to place the surfer visually, or you could use some handy tools that Motion provides to help you work with more precision. Working with the Grid, Rulers, and Guides The Motion Canvas includes three visual tools to help you move, crop, and align objects. They are a grid, rulers, and guides, and they can be turned on and off in the View pop-up menu in the Canvas. You can use these tools one at a time or all together. Let's start with the grid. 1. | From the View pop-up menu, choose Grid.
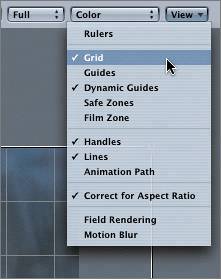
A grid appears over the frame in the Canvas. You can use this grid to align objects.
To place something in an exact location, you can use the rulers.
| 2. | From the View pop-up menu, choose Rulers.
Rulers appear on the left and top of the frame in the Canvas.
You can use the rulers alone or together with guides. Guides are horizontal and vertical yellow lines that mark positions you select on the rulers.
| 3. | Choose Guides from the View pop-up menu to turn on the guides in the Canvas.
You won't see any guides until you create them.
|
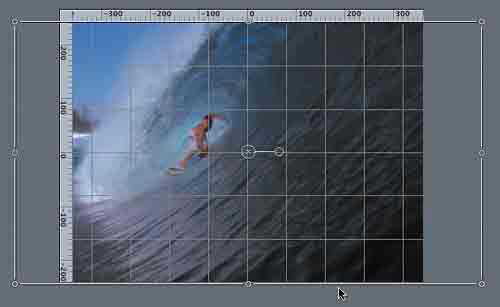
Creating and Deleting Guides The ruler across the top of the Canvas measures the horizontal values of the Canvas and creates horizontal guides. The ruler on the left edge of the Canvas measures the vertical values of the Canvas and creates vertical guides. To create guides, you click the appropriate ruler and drag the guide into position. Let's use the guides to mark the vertical center of the frame. The coordinates for the center of the frame are always 0,0. The first 0 represents the coordinate on the horizontal ruler, or the x-coordinate. The second 0 represents the coordinate on the vertical ruler, or the y-coordinate. Therefore, the coordinates for the frame's center are 0,0. If the center of an object is aligned with the center of the frame, the object's coordinates are also 0,0. 1. | Click the vertical ruler to create a guide; then drag the guide to the center (0) of the horizontal ruler.
As you drag a guide, a small value window appears to show the current position.
x-coordinate = 0 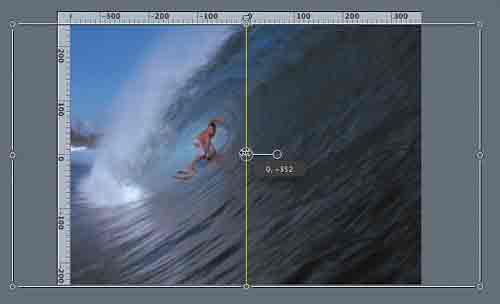
| 2. | Drag the horizontal ruler to create another guide and mark the vertical center (0) of the frame.
y-coordinate = 0 
To delete a guide, you simply drag it to the upper-left corner of the rulers until it is no longer visible. When you release the mouse, the guide vanishes in a puff of smoke. Really.
We need only the vertical guide to divide the frame down the middle, so let's delete the horizontal guide.
| 3. | Drag the horizontal guide upward until it's no longer visible in the frame. Release the mouse.
Puff.
Now that you have a guide to work with, you can turn off the grid.
NOTE The grid does not need to be turned on for you to create guides. However, you do need the rulers to create guides. | 4. | From the View pop-up menu, choose Grid to turn off the grid in the Canvas.
|
Moving an Object into Position The next step is to move the video object toward the left so that the surfer remains in the left half of the frame for the entire clip. 1. | Press Cmd-3 to open the Inspector.
| 2. | Click the Properties tab, if it's not already selected, so that you can view the new position of the object in the Canvas.
| 3. | Press the spacebar to start playback, if the video is not already playing.
| 4. | Drag the video object toward the left so that the surfer remains on the left half of the screen for the clip's entire duration.
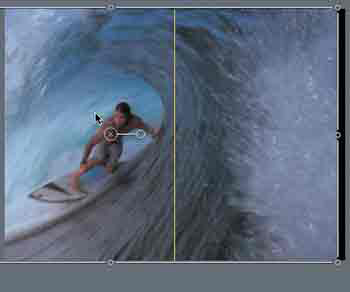
Toward the end of the clip, the front tip of the surfboard should be in the lower-left corner of the frame.
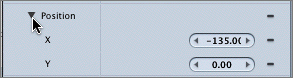
| 5. | On the Properties tab of the Inspector, check the Position coordinates. The final coordinates should be approximately 135,0 (where 135 is the x-coordinate, and 0 is the y-coordinate).

| 6. | Click the disclosure triangle for the Position parameter to view the x- and y-coordinates.
It's a good idea to save the project before moving on.
| 7. | Press Cmd-S to save your progress.
|
|