| The real-time playback capabilities of your Motion projects are proportional to your computer's hardware. The system RAM determines the number of frames of animation that you can preview in real time; the CPU speed determines the number of simulations and complex behaviors that can be applied to composite objects in real time; and the VRAM (video RAM on the graphics card) determines the number of objects, filters, and effects in a composite that can be rendered in real time before a RAM preview is required. What is a RAM preview? Motion performs many complex calculations to represent each frame when you play your project. The process of performing these calculations is referred to as rendering. A project plays back in the Canvas as quickly as possible, up to the specified frame rate for the project. With highly complex projects, the frame rate can drop significantly, making it difficult to see the project at its full frame rate. To get around this problem, instead of having Motion calculate the frames as you go, you can render parts of your project and store the frames in RAM. Then when you play your project, you see the rendered parts at their full frame rate. This view is called a RAM preview. The length of the RAM preview that Motion can perform is directly proportional to the amount of available RAM on your computer. MORE INFO For more information about the hardware requirements for Motion, see the "Getting Started" section of this book and the documentation in the Help menu that came with the application.
Motion provides three RAM preview options: Play Range, Selection, or All (the entire project). The Play Range option renders only the frames within the play range as a RAM preview. Selection, on the other hand, renders the duration of the selected objects or layers. The current project is more than 20 seconds long. That's more than 600 frames, including multiple layers of video, which would require a lot of RAM to render from start to finish. So instead of rendering the entire project, let's render a play range, choosing the 6 seconds of the project starting at 11;00 and ending at 17;00. 1. | Quit any open applications (other than Motion) to free up the system RAM on your computer.
| 2. | Move the playhead to 11;00 and then press Option-Cmd-I to set the play range In point.
| 3. | Move the playhead to 17;00 and then press Option-Cmd-O to set the play range Out point.
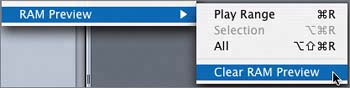
The RAM Preview controls are located at the bottom of the Mark menu.

| 4. | Choose Mark > RAM Preview > Play Range.
A RAM Preview window appears to keep you updated on the progress of your RAM preview.
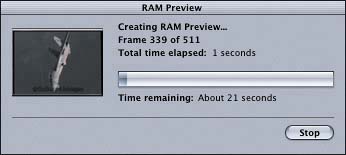
While you watch the estimated remaining time tick down on the progress bar, your computer is performing complex calculations that once required the use of a supercomputer. If you get tired of watching the RAM preview progress, you can watch the grass grow above the mini-Timeline. Okay, it's not grass, but it is a green bar that represents the frames in the RAM preview that have been rendered.
| 5. | When the RAM preview is finished, press the spacebar to see the rendered play range in the Canvas.
You should see and hear the play range in real time. If the green bar didn't fill your entire play range, you didn't have enough system RAM to render a preview of the entire duration.
This is my favorite part of the opening and makes me appreciate all of those twisted, corkscrew, loop-the-loop roller coasters I've ridden over the years.
Unfortunately, the end of the play range is not very easy on the ears because it cuts off the music in the middle of a phrase. Let's extend the play range a bit to see what happens.

| 6. | Drag the play range Out point toward the right for 1 second (to 18;00).
Notice that the play range is now longer than the rendered (green) portion of the project.
| 7. | Press the spacebar to preview the extended play range.
You'll likely see a little bit of a hiccup or stutter in the images when you get to the unrendered portionunless you have a super-fast, fully loaded, top-of-the-line, souped-up Mac, in which case you can gloat quietly to yourself.
To extend a RAM preview, you simply press Cmd-R or choose Mark > RAM Preview again.
| 8. | Press Cmd-R to render the remaining portion of the play range.
If you have enough RAM left on your system, the green bar should extend to fill the rest of the play range.
| 9. | Play the newly extended RAM preview in the Timeline.
|
Clearing the RAM Preview If you make any changes in your project, you'll need to create a new RAM preview. Fortunately, each time you create a new RAM preview for the same frames, it overwrites the old render files for those frames. If you want to create a RAM preview for a different part of the project and want to maximize the amount of RAM available, you can clear the current RAM preview memory. To clear the RAM preview, you simply choose Clear RAM Preview from the RAM Preview submenu. Let's clear the RAM preview memory and then create a new play range to preview. 1. | Choose Mark > RAM Preview > Clear RAM Preview.
The green bar within the play range in the Canvas disappears.
| 2. | Set a new play range with a play range In point of 0;00 and a play range Out point of 8;00.
| 3. | Press Cmd-R to render the play range in a RAM preview.
| 4. | Watch the newly rendered play range in the Canvas.
| 5. | Press Cmd-S to save your progress.
|
Tips for Maximizing Your RAM Preview Here are some tips to help you maximize your computer's RAM preview capabilities: Close any other applications that are running on your computer to free up more RAM for Motion. Turn off any unneeded objects, layers, filters, or behaviors before you create your RAM preview. For example, if you want to create a RAM preview to see the timing of the behaviors, you probably don't need to see any filters or the background at the same time. By turning off those elements of the project, you free up RAM, which can be allocated to additional frames in your RAM preview. Clear your RAM preview when you no longer need it, to free up the RAM for other purposes. Enjoy your RAM preview while the project is open, because once you close the project, you flush the RAM. Add system RAM to your computer. On a G5 computer, Motion can utilize up to 4 GB of system RAM.
|