| You can move and resize a particle emitter in the Canvas the same way that you move and resize an object. For this exercise, you'll use the Select/ Transform tool to change the size of the second Drop Impact emitter. 1. | Move the playhead to 6;15, if that is not already the current frame.
| 2. | In the Canvas, click the dust to select the second Drop Impact emitter.
 A bounding box appears in the Canvas showing the selected emitter, and a Drop Impact 1 region appears at the playhead position in the mini-Timeline. A bounding box appears in the Canvas showing the selected emitter, and a Drop Impact 1 region appears at the playhead position in the mini-Timeline.
Let's zoom out of the Canvas for a better view of the entire bounding box.
| 3. | Press Cmd- (hyphen) to zoom out of the Canvas one level.
|
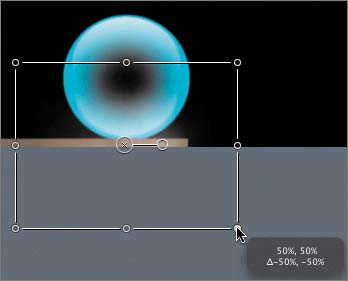
Scaling an Object Toward Its Center In previous lessons, you learned to resize an object with the Select/Transform tool by dragging the corner handles of the bounding box. You also learned that if you hold down the Shift key and drag a corner of the bounding box, you constrain the proportions of the object as you resize it. You can also resize, constrain proportions, and maintain an object's center position at the same time. All you need to do is hold down the Option key in addition to the Shift key as you drag the corner of the bounding box. Let's try it. 1. | Press and hold down the Shift and Option keys; then drag the lower-right corner of the Drop Impact 1 bounding box to resize it to 50 percent of its original size.
Resizing the emitter in the Canvas changes the size of the space the par ticles occupy in the Canvas, not the size of the particles themselves. You'll change the size of the particles in the next exercise.
| 2. | Press the spacebar to see the finished 6-2 Bounce project with the Drop Impact particle emitters applied to it.
Notice the large plume of dust on the first bounce, and the smaller plume of dust on the second bounce.
| 3. | Press Cmd-S to save your project. Then close the 6-2 Bounce project.
Now you know how to apply realistic visual effects using Motion particle emitters.
|
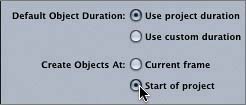
Resetting Project Preferences Before moving on to the next project, it's a good idea to reset the Project preferences so that new objects appear at the start of the project. That way, you can focus on creating and modifying particles and won't have to think about where the playhead is located. 1. | Press Cmd-, (comma) or choose Motion > Preferences to open the Preferences window.
| 2. | In the Preferences window, in the Still Images & Objects area, change the Create Objects At setting to Start of project.
| 3. | Press Cmd-W or click the Close button (X) to close the Project preferences window.
|
|